【word导出带图片】使用docxtemplater导出word,通知书形式的word,表格,代码封装
前端导出word,通知书模版
一、demo-导出

二、代码操作
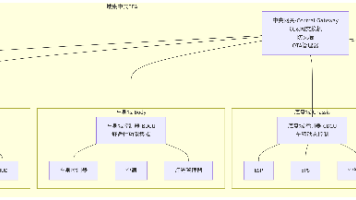
1、页面呈现
项目要求,所以页面和导出来的word模版一致

2、js代码【直接展示点击导出的js代码】
使用插件【先下载这五个插件,然后页面引入插件】
import docxtemplater from 'docxtemplater'
import PizZip from 'pizzip'
import JSZipUtils from 'jszip-utils'
import ImageModule from 'docxtemplater-image-module-free'
import { saveAs } from 'file-saver'
1>代码
expeortexcel() {
clearTimeout(this.timer) //清除延迟执行
this.faultlist = []
this.faultpic = []
const exportData = this.data
// 处理图片
const crfile = exportData.contractorResponsiblePerson[0].link
const drfile = exportData.drawResponsiblePerson[0].link
if (crfile != '') {
this.UrlToBase64(crfile, (dataURL) => {
exportData['crimg'] = dataURL
})
}
if (drfile != '') {
this.UrlToBase64(drfile, (dataURL) => {
exportData['drimg'] = dataURL
})
}
this.faultlist.push(exportData)
this.timer = setTimeout(() => {
//设置延迟执行
this.export2Word(this.faultlist)
}, 5000)
},
// 处理导出图片数据
UrlToBase64(url, callback) {
console.log(url, 'url===')
let image = new Image()
let that = this
//解决跨域问题
image.setAttribute('crossOrigin', 'anonymous')
image.src = url
image.onload = () => {
var canvas = document.createElement('canvas')
canvas.width = image.width
canvas.height = image.height
var context = canvas.getContext('2d')
context.drawImage(image, 0, 0, image.width, image.height)
var quality = 0.8
//这里的dataurl就是base64类型
var dataURL = canvas.toDataURL('image/png', quality)
callback ? callback(dataURL) : null //调用回调函数
}
},
//导出文件
export2Word(faultlistd) {
//v:图片路径,t:时间字符串,name:导出文件名称--变量需自己定制,此处为举例
let self = this
JSZipUtils.getBinaryContent(
window.location.origin + '/tinggong.docx', //需要导出的模板文件地址
function (error, content) {
if (error) {
throw error
}
let zip = new PizZip(content)
let doc = new docxtemplater().loadZip(zip)
// 图片处理
const opts = {}
opts.centered = false // 图片居中,在word模板中定义方式为{%image}
opts.fileType = 'docx'
opts.getImage = (tagValue, tagName) => {
const base64Value = self.base64DataURLToArrayBuffer(tagValue)
if (base64Value) {
return base64Value
}
}
opts.getSize = function (img, tagValue, tagName) {
const sizeOf = require('image-size')
const buffer = Buffer.from(img, 'binary')
const sizeObj = sizeOf(buffer)
const forceWidth = 100
const ratio = forceWidth / sizeObj.width
return [forceWidth, Math.round(sizeObj.height * ratio)]
}
let imageModule = new ImageModule(opts)
doc.attachModule(imageModule)
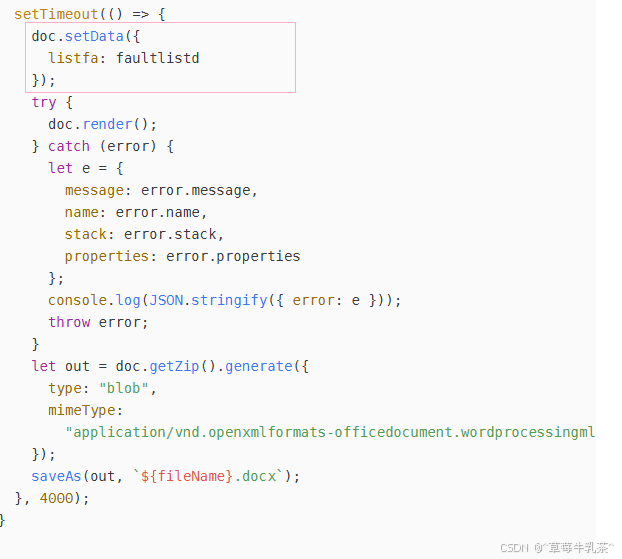
setTimeout(() => {
doc.setData({
//设置模板数据
// compname: cname,
listfa: faultlistd,
// listimg: faultpicd,
})
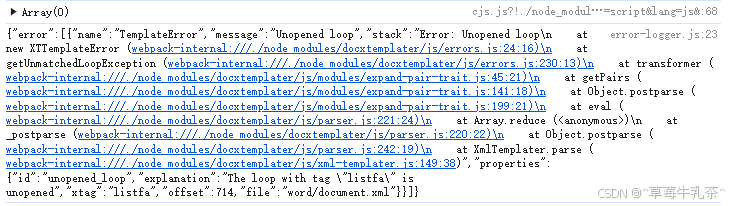
try {
doc.render()
} catch (error) {
let e = {
message: error.message,
name: error.name,
stack: error.stack,
properties: error.properties,
}
console.log(JSON.stringify({ error: e }))
throw error
}
let out = doc.getZip().generate({
type: 'blob',
mimeType:
'application/vnd.openxmlformats-officedocument.wordprocessingml.document', //导出文件格式
})
saveAs(out, '停工通知书.docx')
}, 4000)
},
)
},
//获取base64格式图片
base64DataURLToArrayBuffer(dataURL) {
const base64Regex = /^data:image\/(png|jpg|svg|svg);base64,/
if (!base64Regex.test(dataURL)) {
return false
}
const stringBase64 = dataURL.replace(base64Regex, '')
let binaryString
if (typeof window !== 'undefined') {
binaryString = window.atob(stringBase64)
} else {
binaryString = Buffer.from(stringBase64, 'base64').toString('binary')
}
const len = binaryString.length
const bytes = new Uint8Array(len)
for (let i = 0; i < len; i++) {
const ascii = binaryString.charCodeAt(i)
bytes[i] = ascii
}
return bytes.buffer
},1、this.data是接口返回的数据
2、UrlToBase64处理图片数据
3、export2Word导出文件操作

三、通知书模版【毕竟放在public下-且后缀是.docx】


【语法:】
listfa是数组,#开头, /结束
{%drimg} 图片格式前面需要加%
四、拓展docxtemplater语法
1、基础
Hello {name} ! // 得到 —— Hello John !
{"name": "John"} // 数据格式
2、条件 # 开始 / 结束
{#hasKitty}Cat’s name: {kitty}{/hasKitty}
{#hasDog}Dog’s name: {dog}{/hasDog}{ "hasKitty": true, "kitty": "Minie" "hasDog": false, "dog": null } // 得到Cat’s name: Minie
3、list集合
{#products}
{name}, {price} ¥
{/products}"products": [ { "name": "西服外套", "price": 100 }, { "name": "皮鞋", "price": 200 }, { "name": "劳动力", "price": 0 } ] // 得到 西服外套, 100 ¥ 皮鞋, 200 ¥ 劳动力, 0¥
4、循环遍历一个包含原始数据的数组
{#products} {.} {/products}
 "products": ["包子", "饺子", "麻辣烫"]

// 得到 包子 饺子 麻辣烫
5、循环展示列表【#开头 /结束】
Name age phone {#users}{name} {age} {phone}{/} "users": [ { "name": "John", "age": 22, "phone": "+33653454343" }, { "name": "Mary", "age": 25, "phone": "+33666666666" } ]得到:
Name age phone John 22 +33653454343 Mary 25 +33666666666
五、分割线、我又来了,我有了新的感悟
这一次我将它进行了封装,没进行图片处理的模版,这个是我封装的一个mixins.js文件。
其实内部方法和我之前差不多,
注解:exportData是我接收数据的

1、模版
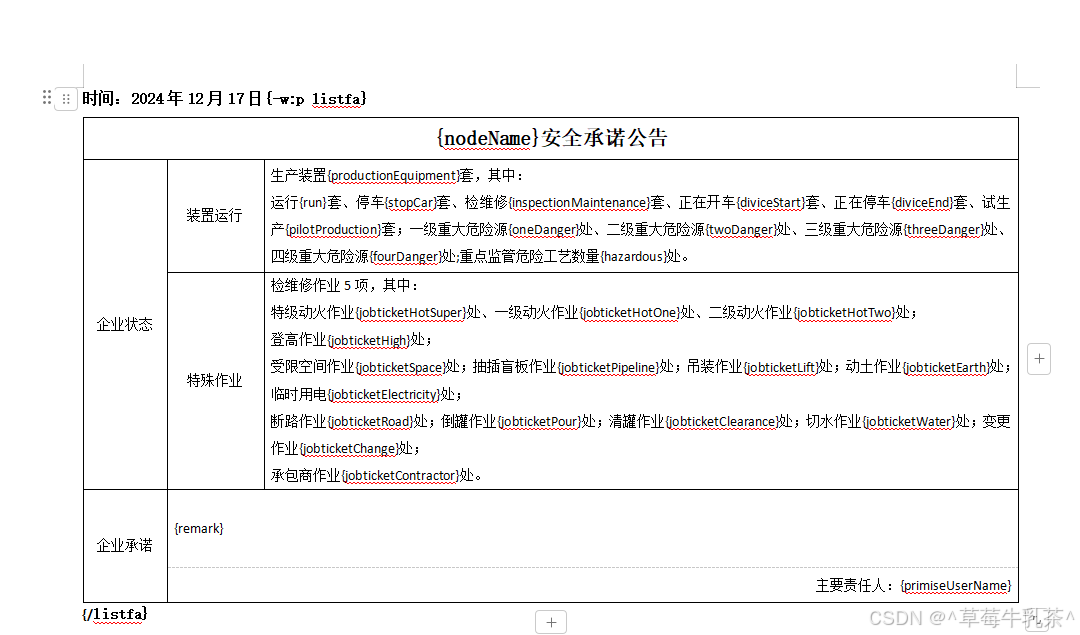
2.1、模版注释
{-w:p listfa}
-w:p 这是标注起始,不写会报错
listfa这个自己定义的数组名称,可自行定义,
剩下的参数就是你想要显示的内容。
2、代码
export const docxdown = {
  data() {
    return {
      timer: null,
      exportData: [],
      fileName: []
    };
  },
  methods: {
    expeortexcel() {
      this.loading = true;
      clearTimeout(this.timer); //清除延迟执行
      this.timer = setTimeout(() => {
        //设置延迟执行
        this.loading = false;
        this.$message({
          type: "info",
          message: "导出中,请稍等 !"
        });
      }, 5000);
      this.exportData.forEach((ele, index) => {
        let faultlist = ele;
        this.export2Word(faultlist, ele.nodeName);
      });
      this.exportData = [];
    },
    //导出文件
    export2Word(faultlistd, nodeName) {
      //v:图片路径,t:时间字符串,name:导出文件名称--变量需自己定制,此处为举例

      let self = this;
      JSZipUtils.getBinaryContent(
        window.location.origin + "/promise.docx", //需要导出的模板文件地址
        function(error, content) {
          if (error) {
            throw error;
          }
          let zip = new PizZip(content);
          let doc = new docxtemplater().loadZip(zip);
          // 图片处理
          const opts = {};
          opts.centered = false; // 图片居中,在word模板中定义方式为{%image}
          opts.fileType = "docx";
          opts.getImage = (tagValue, tagName) => {
            const base64Value = self.base64DataURLToArrayBuffer(tagValue);
            if (base64Value) {
              return base64Value;
            }
          };
          opts.getSize = function(img, tagValue, tagName) {
            const sizeOf = require("image-size");
            const buffer = Buffer.from(img, "binary");
            const sizeObj = sizeOf(buffer);
            const forceWidth = 100;
            const ratio = forceWidth / sizeObj.width;
            return [forceWidth, Math.round(sizeObj.height * ratio)];
          };
          let imageModule = new ImageModule(opts);
          doc.attachModule(imageModule);
          const fileName = nodeName + "安全承诺公告" || "安全承诺公告";
          setTimeout(() => {
            doc.setData({
              listfa: faultlistd
            });
            try {
              doc.render();
            } catch (error) {
              let e = {
                message: error.message,
                name: error.name,
                stack: error.stack,
                properties: error.properties
              };
              console.log(JSON.stringify({ error: e }));
              throw error;
            }
            let out = doc.getZip().generate({
              type: "blob",
              mimeType:
                "application/vnd.openxmlformats-officedocument.wordprocessingml.document" //导出文件格式
            });
            saveAs(out, `${fileName}.docx`);
          }, 4000);
        }
      );
    },
    //获取base64格式图片
    base64DataURLToArrayBuffer(dataURL) {
      const base64Regex = /^data:image\/(png|jpg|svg|svg);base64,/;
      if (!base64Regex.test(dataURL)) {
        return false;
      }
      const stringBase64 = dataURL.replace(base64Regex, "");
      let binaryString;
      if (typeof window !== "undefined") {
        binaryString = window.atob(stringBase64);
      } else {
        binaryString = Buffer.from(stringBase64, "base64").toString("binary");
      }
      const len = binaryString.length;
      const bytes = new Uint8Array(len);
      for (let i = 0; i < len; i++) {
        const ascii = binaryString.charCodeAt(i);
        bytes[i] = ascii;
      }
      return bytes.buffer;
    },
    //带回调的办法
    UrlToBase64(url, callback) {
      console.log(url, "url===");
      let image = new Image();
      let that = this;
      //解决跨域问题
      image.setAttribute("crossOrigin", "anonymous");
      image.src = url;
      image.onload = () => {
        var canvas = document.createElement("canvas");
        canvas.width = image.width;
        canvas.height = image.height;
        var context = canvas.getContext("2d");
        context.drawImage(image, 0, 0, image.width, image.height);
        var quality = 0.8;
        //这里的dataurl就是base64类型
        var dataURL = canvas.toDataURL("image/png", quality);
        callback ? callback(dataURL) : null; //调用回调函数
      };
    }
  }
};

欢迎加入 MCP 技术社区!与志同道合者携手前行,一同解锁 MCP 技术的无限可能!
更多推荐
 9
9 0
0- 0


 已为社区贡献1条内容

所有评论(0)