java request含嵌套_【SpringBoot】 Java中如何封装Http请求,以及JSON多层嵌套解析
前言本文中的内容其实严格来说不算springboot里面的特性,属于JAVA基础,只是我在项目中遇到了,特归纳总结一下。HTTP请求封装目前JAVA对于HTTP封装主要有三种方式:1. JAVA原生封装2. HttpClient 3.X /HttpClient4.X3. Spring RestTemplatehttp请求过程如下:GET:1、创建远程连接2、设置连接方式(get、post、put。
前言
本文中的内容其实严格来说不算springboot里面的特性,属于JAVA基础,只是我在项目中遇到了,特归纳总结一下。
HTTP请求封装
目前JAVA对于HTTP封装主要有三种方式:
1. JAVA原生封装
2. HttpClient 3.X /HttpClient4.X
3. Spring RestTemplate
http请求过程如下:
GET:1、创建远程连接2、设置连接方式(get、post、put。。。)3、设置连接超时时间4、设置响应读取时间5、发起请求6、获取请求数据7、关闭连接
POST:1、创建远程连接2、设置连接方式(get、post、put。。。)3、设置连接超时时间4、设置响应读取时间5、当向远程服务器传送数据/写数据时,需要设置为true(setDoOutput)6、当前向远程服务读取数据时,设置为true,该参数可有可无(setDoInput)7、设置传入参数的格式:(setRequestProperty)8、设置鉴权信息:Authorization:(setRequestProperty)9、设置参数10、发起请求11、获取请求数据12、关闭连接
JAVA原生:
/**
* http get请求
* @param httpUrl 链接
* @return 响应数据
*/
public staticString doGet(String httpUrl){//链接
HttpURLConnection connection=null;
InputStream is=null;
BufferedReader br= null;
StringBuffer result=newStringBuffer();try{//创建连接
URL url=newURL(httpUrl);
connection=(HttpURLConnection) url.openConnection();//设置请求方式
connection.setRequestMethod("GET");//设置连接超时时间
connection.setConnectTimeout(15000);//设置读取超时时间
connection.setReadTimeout(15000);//开始连接
connection.connect();//获取响应数据
if(connection.getResponseCode()==200){//获取返回的数据
is=connection.getInputStream();if(is!=null){
br=new BufferedReader(new InputStreamReader(is,"UTF-8"));
String temp= null;while ((temp=br.readLine())!=null){
result.append(temp);
}
}
}
}catch(MalformedURLException e) {
e.printStackTrace();
}catch(IOException e) {
e.printStackTrace();
}finally{if(br!=null){try{
br.close();
}catch(IOException e) {
e.printStackTrace();
}
}if(is!=null){try{
is.close();
}catch(IOException e) {
e.printStackTrace();
}
}
connection.disconnect();//关闭远程连接
}returnresult.toString();
}/*** post请求
*@paramhttpUrl 链接
*@paramparam 参数
*@return
*/
public staticString doPost(String httpUrl, @Nullable String param) {
StringBuffer result=newStringBuffer();//连接
HttpURLConnection connection=null;
OutputStream os=null;
InputStream is=null;
BufferedReader br=null;try{//创建连接对象
URL url=newURL(httpUrl);//创建连接
connection=(HttpURLConnection) url.openConnection();//设置请求方法
connection.setRequestMethod("POST");//设置连接超时时间
connection.setConnectTimeout(15000);//设置读取超时时间
connection.setReadTimeout(15000);//设置是否可读取
connection.setDoOutput(true);//设置响应是否可读取
connection.setDoInput(true);//设置参数类型
connection.setRequestProperty("Content-Type", "application/x-www-form-urlencoded");//拼装参数
if(param!=null&&!param.equals("")){//设置参数
os=connection.getOutputStream();//拼装参数
os.write(param.getBytes("UTF-8"));
}//设置权限//设置请求头等//开启连接//connection.connect();//读取响应
if(connection.getResponseCode()==200){
is=connection.getInputStream();if(is!=null){
br=new BufferedReader(new InputStreamReader(is,"UTF-8"));
String temp=null;if((temp=br.readLine())!=null){
result.append(temp);
}
}
}//关闭连接
} catch(MalformedURLException e) {
e.printStackTrace();
}catch(IOException e) {
e.printStackTrace();
}finally{if(br!=null){try{
br.close();
}catch(IOException e) {
e.printStackTrace();
}
}if(os!=null){try{
os.close();
}catch(IOException e) {
e.printStackTrace();
}
}if(is!=null){try{
is.close();
}catch(IOException e) {
e.printStackTrace();
}
}//关闭连接
connection.disconnect();
}returnresult.toString();
}
HttpCLient4.X
httpclient有很多版本,目前最新的版本是4.X了,所以推荐使用4.x的方式进行封装
public staticString doGet(String url) {
CloseableHttpClient httpClient= null;
CloseableHttpResponse response= null;
String result= "";try{//通过址默认配置创建一个httpClient实例
httpClient =HttpClients.createDefault();//创建httpGet远程连接实例
HttpGet httpGet = newHttpGet(url);//设置请求头信息,鉴权
httpGet.setHeader("Authorization", "Bearer da3efcbf-0845-4fe3-8aba-ee040be542c0");//设置配置请求参数
RequestConfig requestConfig = RequestConfig.custom().setConnectTimeout(35000)//连接主机服务超时时间
.setConnectionRequestTimeout(35000)//请求超时时间
.setSocketTimeout(60000)//数据读取超时时间
.build();//为httpGet实例设置配置
httpGet.setConfig(requestConfig);//执行get请求得到返回对象
response =httpClient.execute(httpGet);//通过返回对象获取返回数据
HttpEntity entity =response.getEntity();//通过EntityUtils中的toString方法将结果转换为字符串
result =EntityUtils.toString(entity);
}catch(ClientProtocolException e) {
e.printStackTrace();
}catch(IOException e) {
e.printStackTrace();
}finally{//关闭资源
if (null !=response) {try{
response.close();
}catch(IOException e) {
e.printStackTrace();
}
}if (null !=httpClient) {try{
httpClient.close();
}catch(IOException e) {
e.printStackTrace();
}
}
}returnresult;
}public static String doPost(String url, MapparamMap) {
CloseableHttpClient httpClient= null;
CloseableHttpResponse httpResponse= null;
String result= "";//创建httpClient实例
httpClient =HttpClients.createDefault();//创建httpPost远程连接实例
HttpPost httpPost = newHttpPost(url);//配置请求参数实例
RequestConfig requestConfig = RequestConfig.custom().setConnectTimeout(35000)//设置连接主机服务超时时间
.setConnectionRequestTimeout(35000)//设置连接请求超时时间
.setSocketTimeout(60000)//设置读取数据连接超时时间
.build();//为httpPost实例设置配置
httpPost.setConfig(requestConfig);//设置请求头
httpPost.addHeader("Content-Type", "application/x-www-form-urlencoded");//封装post请求参数
if (null != paramMap && paramMap.size() > 0) {
List nvps = new ArrayList();//通过map集成entrySet方法获取entity
Set> entrySet =paramMap.entrySet();//循环遍历,获取迭代器
Iterator> iterator =entrySet.iterator();while(iterator.hasNext()) {
Entry mapEntry =iterator.next();
nvps.add(newBasicNameValuePair(mapEntry.getKey(), mapEntry.getValue().toString()));
}//为httpPost设置封装好的请求参数
try{
httpPost.setEntity(new UrlEncodedFormEntity(nvps, "UTF-8"));
}catch(UnsupportedEncodingException e) {
e.printStackTrace();
}
}try{//httpClient对象执行post请求,并返回响应参数对象
httpResponse =httpClient.execute(httpPost);//从响应对象中获取响应内容
HttpEntity entity =httpResponse.getEntity();
result=EntityUtils.toString(entity);
}catch(ClientProtocolException e) {
e.printStackTrace();
}catch(IOException e) {
e.printStackTrace();
}finally{//关闭资源
if (null !=httpResponse) {try{
httpResponse.close();
}catch(IOException e) {
e.printStackTrace();
}
}if (null !=httpClient) {try{
httpClient.close();
}catch(IOException e) {
e.printStackTrace();
}
}
}returnresult;
}
Spring RestTemplate 封装HTTP
spring自带的一种封装模式,方便简洁,推荐使用
public staticString httpGet(String url){
RestTemplate restTemplate=newRestTemplate();
String result=restTemplate.exchange(url, HttpMethod.GET,null,String.class).getBody();returnresult;
}public staticString httpPost(String url,String name){
RestTemplate restTemplate=newRestTemplate();return restTemplate.postForEntity(url,name,String.class).getBody();
}
HTTPS请求的封装
https请求只是在http请求的基础上面添加了SSL验证,通过下面的SLLClient 封装即可,调用的时候:
httpClient = SSLClient.createSSLClientDefault();
public classSSLClient {public staticCloseableHttpClient createSSLClientDefault(){try{
SSLContext sslContext= new SSLContextBuilder().loadTrustMaterial(null, newTrustStrategy() {//信任所有
public boolean isTrusted(X509Certificate[] chain, String authType) throwsCertificateException {return true;
}
}).build();
SSLConnectionSocketFactory sslsf= newSSLConnectionSocketFactory(sslContext);returnHttpClients.custom().setSSLSocketFactory(sslsf).build();
}catch(KeyManagementException e) {
e.printStackTrace();
}catch(NoSuchAlgorithmException e) {
e.printStackTrace();
}catch(KeyStoreException e) {
e.printStackTrace();
}returnHttpClients.createDefault();
}
}
JSON多层嵌套
处理接口返回的时候,目前用的最多的方式是返回json格式,因为json格式比较成熟,包括取值,实例化等等。这里介绍一种后端处理json返回多层嵌套的方式:
1. 实例化json数据
2. 请求Http 接口获取返回值
3. 实例化返回值并获取你想要的key或者value,或者做验证都行
优点: 实例化了数据结构,想获取任何数据都能使用实例化的方法。不用理会它有几层,它的数据结构是什么(List, array, string等等)
缺点: 需要返回的数据结构稳定,不能返回变动的数据结构, 另外实例化有一定的代码量,比较繁琐(但是有固定插件解决)
实操:
1. IDEA ---settings-----install plugins----GSON 插件
2. 新增一个entity实体类,在新建的实体类使用alt+S 快捷键打开GSON插件
3. 输入你想要实例化的JSON数据,一直下一步即可完成实例化。
实例化截图:
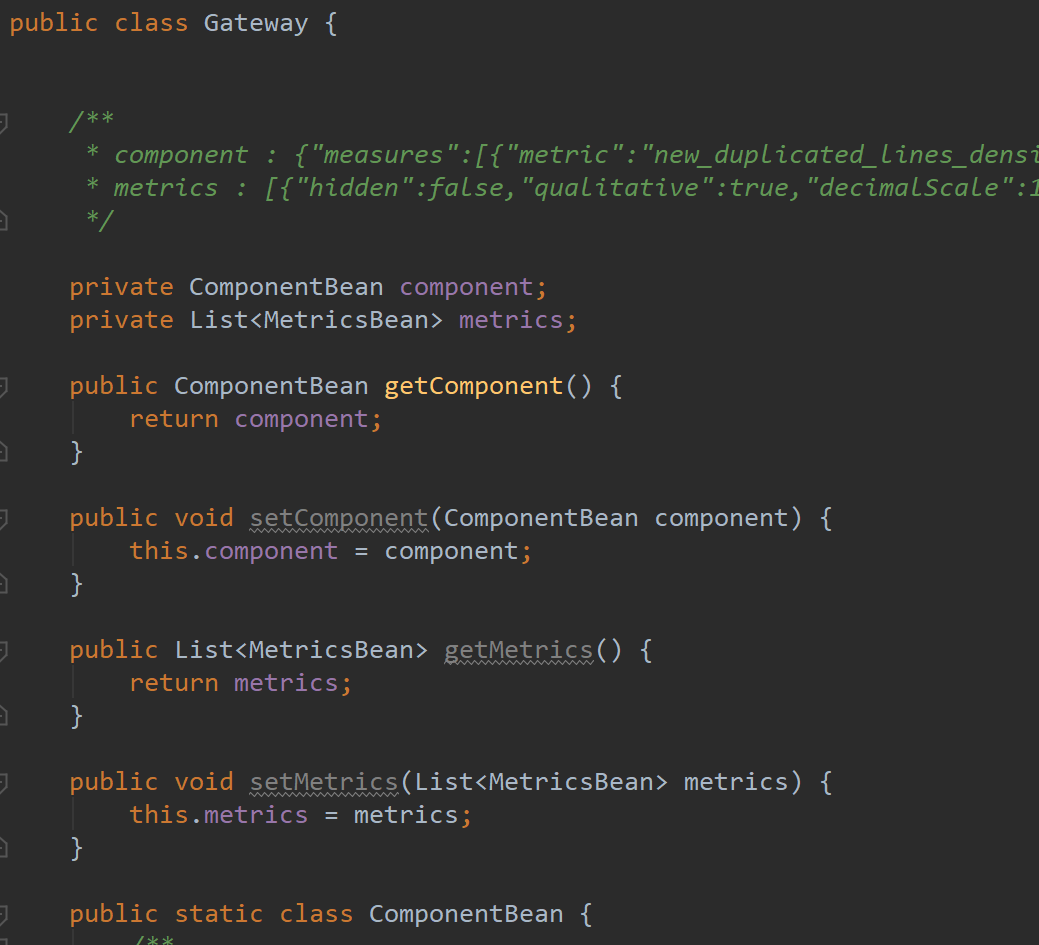
Service层调用实例化:
//实例化的时候注意数据格式,List的话可以循环获取(下面的注释部分);最终存储到map里面返回
Gateway gatewaydata = JSON.parseObject(res, Gateway.class);
Map resMap=new HashMap<>();
String value=gatewaydata.getComponent().getMeasures().get(0).getPeriods().get(0).getValue();
String metric=gatewaydata.getComponent().getMeasures().get(0).getMetric();//获取各个区的名称//List clist=state.getData().get(0).getCity().get(0).getCounty();//for(Country c:clist){//System.out.println("cname:"+c.getName());//}
System.out.println(value+metric);
resMap.put("metric",metric);
resMap.put("value",value);

欢迎加入 MCP 技术社区!与志同道合者携手前行,一同解锁 MCP 技术的无限可能!
更多推荐
 0
0 0
0- 0


 已为社区贡献1条内容

所有评论(0)