Tensort RT 学习记录
/模型类型[n/s/m/l/x/n6/s6/m6/l6/x6 or c/c6 gd gw]因此对于通道数比较多的卷积层和反卷积层,优化力度是比较大的;我学习的是 https://github.com/wang-xinyu/tensorrtx/blob/master/yolov5/yolov5_det_cuda_python.py。参考代码连接: https://github.com/wang-xi
TensoRT(trt)学习记录
连接:
一、 第一天
-
什么是trt,由什么构成的?
trt 核心代码为C++和CUDA,Python端作为前端与用户交互。 -
优点(特点)
大块的矩阵运算,尽量直通到底。因此对于通道数比较多的卷积层和反卷积层,优化力度是比较大的;如细小op操作(例如reshape、gather、split等)一般。我觉得更实用于分割模型。 -
大致步骤
a. Pytorch -> ONNX
b. TensorRT预推理阶段:根据onnx所描述的模型结构和权重数值和当前的软硬件环境生成对应的执行计划,并且序列化为xxx.engine文件持久化保存
c. (安装包内自带的trtexec.exe实现,也可以用python代码自行实现)TensorRT部署阶段:需要使用代码实现加载执行计划文件(xxx.engine) -
可像 pytorch 那样自己搭建网络。
有两个步骤:-
定义网络
§ 现在输入也是一个节点对象了,输出也是一个节点。
§ 需要显示定网络变量,把输入输出放到网络中 -
序列化网络(没什么)
§ 定义 BCHW
""" trt 自定义网络结构示例 """ import tensorrt as trt verbose = True IN_NAME = 'input' # 输入节点名称 OUT_NAME = 'output' # 输出节点名称 IN_H = 224 # 输入张量的高度 IN_W = 224 # 输入张量的宽度 BATCH_SIZE = 1 # 批处理大小 EXPLICIT_BATCH = 1 << (int)( trt.NetworkDefinitionCreationFlag.EXPLICIT_BATCH) # 创建显式batch的标记 TRT_LOGGER = trt.Logger(trt.Logger.VERBOSE) if verbose else trt.Logger() # TRT日志记录器 with trt.Builder(TRT_LOGGER) as builder, builder.create_builder_config() as config, builder.create_network(EXPLICIT_BATCH) as network: # 创建Builder、Config和Network对象 # define network input_tensor = network.add_input( # 添加输入层 name=IN_NAME, dtype=trt.float32, shape=(BATCH_SIZE, 3, IN_H, IN_W)) # 输入层张量信息 pool = network.add_pooling( # 添加池化层 input=input_tensor, type=trt.PoolingType.MAX, window_size=(2, 2)) # 池化层张量信息 pool.stride = (2, 2) # 池化层步幅 pool.get_output(0).name = OUT_NAME # 池化层输出层名称 network.mark_output(pool.get_output(0)) # 标记池化层输出为网络输出层 # serialize the model to engine file profile = builder.create_optimization_profile() # 创建优化配置文件 profile.set_shape_input('input', *[[BATCH_SIZE, 3, IN_H, IN_W]]*3) # 设置输入张量维度 builder.max_batch_size = 1 # 最大批处理大小 config.max_workspace_size = 1 << 30 # 配置可用于任意内部缓冲区的最大GPU内存 engine = builder.build_engine(network, config) # 构建TensorRT引擎 with open('model_python_trt.engine', mode='wb') as f: f.write(bytearray(engine.serialize())) # 序列化引擎模型并写入文件 print("generating file done!") # 输出引擎模型生成完成的信息 -
-
最终推理
步骤:
1. 主流代码的建立(三行)
2. 对模型进行封装,建立一个类-
-. Init 就指定是哪个文件就好
-
Forward :类似c++,先分配再计算。
1) 遍历所有输入张量:获取入口的数量和位置;预留每个阶段中间变量的空间;把输入放到入口处
2)初始化所有输出张量:获取出口的位置;预留每个阶段输出变量的空间;把输出放到出口。
from typing import Union, Optional, Sequence, Dict, Any import torch import tensorrt as trt class TRTWrapper(torch.nn.Module): def __init__(self, engine: Union[str, trt.ICudaEngine], output_names: Optional[Sequence[str]] = None) -> None: super().__init__() self.engine = engine # 如果 engine 是一个字符串,说明需要从文件中加载 TensorRT 引擎,反序列化得到 ICudaEngine 对象 if isinstance(self.engine, str): with trt.Logger() as logger, trt.Runtime(logger) as runtime: with open(self.engine, mode='rb') as f: engine_bytes = f.read() self.engine = runtime.deserialize_cuda_engine(engine_bytes) # 创建执行上下文对象 self.context = self.engine.create_execution_context() # 获取所有的输入输出层名称 names = [_ for _ in self.engine] input_names = list(filter(self.engine.binding_is_input, names)) self._input_names = input_names self._output_names = output_names if self._output_names is None: # 如果未指定输出层名称,自动获取所有非输入层名称 output_names = list(set(names) - set(input_names)) self._output_names = output_names def forward(self, inputs: Dict[str, torch.Tensor]) -> Dict[str, torch.Tensor]: assert self._input_names is not None assert self._output_names is not None # 初始化所有的输入输出层绑定 bindings = [None] * (len(self._input_names) + len(self._output_names)) profile_id = 0 # 遍历所有输入张量:获取入口的数量和位置;预留每个阶段中间变量的空间;把输入放到入口处 for input_name, input_tensor in inputs.items(): # 检查输入张量的形状是否合法 profile = self.engine.get_profile_shape(profile_id, input_name) assert input_tensor.dim() == len(profile[0]), 'Input dim is different from engine profile.' for s_min, s_input, s_max in zip(profile[0], input_tensor.shape, profile[2]): assert s_min <= s_input <= s_max, 'Input shape should be between ' + f'{profile[0]} and {profile[2]}' + f' but get {tuple(input_tensor.shape)}.' # 获取输入张量在 ICudaEngine 中的位置(binding index) idx = self.engine.get_binding_index(input_name) # 检查输入张量是不是在 GPU 上,如果不是,需要将其转移到 GPU 上 assert 'cuda' in input_tensor.device.type # 张量连续化 input_tensor = input_tensor.contiguous() # 如果输入张量的数据类型是 torch.long,在内部被作为torch.int32处理 if input_tensor.dtype == torch.long: input_tensor = input_tensor.int() # 设置当前输入张量的形状,用于在推断过程中反推其他相关的张量形状 self.context.set_binding_shape(idx, tuple(input_tensor.shape)) # 将输入张量的数据指针放到 bindings 对应位置 bindings[idx] = input_tensor.contiguous().data_ptr() # 初始化所有输出张量:获取出口的位置;预留每个阶段输出变量的空间;把输出放到出口 outputs = {} for output_name in self._output_names: # 获取输出张量在 ICudaEngine 中的位置(binding index)。模型的输入输出并不一定是在头部和尾部 idx = self.engine.get_binding_index(output_name) dtype = torch.float32 shape = tuple(self.context.get_binding_shape(idx)) device = torch.device('cuda') # 创建空白张量,用于存储输出 output = torch.empty(size=shape, dtype=dtype, device=device) outputs[output_name] = output # 将输出张量的数据指针放到 bindings 对应位置 bindings[idx] = output.data_ptr() # 使用绑定的输入输出层执行异步推断,并等待执行完成 self.context.execute_async_v2(bindings, torch.cuda.current_stream().cuda_stream) return outputs # 测试代码 model = TRTWrapper('model.engine', ['output']) output = model(dict(input=torch.randn(1, 3, 224, 224).cuda())) print(output) -
二、查看yolov5的tensortrt代码
-
他是转的还是自己写的架构?
我学习的是 https://github.com/wang-xinyu/tensorrtx/blob/master/yolov5/yolov5_det_cuda_python.py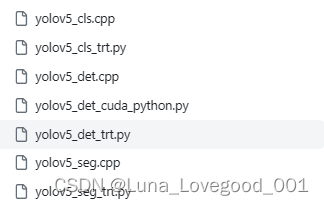前两个是分类,后两个是分割,但中间检测的这个 “trt”he “cuda_pythhon ”区别?Trt 更加好一些,使用了一些封装好的cuda的python接口,后者好像是使用了自定义的cuda算子。
三、如何编写Tensort 代码?
好了,那我们在python 版本的yolov5的基础上,应该如何编写yolov5+tensort 的代码呢?有下面这几个点应该提前知道。
- 在TensorRT中,host和device分别指主机CPU和GPU设备。具体来说,host表示主机CPU,它主要负责管理输入/输出数据、调用TensorRT API和执行应用程序的其他操作;而device则表示 GPU 设备。在TensorRT中,通常使用CUDA API来管理和利用GPU设备的计算资源。在TensorRT中,主机和设备之间需要进行数据传输以完成推理,因此需要使用host和device之间的内存传输等功能。具体来说,为了高效地进行异步数据传输,通常会创建一个CUDA流对象(即CUDA stream),用于管理数据传输的执行顺序和并发度等问题。此外,为了存储每个图像的输入数据,通常还需要在主机端和设备端分别分配两块缓冲区,它们分别对应主机端的固定内存(即pinned memory)和设备端的内存。其中,固定内存缓冲区主要用于将图像数据从主机复制到设备,而设备端内存缓冲区则用于存储预处理后的图像数据。通过这种方式,可以实现高效的异步数据传输,并且最大限度地利用GPU的计算能力,提高处理性能。
3.1 tensort + yolov5 + 图像 的简单示例:
参考代码连接: https://github.com/wang-xinyu/tensorrtx/blob/yolov5-v6.0/yolov5/yolov5_trt.py
这段代码定义了一个名为warmUpThread的类。该类的作用是在程序启动时进行模型的预热,即对一张全零的图片进行推理,以便加速。具体实现是在run方法中调用yolov5_wrapper的infer方法对全零图片进行推理,并输出推理结果的形状和推理时间 。
- 关键是要看他这两个类别inferThread用于推理,warmUpThread用于分配:
- 两个都用主类的infer 方法,只是输入不同(一个全为0,一个是图片) - 这段代码的作用是使用多线程对一批图片进行目标检测。首先,代码会对图片进行预处理,然后创建一个新的线程来进行预热操作,即对一张全0的图片进行推理,以便加速后续的推理操作。接着,代码会对每个batch中的图片创建一个新的线程来进行推理操作,推理结果会保存在output文件夹中。最后,代码会销毁实例.
- 他这是针对本地文件的,把1k个本地文件分为batch 推理的。
结论:大概知道了,tensort 推理流程多了一些内存分配的工作。当然,我的目的是在项目上面跑yolov5 + tensort ,手撕代码没有意义,大概知道就好。然后看看 tensort + yolov5 + 视频 的相关代码。
3.2 tensort + yolov5 + 视频
最后目的:自己的模型+多路流; 目前的目的:本地读取视频。
3.2.1 相关的连接
我还没开始干,先看看下面的就好。
-
先要配置环境:
1). 我打算跟着配置的 https://blog.csdn.net/weixin_46596757/article/details/123904712?spm=1001.2014.3001.5502
2). 其他的环境配置的 link1 ; link2 -
我选择的项目代码库
1)yolov5+视频
a. https://github.com/YINYIPENG-EN/YOLOv5TensorRT/blob/master/yolov5.cpp
b. https://github.com/GaoJieo/yolov5-tensorrtx-VideoCapture (我用的) -
其他的项目库
3.2.2 环境搭建
目的:跑起来,管他什么图像和视频的。环境的部署完全按照:
- 总流程:https://blog.csdn.net/gulingfengze/article/details/108425949 和 https://blog.csdn.net/weixin_46596757/article/details/123904712?spm=1001.2014.3001.5502
- 必须先 opencv - contribute 的安装:
- https://cloud.tencent.com/developer/article/2124101?areaSource=106005.17
- https://blog.csdn.net/HikD_bn/article/details/108454830
- https://www.jianshu.com/p/1389704c3167
遇到的问题,有先后顺序的:
-
遇到 CUDA Check 红色波浪线
答:Include CUDA的东西:头文件和库 -
遇到 LNK2001 无法解析的外部符号 “public: __cdecl nvinfer1::YoloPluginCreator::YoloPluginCreator(void)” (??0YoloPluginCreator@nvinfer1@@QEAA@XZ) yolov5-tensorrtx-VideoCapture D:\files\C_code\TensortRT_related\yolov5-tensorrtx-VideoCapture\yolov5.obj
答:我不太清楚是什么导致的。我的做法是:必须先安装 opencv 的拓展包(contribute),然后你需要用到 opencv_img_hash410.lib 文件。 -
在安装了 opencv -contribute 并且有了 opencv_img_hash410.lib 之后,还是 LNK2001 无法解析的外部符号 "public: virtual bool __cdecl nvinfer1::YoloLayerPlugin::isOutputBroadcastAcrossBatch(int,bool const *,int)const " (?isOutputBroadcastAcrossBatch@YoloLayerPlugin@nvinfer1@@UEBA_NHPEB_NH@Z) yolov5-tensorrtx-VideoCapture D:\files\C_code\TensortRT_related\yolov5-tensorrtx-VideoCapture\yolov5.obj
答:Cu 编程方式不对,按照 https://blog.csdn.net/jacke121/article/details/109212123 -
在设置了Cu 编程方式后, 生成完成了!然后运行的时候发现报错: The engine plan file is not compatible with this version of Tensort verstion 8.4.3.1 got 8.4.0.6
答: 重新生成 engine 文件,需要 改 代码中的 parse[4] = “s”; //模型类型 [n/s/m/l/x/n6/s6/m6/l6/x6 or c/c6 gd gw] -
在cu设置、重生成 engine 后,错误 Error opening file (/build/opencv/modules/videoio/src/cap_ffmpeg_impl.hpp:901)
答:把读取视频文件改为读取摄像头,发现OK了!!!说明是我们在使用 opencv 拓展包读取的时候有点问题。不过到此为止了!
最后vs2019上面配置的(cuda+tensort +opencv+contribute)截图展示,便于后期用,见附录1
附录
附录1
最后vs2019上面配置的(cuda+tensort +opencv+contribute)截图展示,便于后期用,见附录1
- VC++
- 包含目录:
- D:\program_files\opencv\new_buid\install\include
- D:\program_files\opencv\new_buid\install\include\opencv2
- 库目录
- C:\Program Files\NVIDIA GPU Computing Toolkit\CUDA\v11.1\lib\x64
- C:\Program Files\NVIDIA GPU Computing Toolkit\CUDA\v11.1\lib
- D:\program_files\opencv\new_buid\install\x64\vc16\lib
- 包含目录:
- C/C++
- 常规-》附加包含目录
- C:\Program Files\NVIDIA GPU Computing Toolkit\CUDA\v11.1\include
- D:\program_files\TensorRT-8.4.3.1\include
- 预处理器
- 预处理器定义:API_EXPORTS


- 预处理器定义:API_EXPORTS
- 常规-》附加包含目录
- 连接器
- 常规 - 附加库目录 -
- D:\program_files\TensorRT-8.4.3.1\lib;
- C:\Program Files\NVIDIA GPU Computing Toolkit\CUDA\v11.1\lib;
- C:\Program Files\NVIDIA GPU Computing Toolkit\CUDA\v11.1\lib\x64;

- 输入 - 附加依赖项
C:\Program Files\NVIDIA GPU Computing Toolkit\CUDA\v11.1\lib\x64*.lib
D:\program_files\TensorRT-8.4.3.1\lib*.lib
opencv_world410d.lib
opencv_world410.lib
opencv_img_hash410.lib
opencv_img_hash410d.lib
nvinfer.lib
cudart.lib
cuda.lib
cublas.lib
cudnn.lib
- 常规 - 附加库目录 -
- 还需要设置了Cu 编程方式

欢迎加入 MCP 技术社区!与志同道合者携手前行,一同解锁 MCP 技术的无限可能!
更多推荐
 0
0 0
0- 0


 已为社区贡献1条内容

所有评论(0)