langchain系列(七)- LangGraph Platform、LangGraph Studio、LangSmith基本用法
LangChain核心思想逐渐向LangGraph偏移,同时有了LangGraph Platform、LangGraph Studio。LangSmith之前就有了,这三个组件作为辅助类的应用,本文进行了简单的介绍以及使用,方便后续博客的工具使用
目录
一、导读
环境:OpenEuler、Windows 11、WSL 2、Python 3.12.3 langchain 0.3 langgraph 0.2
背景:前期忙碌的开发阶段结束,需要沉淀自己的应用知识,过一遍LangGraph
时间:20250227
说明:技术梳理,LangGraph的platform、studio、LangSmith的基本使用
二、综述
LangChain图示
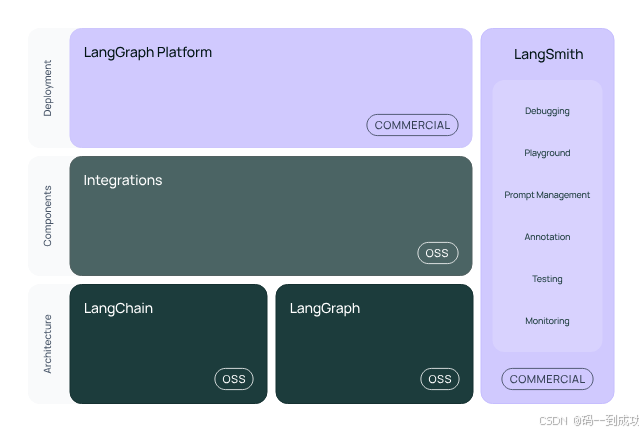
使用LangChain开发主要使用LangChain的基础语法,框架使用LangGraph,组件使用的是Integrations(第三方集成,例如:langchain-openai)。
部署使用LangGraph Platform,最初版本(LangChain 0.1版本)使用LangServe。
跟踪、debug等使用LangSmith
本文主要简单介绍这三种工具在开发中的基本使用,详细功能请自行研究
三、LangSmith的基本使用
想要分析大模型的具体运行情况存在困难,IDE实现调试不可行。而使用LangSmith可以实现相关的功能,下面通过代码实现,来说明其基本功能
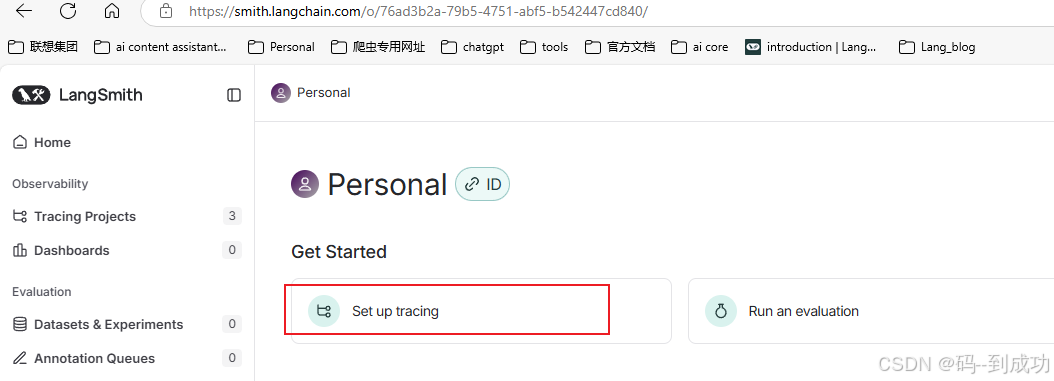
1、注册LangSmith
2、生成key
在网站主页中,点击Set up tracing -->Generate API Key --> 复制key
API Key 示例:lsv2_pt_d17ed5xxxxxxxxxxxxx xxxxxx xxxx_cf08898efc
3、项目配置API Key
os.environ["LANGCHAIN_TRACING_V2"] = "true"
os.environ["LANGCHAIN_API_KEY"] = "lsv2_pt_d17ed5xxxxxxxxxxxxx xxxxxx   xxxx_cf08898efc"
os.environ["LANGCHAIN_PROJECT"] = "chatbot_test"
4、代码运行
代码实现
from langchain_openai import ChatOpenAI
from langgraph.graph import StateGraph, START, END
from langgraph.graph.message import MessagesState
import os

llm = ChatOpenAI(
    base_url="https://lxxxxx.enovo.com/v1/",
    api_key="sxxxxxxxwW",
    model_name="qwen2.5-instruct"
    )


os.environ["LANGCHAIN_TRACING_V2"] = "true"
os.environ["LANGCHAIN_API_KEY"] = "lsv2_pt_d17ed5xxxxxxxxxxxxx xxxxxx   xxxx_cf08898efc"
os.environ["LANGCHAIN_PROJECT"] = "chatbot_test"

graph_builder = StateGraph(MessagesState)

def chatbot(state: MessagesState):
    return {"messages": [llm.invoke(state["messages"])]}

graph_builder.add_node("chatbot", chatbot)
graph_builder.add_edge(START, "chatbot")
graph_builder.add_edge("chatbot", END)
graph = graph_builder.compile()

for event in graph.stream({"messages": [{"role": "user", "content": "中国最好的大学是哪所?"}]}):
    for value in event.values():
        print("Assistant:", value["messages"][-1].content)
这是上一章的代码,直接执行即可
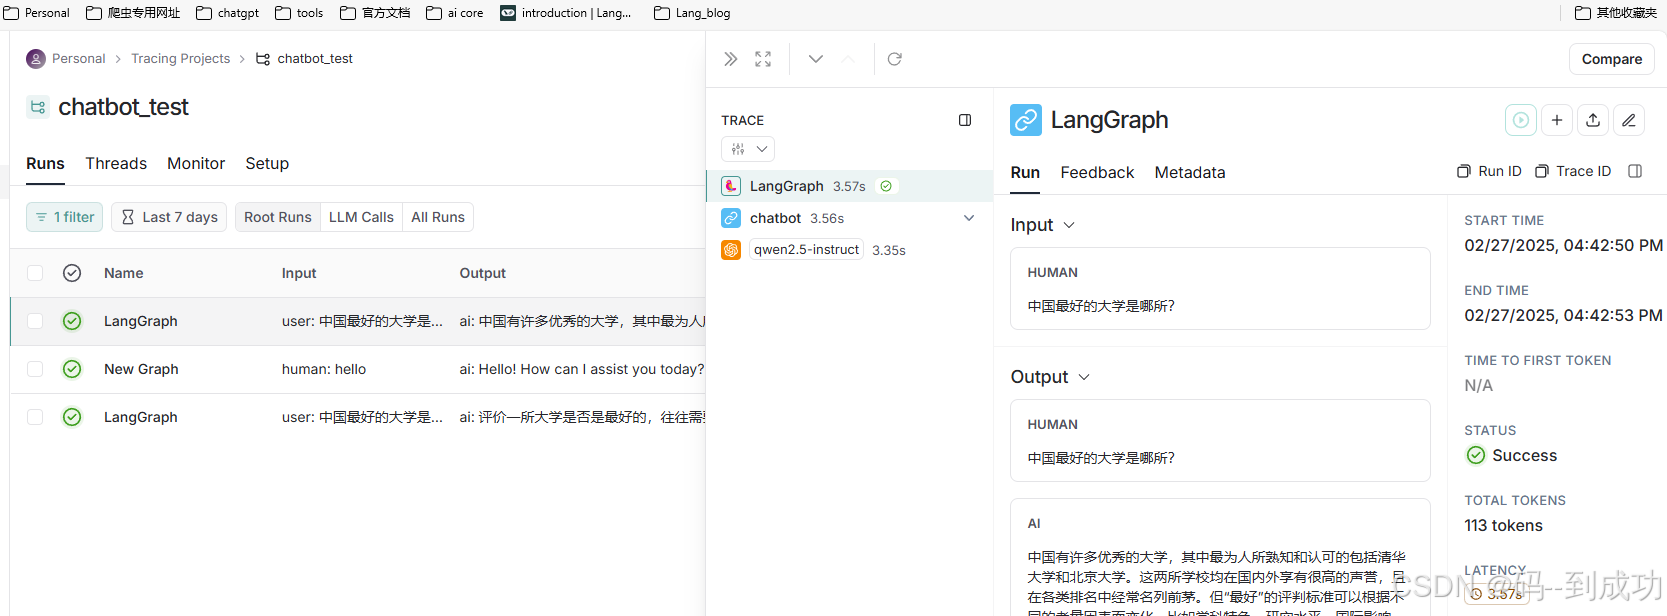
5、网站测试
打开刚才的网址,点击Tracing Projects,如下图:
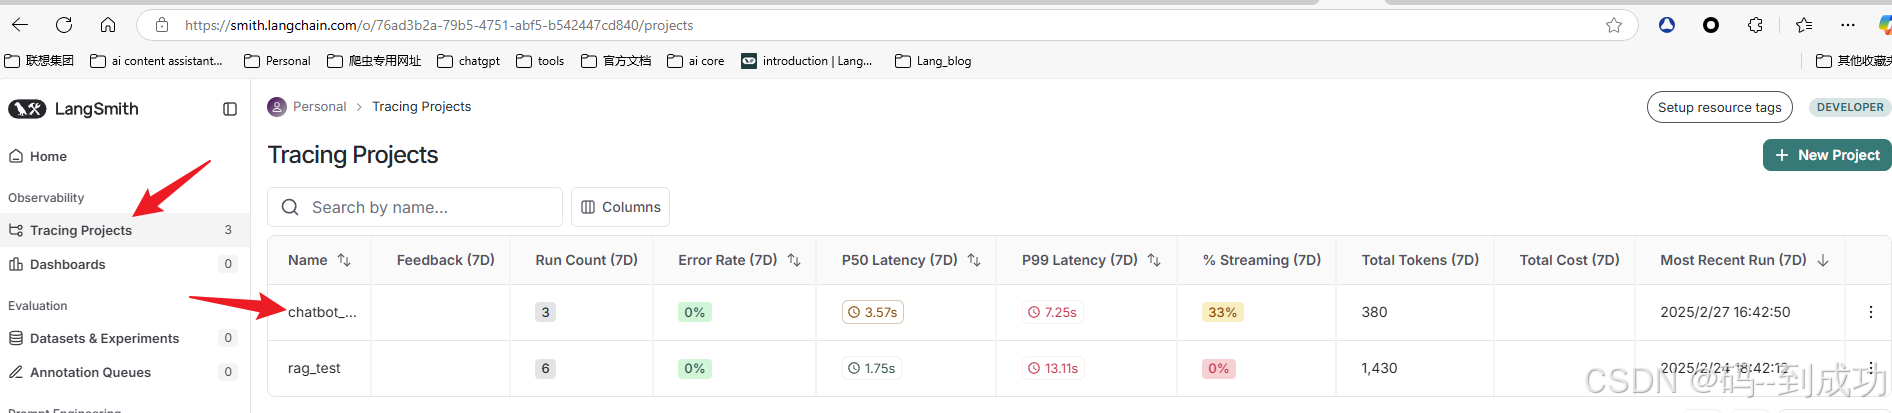
可以查看相关的详细信息
当然,还有其他功能,此处不在赘述
四、LangGraph Platform
1、简介
部署应用的工具,可以在本地或云端部署,基于Fast API框架,有以下几种方式:
自托管轻量版: 一个免费(每年最多执行100万个节点)的LangGraph平台的受限版本,你可以在本地或自托管的方式下运行
云SaaS: 作为LangSmith的一部分托管。
自带云: 我们管理基础设施,因此你不必自己管理,但所有基础设施都在你的云环境中运行。
自托管企业版: 完全由你管理。
本文仅介绍本地启动一个 LangGraph 服务器,并使用 REST API 和 LangGraph Studio Web UI 与其进行交互
2、使用方法
(1)安装LangGraph CLI
pip install --upgrade "langgraph-cli[inmem]"(2)创建LangGraph应用
langgraph new /usr/local/test --template react-agent-python使用react-agent模板,创建应用在/usr/local/test下
也可以使用 langgraph new,其方法如下
(venv) jack@Laptop-L14-gen4:~/langchain_test/langchain_learn/langgraph_tt/integration_lang$ langgraph new
📂 Please specify the path to create the application [.]: chat_bot
🌟 Please select a template:
1. New LangGraph Project - A simple, minimal chatbot with memory.
2. ReAct Agent - A simple agent that can be flexibly extended to many tools.
3. Memory Agent - A ReAct-style agent with an additional tool to store memories for use across conversational threads.
4. Retrieval Agent - An agent that includes a retrieval-based question-answering system.
5. Data-enrichment Agent - An agent that performs web searches and organizes its findings into a structured format.
Enter the number of your template choice (default is 1): 1

You selected: New LangGraph Project - A simple, minimal chatbot with memory.
Choose language (1 for Python 🐍, 2 for JS/TS 🌐): 1
📥 Attempting to download repository as a ZIP archive...
URL: https://github.com/langchain-ai/new-langgraph-project/archive/refs/heads/main.zip
✅ Downloaded and extracted repository to /home/jack/langchain_test/langchain_learn/langgraph_tt/integration_lang/chat_bot
🎉 New project created at /home/jack/langchain_test/langchain_learn/langgraph_tt/integration_lang/chat_bot
需要先指定应用名称,再选择模板,最后选择language(python或js)
(3)修改graph
按照自己的需求添加节点、边、状态信息
修改文件路径:chat_bot/src/agent/graph.py
将内容修改如下:
"""Define a simple chatbot agent.

This agent returns a predefined response without using an actual LLM.
"""

from langgraph.graph import StateGraph


from langchain_openai import ChatOpenAI
from langgraph.graph import StateGraph, START, END
from langgraph.graph.message import MessagesState


llm = ChatOpenAI(
    base_url="https://lxxxxx.enovo.com/v1/",
    api_key="sxxxxxxxwW",
    model_name="qwen2.5-instruct"
    )

graph_builder = StateGraph(MessagesState)

def chatbot(state: MessagesState):
    return {"messages": [llm.invoke(state["messages"])]}

graph_builder.add_node("chatbot", chatbot)
graph_builder.add_edge(START, "chatbot")
graph_builder.add_edge("chatbot", END)
graph = graph_builder.compile()
graph.name = "New Graph"  # This defines the custom name in LangSmith
此处,我偷懒了,并未完全按照LangGraph的推荐用法。仅仅为了最简化实现Platform的功能实现
(4)运行应用
langgraph dev 命令启动 LangGraph 服务器时使用的是内存模式。这种模式适合于开发和测试目的。对于生产环境,你应该部署 LangGraph 服务器并提供持久存储后端的访问权限。
如果你想使用持久存储后端测试你的应用程序,可以使用 langgraph up 命令代替 langgraph dev。你需要在你的机器上安装 docker 才能使用此命令。
效果如下:
(venv) jack@Laptop-L14-gen4:~/langchain_test/langchain...chat_bot$ langgraph dev
INFO:langgraph_api.cli:

        Welcome to

╦  ┌─┐┌┐┌┌─┐╔═╗┬─┐┌─┐┌─┐┬ ┬
║  ├─┤││││ ┬║ ╦├┬┘├─┤├─┘├─┤
╩═╝┴ ┴┘└┘└─┘╚═╝┴└─┴ ┴┴  ┴ ┴

- 🚀 API: http://127.0.0.1:2024
- 🎨 Studio UI: https://smith.langchain.com/studio/?baseUrl=http://127.0.0.1:2024
- 📚 API Docs: http://127.0.0.1:2024/docs

This in-memory server is designed for development and testing.
For production use, please use LangGraph Cloud.
成功运行
三个url,分别是:API 、API Docs、Studio UI,点击链接可直接使用,关于API相关的url大家自行研究,此处不再赘述。
(5)Studio Web UI 访问
访问地址:https://smith.langchain.com/studio/?baseUrl=http://127.0.0.1:2024
页面如下:
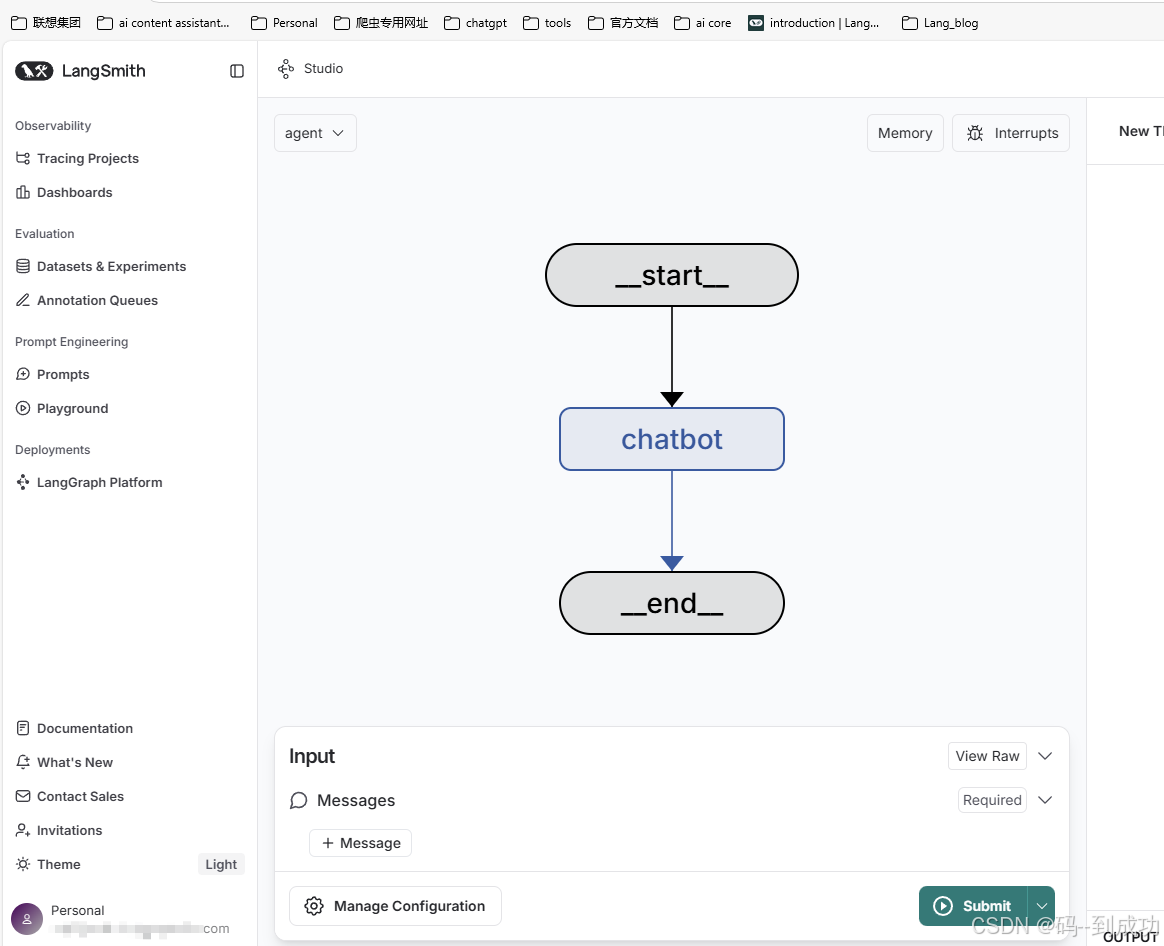
(6)测试效果
点击+ Message,输入hello,点击Submit,效果如下图:

在左侧的message中点击,输入hello,可以看到,右侧会输出相应的内容,而且会显示哪个节点输出的信息。
(7)个人推测
LangGraph Platform可以实现一个图的部署,最终形成一个微服务。关于该观点是否正确,请自行斟酌。
五、总结
本文简单介绍三个组件的使用,其他功能等待大家继续研讨。如果后续有时间,我可能会继续更新本文,具体看情况吧。

欢迎加入 MCP 技术社区!与志同道合者携手前行,一同解锁 MCP 技术的无限可能!
更多推荐


 23
23 0
0- 0


 已为社区贡献1条内容

所有评论(0)