新手如何快速从数据集制作开始搭建自己的yolov5模型(详细图文教程)
本文将对如何快速获取属于自己的模型展开简要介绍,从数据准备、模型训练到最终部署,一步步助力大家迅速领略深度学习的独特魅力。
引言
尽管当下 YOLO 系列已推出至 YOLOv12,但 YOLOv5 依旧堪称 YOLO 项目中的经典之作。在诸多相对简易的目标检测项目里,YOLOv5 的表现并不逊色于高版本的 YOLO。不仅如此,因其结构较为简洁,对其进行个性化修改也更为轻松,从模型架构调整到算法参数优化,都能较为顺畅地实现,故而特别适合作为涉足 YOLO 系列的入门练手项目。
基于此,本文将对如何快速获取属于自己的模型展开简要介绍,从数据准备、模型训练到最终部署,一步步助力大家迅速领略深度学习的独特魅力。
废话也不多说了,直接开始吧。
本文使用的数据集来源:
https://gitcode.com/open-source-toolkit/d8cf0
在开始之前,请确保你的电脑已经下载了anaconda,pytorch,opencv等工具
如尚未下载,可参见笔者之前的文章:
Ubuntu20.04双系统安装及CUDA,ROS等工具安装超完善版(持续更新中)_ubuntu 20.04 和 20.04.6-CSDN博客
目录
数据集制作
labelme
安装
1.首先在anaconda创建自己的虚拟环境
conda create -n 名字 python=3.8.202.进入虚拟环境
conda activate 名字3.安装pqyt5
pip install pyqt54.安装labelme(这里推荐通过conda-forge安装,可以避免很多版本的冲突问题)
conda install -c conda-forge labelme5.在终端输入labelme,当有图形化界面出现时,就证明安装成功了

使用
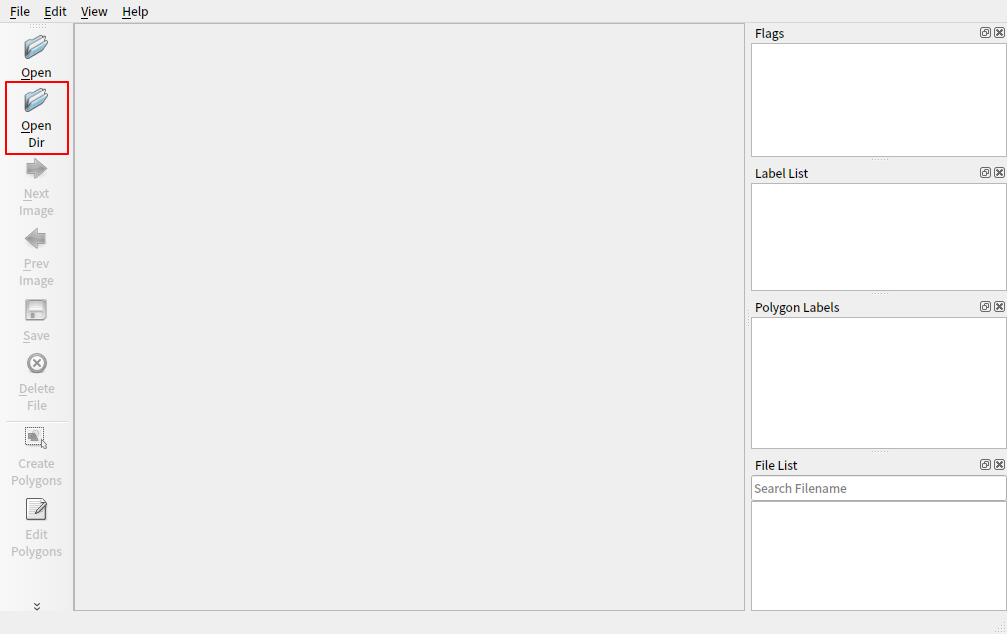
点击左上角的opendir,选择你装有图片的文件夹
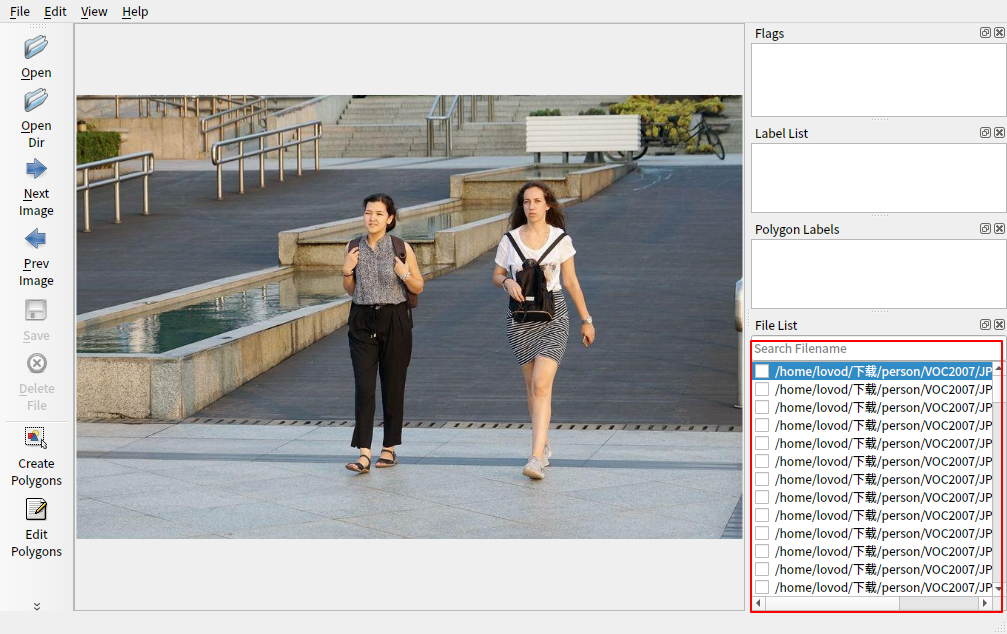
此时右下角会出现该文件下的所有图片
使用左下角的绘制工具为你的目标画框 (多目标时使用不同的标签名称)
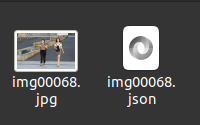
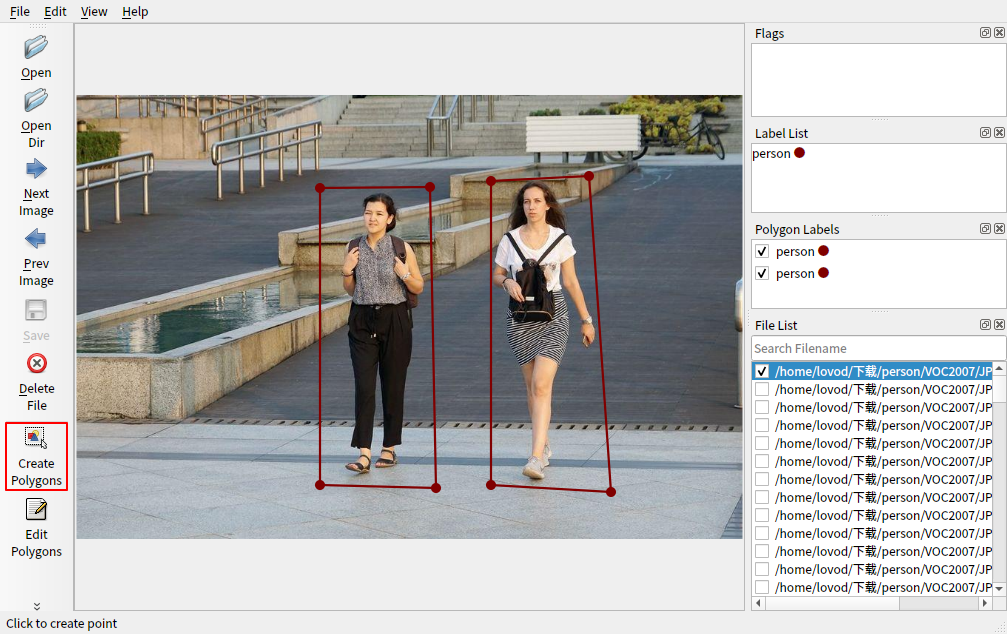 标注成功后指定文件夹保存生成的json文件
可以辅助使用的一些快捷键
- ctrl+鼠标滚轮:放大缩小
- alt+鼠标滚轮 :图像左右移动
- A与D:上一张/下一张图片
以上便是使用labelme制作数据集的方法,当然这种方法是很耗时间精力的(当你需要处理上万张图片的时候,什么叫真正的绝望)
所以你也可以选择其他方式:
- 使用roboflow的自动标注(效果见仁见智吧,当然你也可以使用它来帮你直接构建模型)
- 直接使用现有的数据集:github,Hugging Face等等提供数据集的网站
为了省事,本文使用了一个现成的人物单目标检测数据集作为演示
数据集格式修改
知周所众,yolo使用的数据集格式是txt,但是你会遇到各种格式的数据集,以下是几种常见数据集格式修改为yolo格式的方法
json转txt
import json
import os
from tqdm import tqdm
def convert_label(json_dir, save_dir, classes):
json_paths = os.listdir(json_dir)
classes = classes.split(',')
for json_path in tqdm(json_paths):
path = os.path.join(json_dir, json_path)
with open(path, 'r') as load_f:
json_dict = json.load(load_f)
h, w = json_dict['imageHeight'], json_dict['imageWidth']
# save txt path
txt_path = os.path.join(save_dir, json_path.replace('json', 'txt'))
txt_file = open(txt_path, 'w')
for shape_dict in json_dict['shapes']:
label = shape_dict['label']
label_index = classes.index(label)
points = shape_dict['points']
points_nor_list = []
for point in points:
points_nor_list.append(point[0] / w)
points_nor_list.append(point[1] / h)
points_nor_list = list(map(lambda x: str(x), points_nor_list))
points_nor_str = ' '.join(points_nor_list)
label_str = str(label_index) + ' ' + points_nor_str + '\n'
txt_file.writelines(label_str)
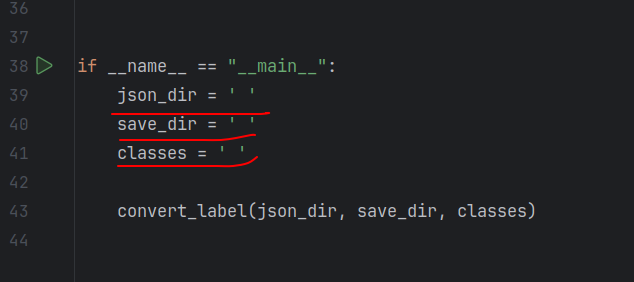
if __name__ == "__main__":
json_dir = ' '
save_dir = ' '
classes = ' '
convert_label(json_dir, save_dir, classes)需要修改的是这三行,改为json文件位置,储存txt文件位置和类别名称即可
xml转txt
import xml.etree.ElementTree as ET
import os
def convert(size, box):
x_center = (box[0] + box[1]) / 2.0
y_center = (box[2] + box[3]) / 2.0
x = x_center / size[0]
y = y_center / size[1]
w = (box[1] - box[0]) / size[0]
h = (box[3] - box[2]) / size[1]
return (x, y, w, h)
def convert_annotation(xml_files_path, save_txt_files_path, classes):
xml_files = os.listdir(xml_files_path)
print(xml_files)
for xml_name in xml_files:
print(xml_name)
xml_file = os.path.join(xml_files_path, xml_name)
out_txt_path = os.path.join(save_txt_files_path, xml_name.split('.')[0] + '.txt')
out_txt_f = open(out_txt_path, 'w')
tree = ET.parse(xml_file)
root = tree.getroot()
size = root.find('size')
w = int(size.find('width').text)
h = int(size.find('height').text)
for obj in root.iter('object'):
difficult = obj.find('difficult').text
cls = obj.find('name').text
if cls not in classes or int(difficult) == 1:
continue
cls_id = classes.index(cls)
xmlbox = obj.find('bndbox')
b = (float(xmlbox.find('xmin').text), float(xmlbox.find('xmax').text), float(xmlbox.find('ymin').text),
float(xmlbox.find('ymax').text))
print(w, h, b)
bb = convert((w, h), b)
out_txt_f.write(str(cls_id) + " " + " ".join([str(a) for a in bb]) + '\n')
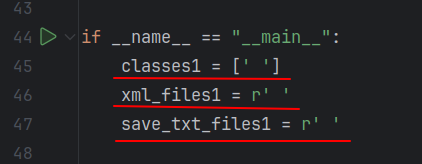
if __name__ == "__main__":
classes1 = [' ']
xml_files1 = r' '
save_txt_files1 = r' '
convert_annotation(xml_files1, save_txt_files1, classes1)
with open(save_txt_files1 + '/classes.txt', 'w') as file:
for class_name in classes1:
file.write(class_name + '\n')修改内容如下,改为xml文件位置,储存txt文件位置和类别名称即可
数据集划分
本人采用的是7+2+1格式,即70%的训练集,20%的验证集和10%的测试集
也可以自行选择喜欢的分割方式
import os
import shutil
import random

random.seed(0)

def split_data(file_path, new_file_path, train_rate, val_rate, test_rate):
    eachclass_image = []
    for image in os.listdir(file_path):
        eachclass_image.append(image)
    total = len(eachclass_image)
    random.shuffle(eachclass_image)
    train_images = eachclass_image[0:int(train_rate * total)]
    val_images = eachclass_image[int(train_rate * total):int((train_rate + val_rate) * total)]
    test_images = eachclass_image[int((train_rate + val_rate) * total):]

    for image in train_images:
        print(image)
        old_path = file_path + '/' + image
        new_path1 = new_file_path + '/' + 'train' + '/' + 'images'
        if not os.path.exists(new_path1):
            os.makedirs(new_path1)
        new_path = new_path1 + '/' + image
        shutil.copy(old_path, new_path)
    new_name = os.listdir(new_file_path + '/' + 'train' + '/' + 'images')

    for im in new_name:
        old_xmlpath = txtpath + '/' + im[:-3] + 'txt'
        new_xmlpath1 = new_file_path + '/' + 'train' + '/' + 'labels'
        if not os.path.exists(new_xmlpath1):
            os.makedirs(new_xmlpath1)
        new_xmlpath = new_xmlpath1 + '/' + im[:-3] + 'txt'
        shutil.copy(old_xmlpath, new_xmlpath)

    for image in val_images:
        old_path = file_path + '/' + image
        new_path1 = new_file_path + '/' + 'val' + '/' + 'images'
        if not os.path.exists(new_path1):
            os.makedirs(new_path1)
        new_path = new_path1 + '/' + image
        shutil.copy(old_path, new_path)
    new_name = os.listdir(new_file_path + '/' + 'val' + '/' + 'images')

    for im in new_name:
        old_xmlpath = txtpath + '/' + im[:-3] + 'txt'
        new_xmlpath1 = new_file_path + '/' + 'val' + '/' + 'labels'
        if not os.path.exists(new_xmlpath1):
            os.makedirs(new_xmlpath1)
        new_xmlpath = new_xmlpath1 + '/' + im[:-3] + 'txt'
        shutil.copy(old_xmlpath, new_xmlpath)

    for image in test_images:
        old_path = file_path + '/' + image
        new_path1 = new_file_path + '/' + 'test' + '/' + 'images'
        if not os.path.exists(new_path1):
            os.makedirs(new_path1)
        new_path = new_path1 + '/' + image
        shutil.copy(old_path, new_path)
    new_name = os.listdir(new_file_path + '/' + 'test' + '/' + 'images')

    for im in new_name:
        old_xmlpath = txtpath + '/' + im[:-3] + 'txt'
        new_xmlpath1 = new_file_path + '/' + 'test' + '/' + 'labels'
        if not os.path.exists(new_xmlpath1):
            os.makedirs(new_xmlpath1)
        new_xmlpath = new_xmlpath1 + '/' + im[:-3] + 'txt'
        shutil.copy(old_xmlpath, new_xmlpath)


if __name__ == '__main__':
    file_path = ' '  # 这里放你存JPG照片的地址
    txtpath = ' '  # 这里放你存label的地址
    new_file_path = ' '  # 这里填你打算新建立的文件夹的名字
    split_data(file_path, new_file_path, train_rate=0.7, val_rate=0.2, test_rate=0.1) #train,val and test的划分。
(这里懒得截图了,根据提示改吧)
自此,你拥有了第一个可供训练的数据集!开始训练你的第一个模型吧!
yolov5下载及配置
直接从github官网上clone下来就好
https://github.com/ultralytics/yolov5接下来使用pycharm打开yolov5
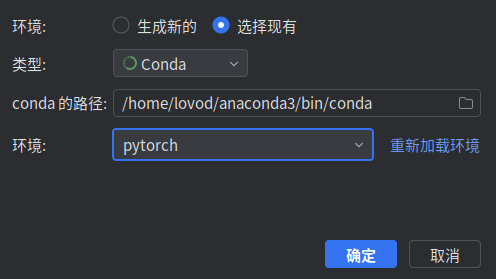
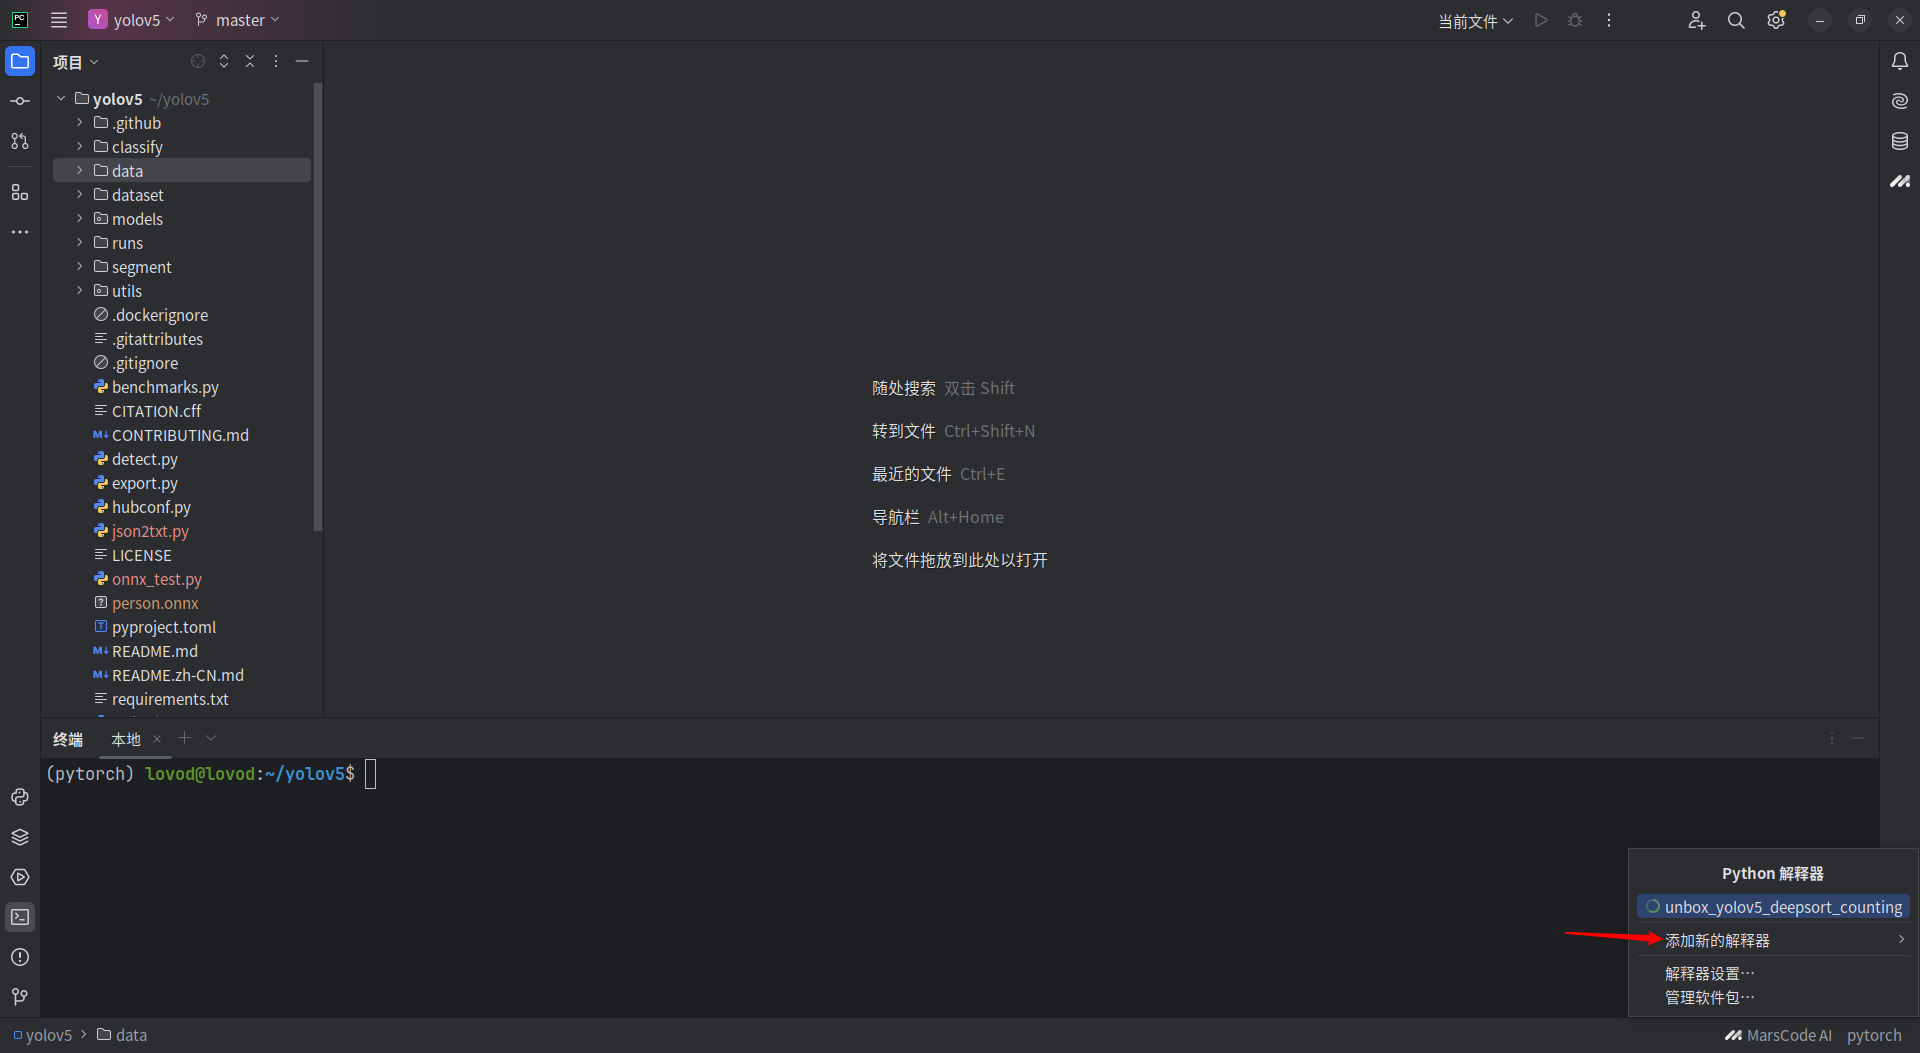 选择添加本地解释器
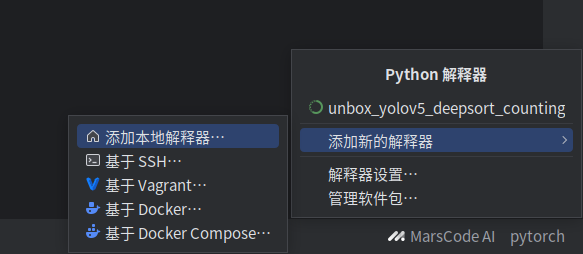
在现有中选择conda环境下你提前准备好的虚拟环境
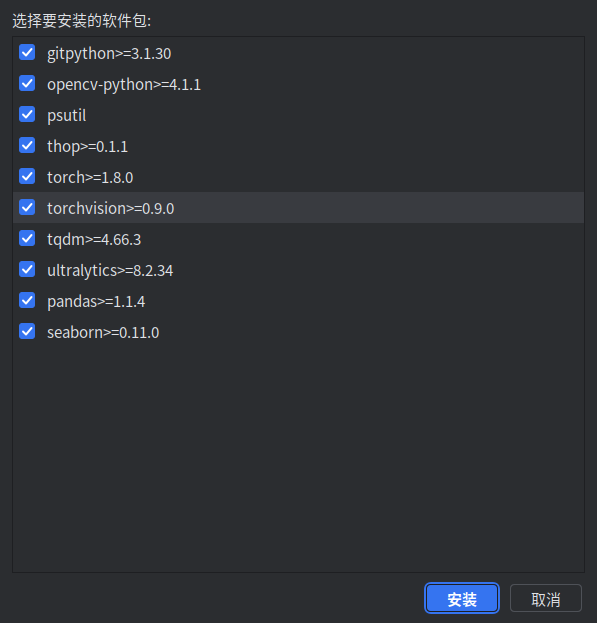
之后会提示你运行yolov5所缺失的软件包,按提示下载即可 (这一步比较耗时,需要耐心等待)

之后yolov5就可以正常使用了 !
模型训练
数据集参数文件
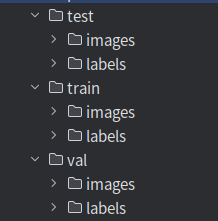
此时你的数据集应有如下结构
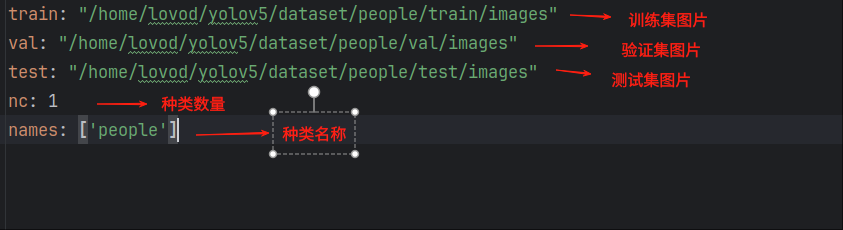
创建data.yaml文件,内容如下(注意!格式不要出错!)
参数修改
模型文件
在models下找到对应的模型文件(以yolov5s.yaml为例)
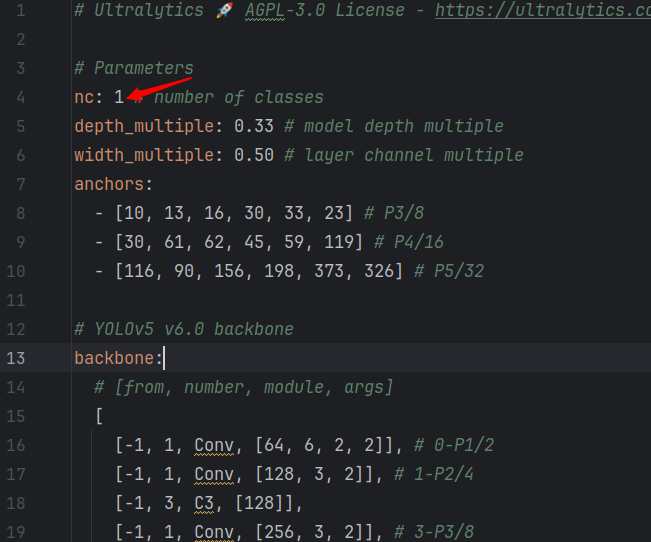
修改nc的值为识别目标类别数量即可(与data.yaml文件一致)
train.py
在train.py文件中找到函数
def parse_opt(known=False)
修改其中参数

要修改的参数:
- 567行:初始权重文件,根据选择的模型直接修改即可
- 568行:模型文件位置
- 569行:数据集参数,即你创建的yaml文件
- 570行:超参数文件,这里用了默认的
- 571行:训练轮次(一般100到300,数据集简单的可以减少写训练批次缩减训练时间)
- 572行:训练批次大小,即每批训练多少张文件(可选择4,8,16等等,视电脑能力决定)
- 588行:如果电脑有显卡且安装了cuda,那默认为0就好
- 593行:工作进程数,视电脑情况选择
开始训练
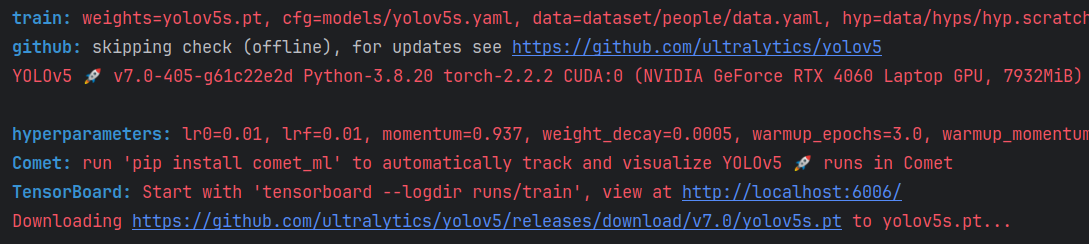
修改完参数之后启动train.py文件,如下即开始训练
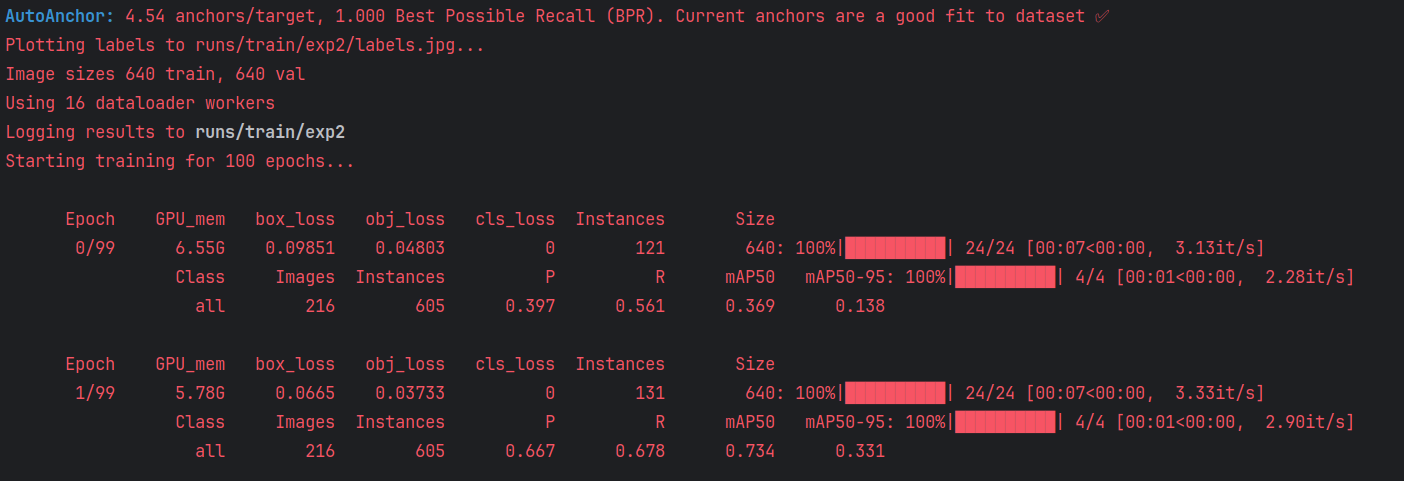
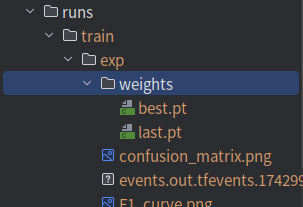
训练完成的结果会在runs/train文件夹中
一些可能有用的补充
yolov5模型的选择
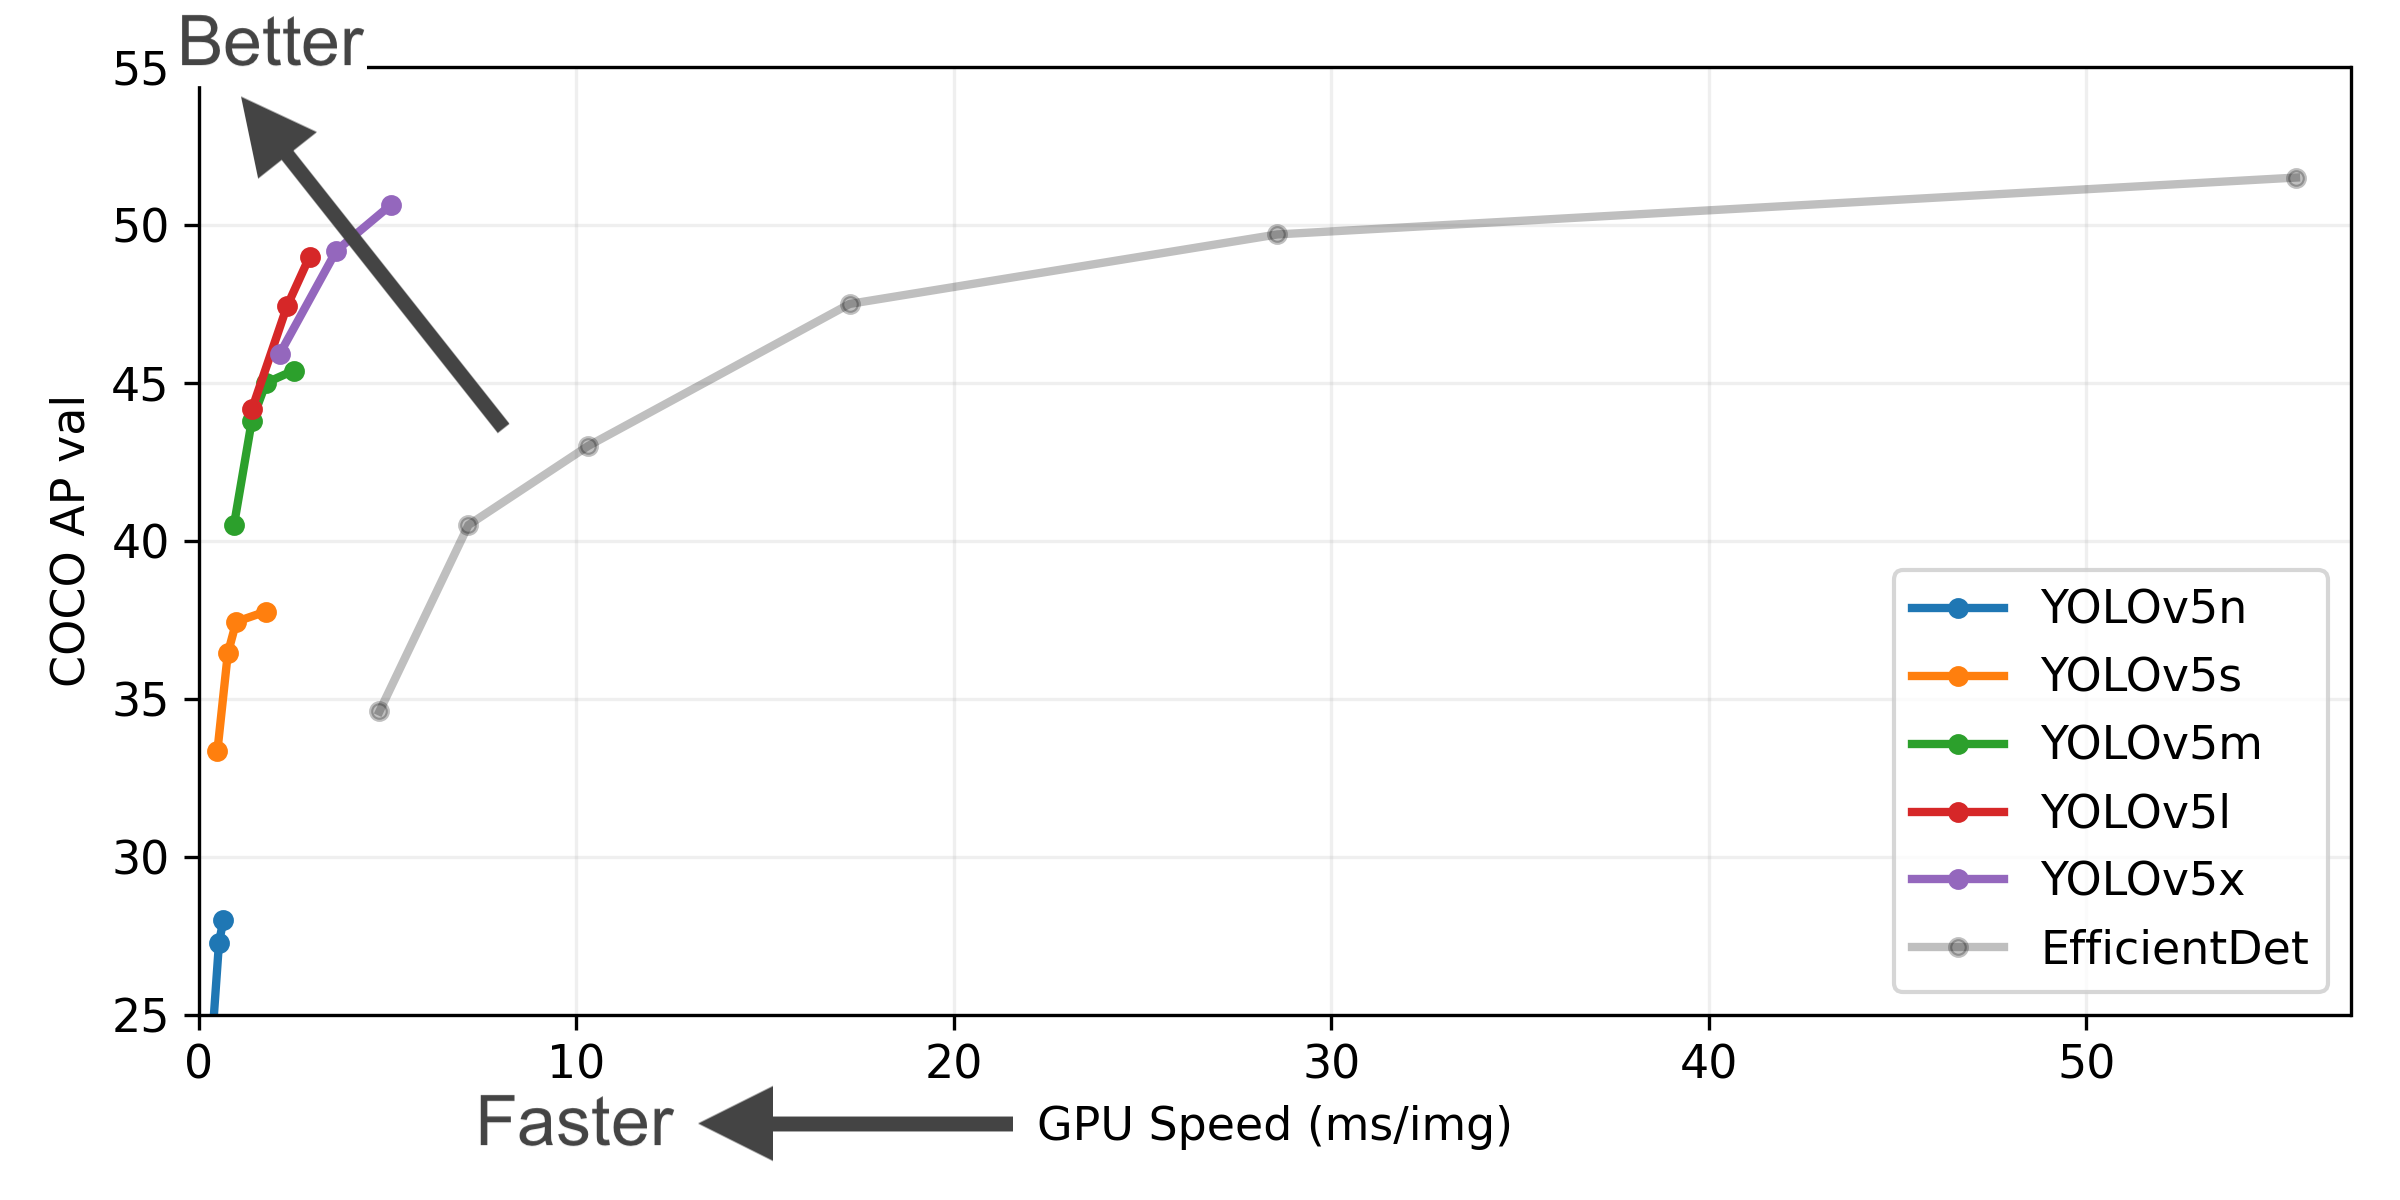
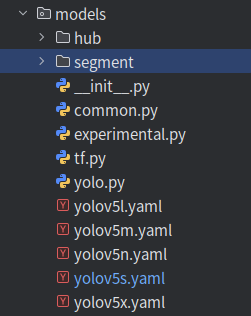
yolov5一共有5个版本,从轻量化到精细化,其文件位置一般如下图所示,因为测试内容比较简单,所以这里采用的是yolov5s
初始参数文件
初始参数文件会提供一个基准,使你的模型更快地到达最佳效果,当然你也可以不使用
一般来说在启动train.py文件时会自动下载,如果下载失败可以根据输出给出的提示自行下载,然后将得到的.pt文件放置到yolov5根目录。
(复制链接到浏览器打开即可)
训练失败
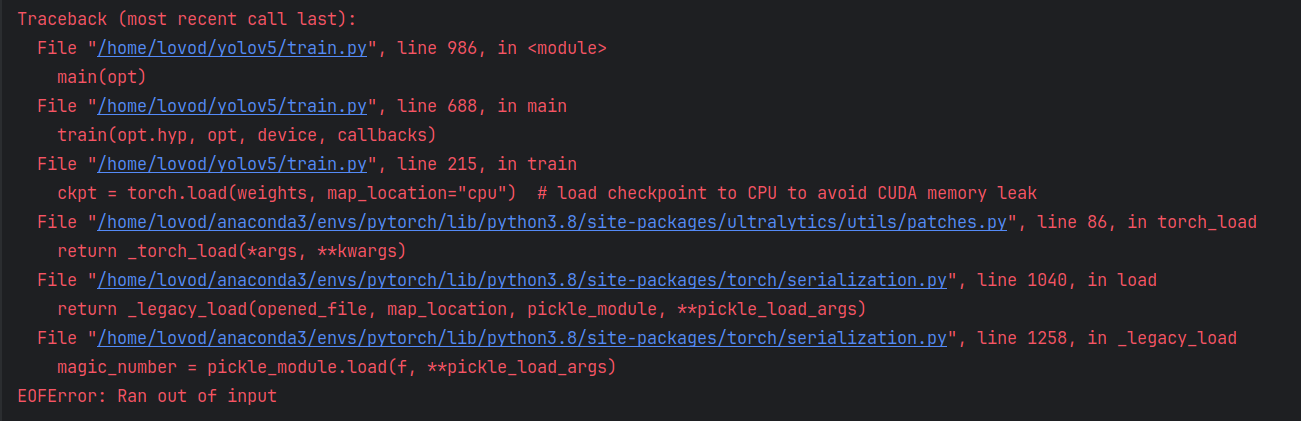
大概率是电脑撑不住了,试试降低worker和batch-size
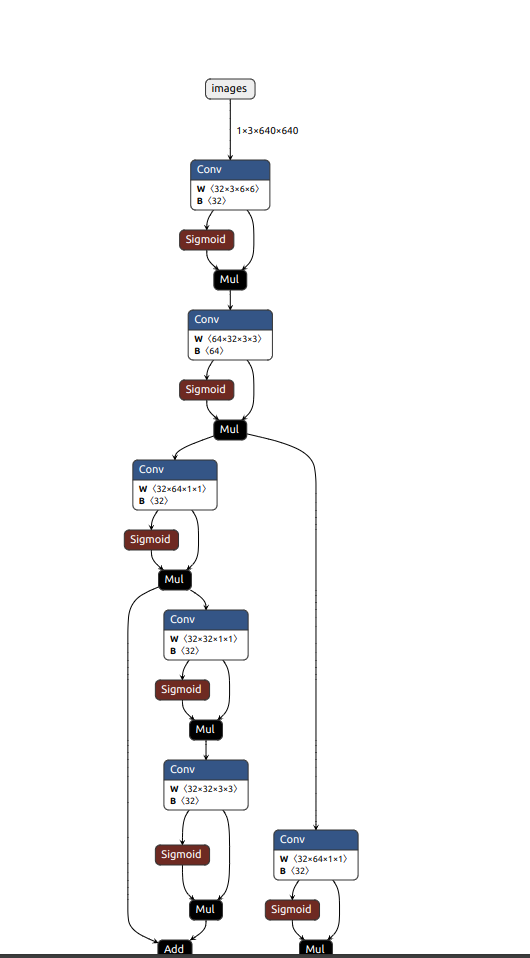
Netron
一个很好用的工具,可以快速分析模型的结构
比如说,这次测试所训练出的模型(onnx格式)部分结构如下图
测试模型
找到detect.py内的函数
def parse_opt()
修改其中参数
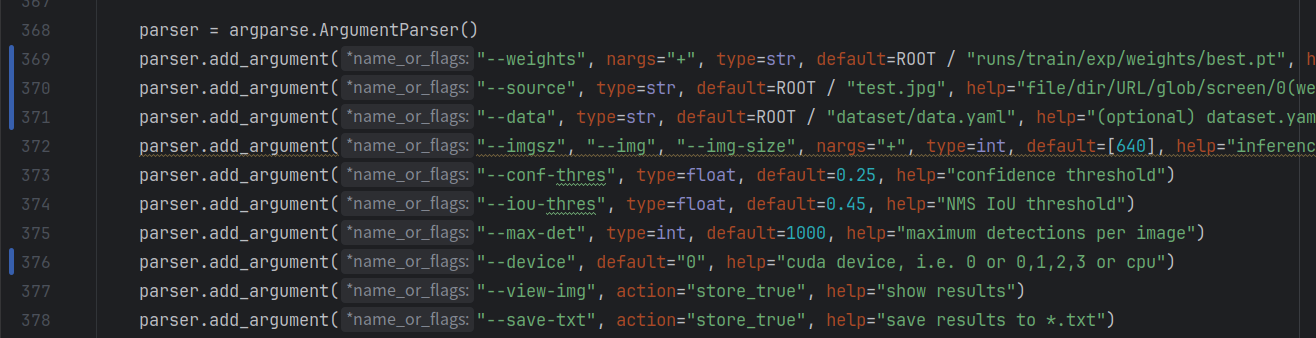
要修改的参数:
- 369行:训练权重文件,即你刚刚训练出来的文件
- 370行:待检测目标(图片或者视频)
- 371行:数据集参数文件(同上)
- 373行:置信度(置信度高于该值就会被视为输出目标)
- 374行:极大值抑制(理解成防止框的重叠即可,详细的自行百度)
- 376行:GPU,设置默认为0即可
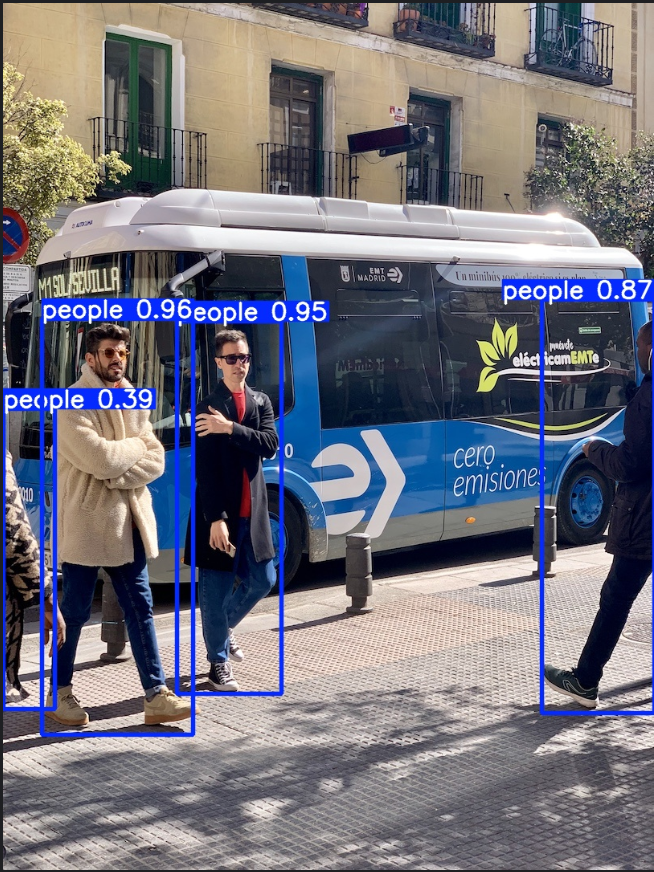
启动detect.py文件,训练结果会被保存在runs/detect内
C++调用yolov5模型
如果想用c++调用yolov5模型,需要现将模型导出为onnx格式
在export.py中找到函数
def parse_opt(known=False)
修改其参数

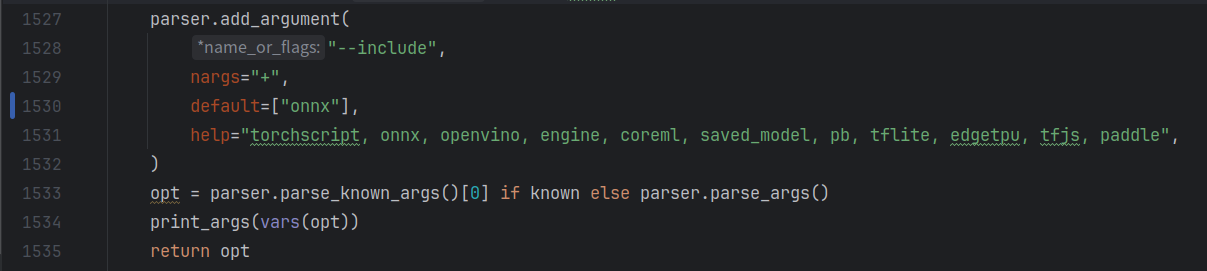
要修改的参数:
- 1503行:数据集参数文件,同上
- 1504行:训练权重,同上
- 1507行:默认为0,同上
- 1530行:改为你要转换的文件类型,这里转换的是onnx
修改完参数后启动文件,onnx会生成在你训练的权重文件夹里(如果pycharm不显示的话就去文件夹里面找)
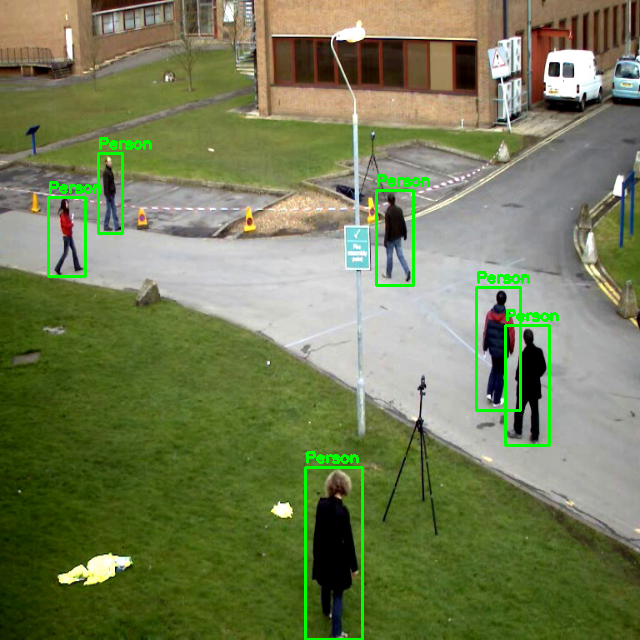
这里提供一份c++调用onnx模型的代码(以后如果有时间的话再出个该代码的详解)
#include <iostream>
#include <opencv2/opencv.hpp>

using namespace std;
using namespace cv;

const string onnx_path = "/home/lovod/CLionProjects/src/track/model/best.onnx";
const string video_path = "/home/lovod/CLionProjects/src/track/data/testvideo1.mp4";

struct Bbox
{
    float x1;
    float y1;
    float x2;
    float y2;
    float score;
    float class_probability;
};

void coordinate_convert(float *pdata, vector<Bbox> &bboxes)
{
    Bbox bbox;
    float x,y,w,h;
    x = pdata[0];
    y = pdata[1];
    w = pdata[2];
    h = pdata[3];
    bbox.x1 = x - w / 2;
    bbox.y1 = y - h / 2;
    bbox.x2 = x + w / 2;
    bbox.y2 = y + h / 2;
    bbox.score = pdata[4];
    bbox.class_probability = pdata[5];
    bboxes.push_back(bbox);
}

float iou(const Bbox &box1, const Bbox &box2)
{
    float area1 = (box1.x2 - box1.x1) * (box1.y2 - box1.y1);
    float area2 = (box2.x2 - box2.x1) * (box2.y2 - box2.y1);

    float x1 = max(box1.x1, box2.x1);
    float y1 = max(box1.y1, box2.y1);
    float x2 = min(box1.x2, box2.x2);
    float y2 = min(box1.y2, box2.y2);

    float intersection = std::max(0.0f, x2 - x1) * std::max(0.0f, y2 - y1);
    float union_area = area1 + area2 - intersection;
    return intersection / union_area;
}

vector<Bbox> nms(const vector<Bbox> &bboxes, float iouThreshold = 0.45)
{
    vector<Bbox> result;
    if (bboxes.empty()) return result;

    // 按照得分从高到低排序
    vector<pair<int, float>> scores;
    for (size_t i = 0; i < bboxes.size(); ++i) {
        scores.emplace_back(i, bboxes[i].score);
    }
    sort(scores.begin(), scores.end(), [](const auto& a, const auto& b) {
        return a.second > b.second;
    });

    vector<bool> keep(bboxes.size(), true);

    for (size_t i = 0; i < scores.size(); ++i) {
        int index = scores[i].first;
        if (!keep[index]) continue;

        result.push_back(bboxes[index]);

        for (size_t j = i + 1; j < scores.size(); ++j) {
            int nextIndex = scores[j].first;
            if (keep[nextIndex]) {
                float iouValue = iou(bboxes[index], bboxes[nextIndex]);
                if (iouValue > iouThreshold) {
                    keep[nextIndex] = false;
                }
            }
        }
    }
    return result;
}

vector<Bbox> postprocess(const Mat &output,float confThreshold=0.25)
{
    vector<Bbox> bboxes;
    vector<Bbox> result;
    float *pdata = (float*)output.data; //pdata指向output的第一个元素,可像数组一样访问
    int length = 6;

    for(int i=0;i<output.total()/length;i++)
    {
        double confidence = pdata[4];
        if(confidence > confThreshold)
        {
            coordinate_convert(pdata,bboxes);
        }
        pdata += length;
    }

    result = nms(bboxes,0.25);

    return result;
}

void drawBoxes(Mat &img, const vector<Bbox> &bboxes)
{
    for(const auto &box:bboxes)
    {
        rectangle(img,Point(box.x1,box.y1),Point(box.x2,box.y2),Scalar(0,255,0),2);
        putText(img,"Person",Point(box.x1,box.y1-5),FONT_HERSHEY_SIMPLEX,0.5,Scalar(0,255,0),2);
    }
}

int main()
{
    // 加载模型
    dnn::Net net = dnn::readNetFromONNX(onnx_path);

    VideoCapture cap(video_path);

    while(true)
    {
        Mat img;
        cap >> img;

        resize(img, img, Size(640, 640));

        Mat blob = dnn::blobFromImage(img,1.0/255.0,Size(640,640),Scalar(0,0,0),true);
        net.setInput(blob);

        vector<Mat> outputs;
        vector<String> outNames={"output0"};
        net.forward(outputs,outNames);

        vector<Bbox> boxes;
        for(auto &output:outputs)
        {
            vector<Bbox> currentBoxes = postprocess(output, 0.25);
            boxes.insert(boxes.end(), currentBoxes.begin(), currentBoxes.end());
        }

        drawBoxes(img, boxes);

        imshow("img", img);
        waitKey(25);
    }
}
演示如下:
结语
不知道写点什么好了,那就这样吧。

欢迎加入 MCP 技术社区!与志同道合者携手前行,一同解锁 MCP 技术的无限可能!
更多推荐
 42
42 0
0- 0


 已为社区贡献1条内容

所有评论(0)