MCP+A2A 从0到1构建类Manus多Agent全栈应用
·
1、深入理解DeepSeek与GPT模型的工具调用
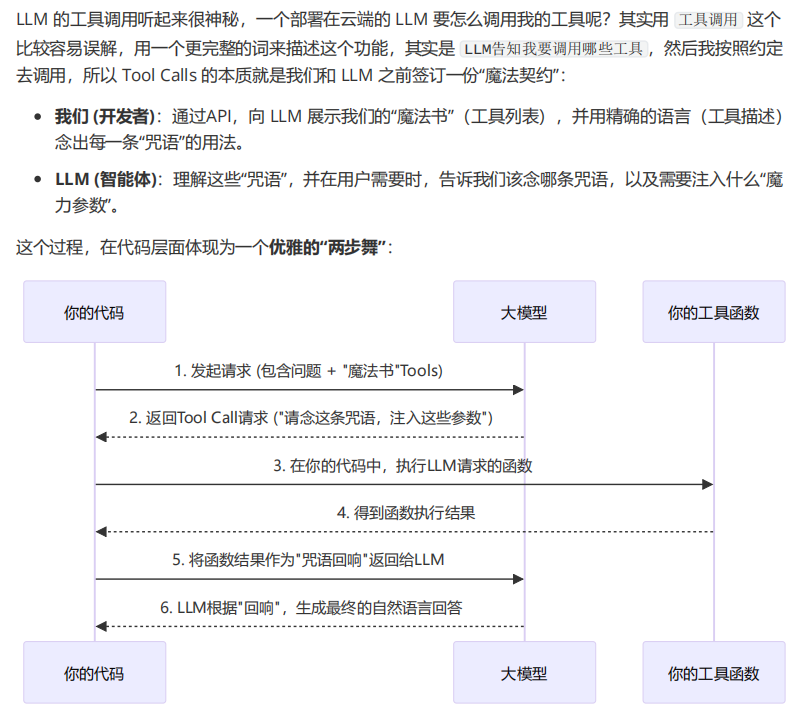

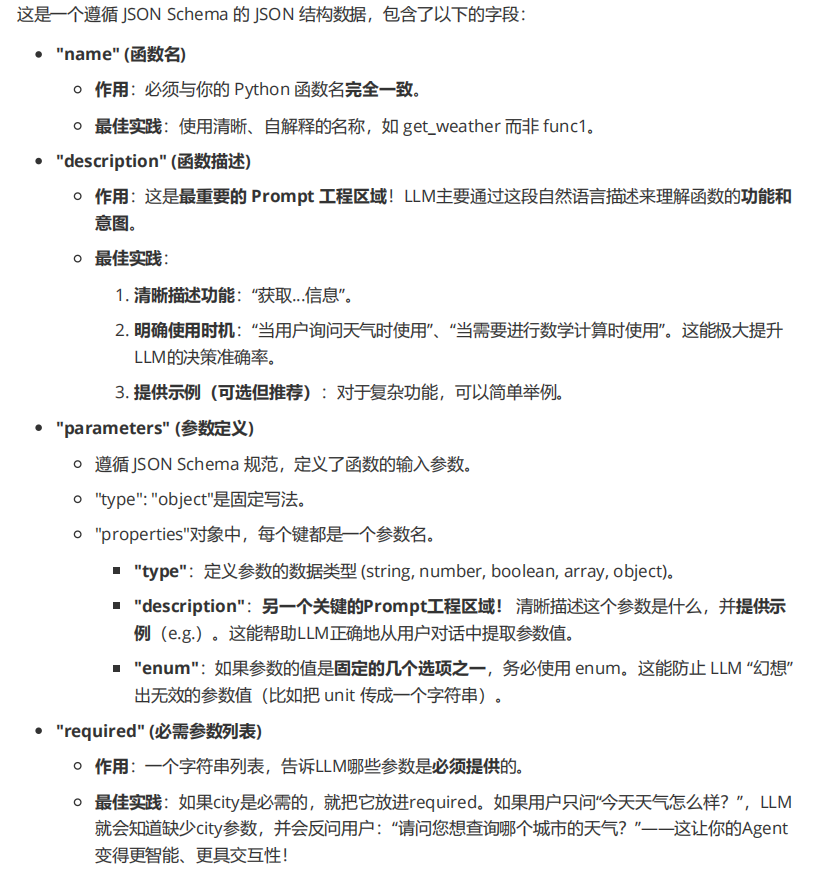
1、工具调用参数精细化解读


#!/usr/bin/env python
# -*- coding: utf-8 -*-
"""
@Time : 2025/7/5 0:36
@Author : thezehui@gmail.com
@File : 3_7_为ReAct Agent添加计算工具.py
"""
import json
import dotenv
from openai import OpenAI
dotenv.load_dotenv()
def calculator(expression: str) -> str:
"""一个简单的计算器,可以执行数学表达式"""
try:
result = eval(expression)
return json.dumps({"result": result})
except Exception as e:
return json.dumps({"error": f"无效表达式, 错误信息: {str(e)}"})
class ReActAgent:
def __init__(self):
self.client = OpenAI(base_url="http://192.168.8.221:9026/v1")
self.messages = [
{
"role": "system",
"content": "你是一个强大的聊天机器人,请根据用户的提问进行答复,如果需要调用工具请直接调用,不知道请直接回复不清楚"
}
]
self.model = "Qwen3.5-27B-FP8"
self.available_tools = {"calculator": calculator}
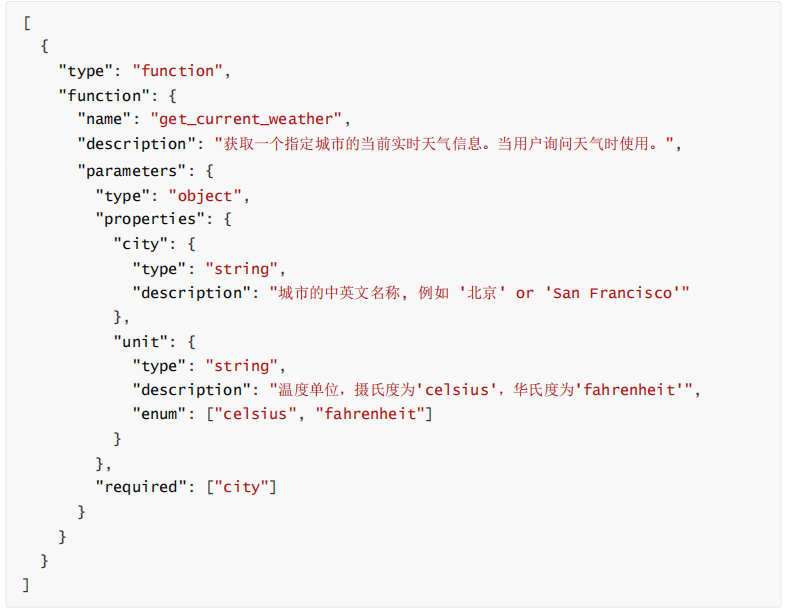
self.tools = [
{
"type": "function",
"function": {
"name": "calculator",
"description": "一个可以计算数学表达式的计算器",
"parameters": {
"type": "object",
"properties": {
"expression": {
"type": "string",
"description": "需要计算的数学表达式,例如:'123+456+789'"
}
},
"required": ["expression"]
}
}
}
]
def process_query(self, query: str) -> str:
"""使用deepseek处理用户输出"""
self.messages.append({"role": "user", "content": query})
# 调用deepseek发起请求
response = self.client.chat.completions.create(
model=self.model,
messages=self.messages,
tools=self.tools,
)
# 获取响应消息+工具响应
response_message = response.choices[0].message
tool_calls = response_message.tool_calls
# 将模型第一次回复添加到历史消息中
self.messages.append(response_message.model_dump())
# 判断是否执行工具调用
if tool_calls:
# 循环执行工具调用
for tool_call in tool_calls:
print("Tool Call: ", tool_call.function.name)
tool_name = tool_call.function.name # 工具名称
tool_args = json.loads(tool_call.function.arguments) # 所需参数
function_to_call = self.available_tools[tool_name] # 工具函数
# 调用工具
result = function_to_call(**tool_args)
print(f"Tool [{tool_name}] Result: {result}")
# 将工具结果添加到历史消息中
self.messages.append({
"tool_call_id": tool_call.id,
"role": "tool",
"name": tool_name,
"content": result,
})
# 再次调用模型,让它基于工具调用的结果生成最终回复内容
second_response = self.client.chat.completions.create(
model=self.model,
messages=self.messages,
tools=self.tools,
tool_choice="none",
)
self.messages.append(second_response.choices[0].message.model_dump())
return "Assistant: " + second_response.choices[0].message.content
else:
return "Assistant: " + response_message.content
def chat_loop(self):
"""运行循环对话"""
while True:
try:
# 获取用户的输入
query = input("\nQuery: ").strip()
if query.lower() == "quit":
break
print(self.process_query(query))
except Exception as e:
print(f"\nError: {str(e)}")
if __name__ == "__main__":
ReActAgent().chat_loop()
2、Pydantic数据校验即数据解析
uv add pydantic pydantic[email]

#!/usr/bin/env python
# -*- coding: utf-8 -*-
"""
@Time    : 2025/7/6 20:28
@Author  : thezehui@gmail.com
@File    : 3_8_Pydantic解析数据.py
"""
from pydantic import BaseModel, Field, EmailStr


class UserInfo(BaseModel):
    """传递用户的信息进行数据提取&处理,涵盖name、age、email等"""
    name: str = Field(..., description="用户名字")
    age: int = Field(..., description="用户年龄,必须是正整数")
    email: EmailStr = Field(..., description="用户的电子邮件")


# 假设这是从Tool Calls的arguments中获取的字符串
json_string = '{"name": "张三", "age": 25, "email": "zhangsan@example.com"}'

# --- Pydantic的优雅之道 ---
try:
    user = UserInfo.model_validate_json(json_string)  # Pydantic V2的推荐方法

    # 得到的是一个真正的Python对象,而不是字典!
    print(f"解析成功!用户名: {user.name}")
    print(f"用户年龄: {user.age}")
    print(f"用户邮箱: {user.email}")
    print(user)  # 打印出的对象清晰明了

except Exception as e:
    print(f"数据校验失败: {e}")

# --- 让我们试试错误数据 ---
invalid_json_string = '{"name": "李四", "age": -5, "email": "not-an-email"}'
try:
    UserInfo.model_validate_json(invalid_json_string)
except Exception as e:
    print("\n--- 错误数据测试 ---")
    print(f"数据校验失败:\n{e}")


#!/usr/bin/env python
# -*- coding: utf-8 -*-
"""
@Time : 2025/7/5 11:50
@Author : thezehui@gmail.com
@File : 3_8_Pydantic结合Tool Calls实现数据提取.py
"""
import dotenv
from openai import OpenAI
from pydantic import BaseModel, Field, EmailStr
dotenv.load_dotenv()
class UserInfo(BaseModel):
"""传递用户的信息进行数据提取&处理,涵盖name、age、email"""
name: str = Field(..., description="用户名字")
age: int = Field(..., gt=0, description="用户年龄,必须是正整数")
email: EmailStr = Field(..., description="用户的电子邮件")
client = OpenAI(base_url="http://192.168.8.221:9026/v1")
response = client.chat.completions.create(
model="Qwen3.5-27B-FP8",
messages=[
{"role": "user", "content": "我叫泽辉呀,今年18岁,我的联系方式是zehuiya@163.com"}
],
tools=[
{ # 这里注册的并不是 Python 函数,而是告诉 LLM:"请按照这个 JSON Schema 输出数据。"
"type": "function",
"function": {
"name": UserInfo.__name__,
"description": UserInfo.__doc__,
"parameters": UserInfo.model_json_schema(),
}
}
],
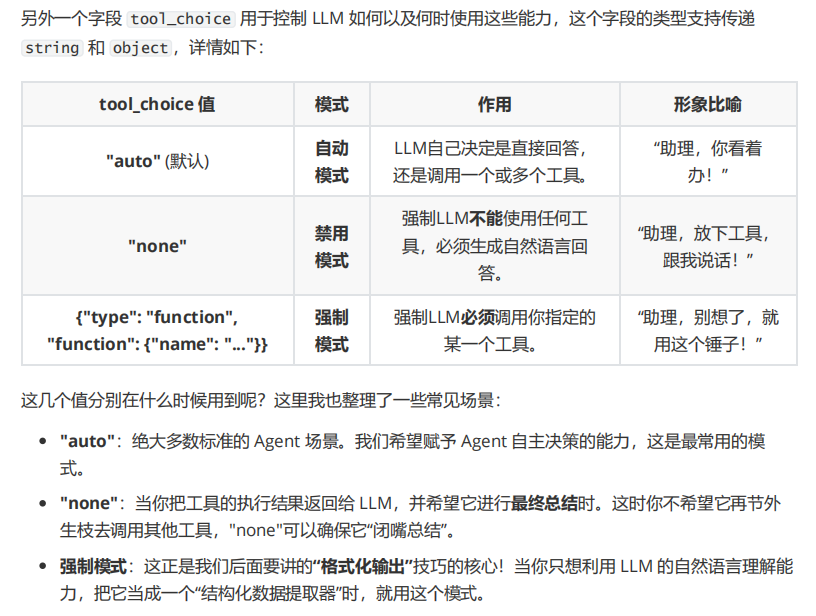
tool_choice={"type": "function", "function": {"name": UserInfo.__name__}} # 强制要求大模型调用指定的 Tool(Function)。
)
print(response.choices[0].message.tool_calls[0].function.arguments)
print("-----------------------------------------------------------")
user_info = UserInfo.model_validate_json(response.choices[0].message.tool_calls[0].function.arguments)
print(user_info.name)
print("-----------------------------------------------------------")
print(UserInfo.model_json_schema())


#!/usr/bin/env python
# -*- coding: utf-8 -*-
"""
@Time    : 2025/7/6 1:01
@Author  : thezehui@gmail.com
@File    : 3_9_DeepSeek JSON Output示例.py
"""
import dotenv
from openai import OpenAI
from pydantic import BaseModel, Field

dotenv.load_dotenv()


class SplitTask(BaseModel):
    task_count: int = Field(..., gt=0, le=10, description="拆分的子任务总数")
    tasks: list[str] = Field(..., description="拆分的任务列表")


client = OpenAI(base_url="http://192.168.8.221:9026/v1")

system_prompt = """用户将提问一个问题,请拆解这个问题为多个串联的小任务,拆解的小任务数量不超过10个,你可以使用任何假设的工具、LLM、代码等。
并以json格式输出,其中task_count字段代表拆分任务的总数,tasks为拆分的任务数组(tasks数组内的每个元素都是一个字符串,有顺序之分)。

示例输入:
今天广州的天气怎样?

示例输出:
{
    "task_count": 3,
    "tasks": ["调用浏览器搜索今天的时间", "调用浏览器搜索广州的天气", "综合搜索的结果/内容调用LLM整理答案并回复用户"]
}
"""

while True:
    user_prompt = input("Query: ").strip()
    if user_prompt.lower() == "quit":
        break

    messages = [
        {"role": "system", "content": system_prompt},
        {"role": "user", "content": user_prompt},
    ]

    response = client.chat.completions.create(
        model="Qwen3.5-27B-FP8",
        messages=messages,
        response_format={"type": "json_object"}
    )

    split_task = SplitTask.model_validate_json(response.choices[0].message.content)     # 把大模型返回的 JSON字符串,解析成 SplitTask 这个 Pydantic 模型对象,并进行字段校验 + 类型转换。

    print(split_task)

    print("拆解任务数: ", split_task.task_count)
    for idx, task in enumerate(split_task.tasks):
        print(f"{str(idx + 1).zfill(2)}.{task}")

    print("===============\n")


欢迎加入 MCP 技术社区!与志同道合者携手前行,一同解锁 MCP 技术的无限可能!
更多推荐
 0
0 0
0- 0


 已为社区贡献1条内容

所有评论(0)