手把手开发 Figma 自由透视插件:从单应性矩阵到 1600 万像素 Canvas 渲染全解析
一句话总结:本文完整拆解一个可发布到 Figma Community 的自由透视插件——如何用 React 做交互、用单应性矩阵做数学、用 Canvas 逆映射做高质量输出,并在 Figma 双线程沙箱里跑通全链路。附带完整代码思路,前端/设计工具开发者可直接复用。
适合人群:前端工程师、Figma 插件开发者、对计算机视觉感兴趣的设计师、想在 CSDN 发技术干货的创作者
关键词:Figma 插件、透视变换、单应性矩阵、Homography、Canvas 图像处理、React、双线性插值、Mesh 变形
标签:Figma 插件开发 透视变换 Canvas 计算机视觉 React 前端
👉 Free Perspective - Figma 自由透视工具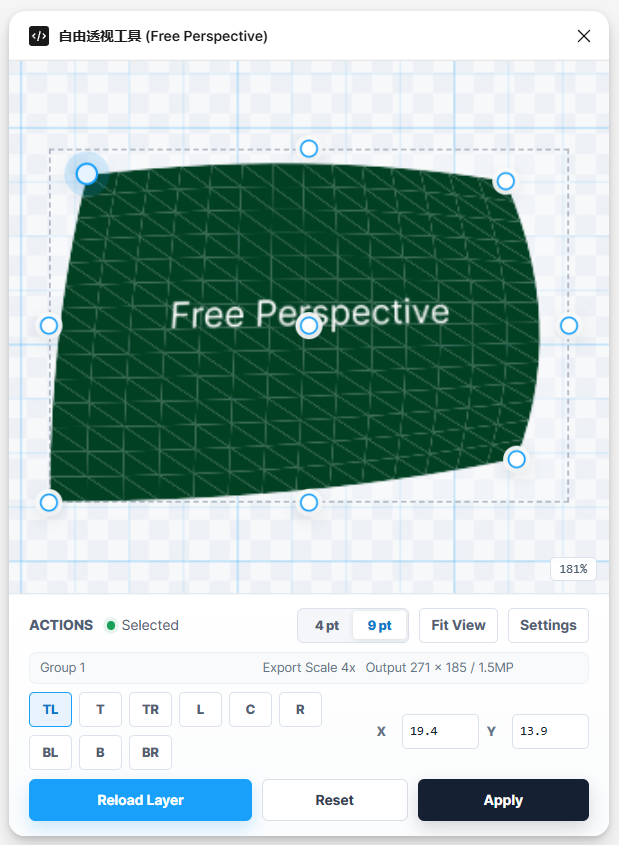
前言:为什么 Figma 需要一款「自由透视」插件?
做 UI 设计的朋友一定遇到过这些场景:
- 把 Logo 贴到手机 Mockup 屏幕上,需要模拟 3D 透视
- 做海报时,文字/图片要随透视角度变形
- 导出素材给开发,需要非矩形的透视裁切
Photoshop 有「自由变换 → 透视」,Sketch 有插件生态,但 Figma 原生只支持旋转、等比/非等比缩放,没有四角拖拽透视。
官方不做的,就是插件的机会。
我开发并开源了 Free Perspective Tool(自由透视工具),核心能力:
| 能力 | 说明 |
|---|---|
| 四角透视 | 拖拽 TL/TR/BR/BL 四个角,实时 GPU 预览 |
| Mesh 网格变形 | 3×3 控制点 + B 样条,支持轻微曲面 |
| 高质量输出 | Canvas 逆映射 + 预乘 Alpha 双线性插值 |
| 非破坏性编辑 | 结果写入 pluginData,可二次编辑 |
| 纯本地运行 | networkAccess: none,零 CDN 依赖 |
本文不是功能说明书,而是从 0 到 1 的技术拆解——你读完后,应该能独立实现一个同类插件。
一、整体架构:Figma 插件的双线程模型
Figma 插件 = Plugin 主线程 + UI iframe 线程,通过 postMessage 通信。
用户选中图层
     │
     ▼
┌──────────────────────────────────────────────────────────────┐
│  Plugin 主线程 (code.js)                                      │
│  · exportAsync 导出 PNG                                       │
│  · createImage + createRectangle 写回                         │
│  · pluginData 存/取元数据                                     │
└───────────────────────────┬──────────────────────────────────┘
                            │ ImageData (Uint8Array + 尺寸)
                            ▼
┌──────────────────────────────────────────────────────────────┐
│  UI 线程 (React + Canvas)                                     │
│  · Blob URL 预览原图                                          │
│  · CSS matrix3d 实时透视预览                                  │
│  · warpImage() 像素级渲染                                     │
│  · 撤销/重做、吸附、坐标输入                                   │
└───────────────────────────┬──────────────────────────────────┘
                            │ TransformApplyImage (PNG bytes)
                            ▼
                    写回 Figma 画布
为什么像素处理必须放 UI 线程?
Figma Plugin API 没有 Canvas、没有 ImageData、没有像素级 API。主线程只能:
node.exportAsync()→ 拿到 PNG 字节figma.createImage(bytes)→ 创建图像填充- 改节点属性(name、x、y、fills)
所有「把矩形图像 warp 成四边形」的计算,必须在 UI iframe 里用浏览器 Canvas 完成,再把结果字节传回主线程。
这是 Figma 插件开发里最重要的架构决策之一。
消息协议设计
export const MessageType = {
  LanguageChanged: 'language-changed',
  SelectionChange: 'selection-change',
  TransformStart: 'transform-start',       // UI → Plugin:开始导出
  ImageData: 'image-data',                 // Plugin → UI:PNG + 尺寸
  TransformApplyImage: 'transform-apply-image', // UI → Plugin:写回
  Error: 'error',
  Notify: 'notify'
};
原则:类型枚举 + 单向数据流。UI 不直接碰 Figma 节点,Plugin 不做 Canvas 运算。
二、数学基础:单应性变换(Homography)
2.1 什么是透视变换?
透视变换把平面上的点 (x, y) 映射到另一个平面 (u, v),用一个 3×3 矩阵 H(8 个自由度)描述:
       h₀·x + h₁·y + h₂
u = ─────────────────────
       h₆·x + h₇·y + 1

       h₃·x + h₄·y + h₅
v = ─────────────────────
       h₆·x + h₇·y + 1
最后一行归一化为 h₈ = 1(齐次坐标惯例)。
2.2 从四角求矩阵
源图是矩形 [0,0] [w,0] [w,h] [0,h],用户拖出目标四边形四个角 (uᵢ, vᵢ)。
每对对应点提供 2 个方程,4 对点 → 8 方程 8 未知数,构成线性方程组 Ah = b:
export function calculateHomography(width, height, destination) {
  const source = [
    { x: 0, y: 0 },
    { x: width, y: 0 },
    { x: width, y: height },
    { x: 0, y: height }
  ];

  const matrix = [];
  const values = [];

  for (let i = 0; i < 4; i++) {
    const { x, y } = source[i];
    const { x: u, y: v } = destination[i];
    // u 方程
    matrix.push([x, y, 1, 0, 0, 0, -x * u, -y * u]);
    // v 方程
    matrix.push([0, 0, 0, x, y, 1, -x * v, -y * v]);
    values.push(u, v);
  }

  return [...solveLinearSystem(matrix, values), 1];
}
求解器用部分选主元高斯消元,对退化四边形(面积 < 1px²)直接抛错:
const area = Math.abs(
  points.reduce((sum, point, index) => {
    const next = points[(index + 1) % points.length];
    return sum + point.x * next.y - next.x * point.y;
  }, 0)
) / 2;

if (area < 1) {
  throw new Error('Perspective area is too small');
}
2.3 预览 vs 输出的两套渲染路径
| 阶段 | 技术 | 优点 | 缺点 |
|---|---|---|---|
| 实时预览 | CSS matrix3d() |
GPU 加速,60fps 拖拽 | 浏览器插值,边缘可能略糊 |
| 最终输出 | Canvas 逆映射逐像素 | 质量完全可控 | CPU 密集,需分批 yield |
预览代码核心:
export function getCSSMatrix3D(matrix) {
  return `matrix3d(
    ${matrix[0]}, ${matrix[3]}, 0, ${matrix[6]},
    ${matrix[1]}, ${matrix[4]}, 0, ${matrix[7]},
    0, 0, 1, 0,
    ${matrix[2]}, ${matrix[5]}, 0, 1
  )`;
}
输出走完全不同的管线——下一节详述。
三、Canvas 像素级渲染:逆映射 + 双线性插值
3.1 为什么用逆映射?
正向映射(遍历源图每个像素,投影到目标)会产生空洞和重叠。
逆映射(遍历目标画布每个像素,反查源图坐标)保证每个输出像素都有值:
for each 目标像素 (x, y):
    (sx, sy) = H⁻¹ · (x, y)    // 逆矩阵
    color = bilinearSample(源图, sx, sy)
    写入目标像素
async function renderPerspectiveWarp(context, options) {
  const homography = calculateHomography(sourceWidth, sourceHeight, shiftedDestination);
  const inverse = invertMatrix(homography);

  for (let y = 0; y < outputHeight; y++) {
    for (let x = 0; x < outputWidth; x++) {
      const planeW = inverse[6] * x + inverse[7] * y + inverse[8];
      if (Math.abs(planeW) < 0.0001) continue;

      const sourceX = (inverse[0] * x + inverse[1] * y + inverse[2]) / planeW;
      const sourceY = (inverse[3] * x + inverse[4] * y + inverse[5]) / planeW;
      sampleSourcePixel(sourceBytes, sourceWidth, sourceHeight,
                        sourceX, sourceY, destinationBytes, destinationIndex);
    }

    if (y % 16 === 0) {
      await yieldToMainThread();  // 防止 UI 卡死
    }
  }
}
3.2 预乘 Alpha 的双线性插值
带透明通道的 PNG 不能直接对 RGBA 做线性插值——半透明边缘会出现暗边(黑边)。
正确做法:预乘 Alpha(Premultiplied Alpha) 插值后再还原:
function sampleSourcePixel(sourceBytes, sourceWidth, sourceHeight,
                          sourceX, sourceY, destinationBytes, destinationIndex) {
  const x0 = Math.floor(clampedX), y0 = Math.floor(clampedY);
  const x1 = Math.min(x0 + 1, sourceWidth - 1);
  const y1 = Math.min(y0 + 1, sourceHeight - 1);
  const weightX = clampedX - x0, weightY = clampedY - y0;

  // 四个邻域像素的 alpha
  const alpha00 = sourceBytes[sourceIndex00 + 3] / 255;
  // ... alpha10, alpha01, alpha11

  const alpha = alpha00 * w00 + alpha10 * w10 + alpha01 * w01 + alpha11 * w11;
  if (alpha <= 0) return;

  for (let channel = 0; channel < 3; channel++) {
    const premultiplied =
      sourceBytes[...] * alpha00 * w00 + ...;
    destinationBytes[destinationIndex + channel] = Math.round(premultiplied / alpha);
  }
  destinationBytes[destinationIndex + 3] = Math.round(alpha * 255);
}
这是图像处理里的经典细节,很多教程会漏掉,直接导致透明 Logo 贴 Mockup 时出现黑边。
3.3 输出尺寸与内存保护
Figma 插件跑在浏览器里,OOM 是真实风险。项目设了两道硬上限:
| 阶段 | 上限 | 策略 |
|---|---|---|
| 从 Figma 导出 | 1200 万像素 | 按图层面积动态算 scale |
| Canvas 输出 | 1600 万像素 | 超限自动降 density |
function getExportScale(node) {
  const area = Math.max(1, node.width * node.height);
  const maxScale = Math.sqrt(12_000_000 / area);
  return Math.max(0.25, Math.min(4, Math.floor(maxScale * 10) / 10));
}

function getOutputDensity(sourceDensity, destinationBounds) {
  const desiredPixels = Math.ceil(w * d) * Math.ceil(h * d);
  if (desiredPixels <= 16_000_000) return { density: sourceDensity, wasClamped: false };

  const clampRatio = Math.sqrt(16_000_000 / desiredPixels);
  return { density: Math.max(0.25, sourceDensity * clampRatio), wasClamped: true };
}
输出超过 1200 万像素时,UI 会弹二次确认——避免用户误操作等 30 秒渲染。
3.4 边缘羽化
透视结果边缘有时会有 1px 锯齿,可选 0–8px 羽化:
function applyFeatherAlpha(destinationBytes, width, height, featherPixels) {
  for (let y = 0; y < height; y++) {
    const distanceY = Math.min(y, height - 1 - y);
    for (let x = 0; x < width; x++) {
      const distance = Math.min(Math.min(x, width - 1 - x), distanceY);
      if (distance >= featherPixels) continue;
      const alphaScale = distance / featherPixels;
      destinationBytes[(y * width + x) * 4 + 3] *= alphaScale;
    }
  }
}
四、Mesh 网格变形:超越四角透视
4.1 四角透视的局限
单应性变换是共面映射——适合屏幕贴图、海报透视,但无法表达轻微弯曲(比如贴到圆柱面)。
4.2 3×3 控制点 + 二次 B 样条
9 个控制点排成 3×3 网格,用二次 B 样条基函数插值任意 (u,v) ∈ [0,1]² 处的目标坐标:
export function quadraticBasis(t) {
  const c = Math.max(0, Math.min(1, t));
  const inv = 1 - c;
  return [inv * inv, 2 * inv * c, c * c];  // (1-t)², 2(1-t)t, t²
}

export function evaluateMeshPoint(points, u, v) {
  const basisU = quadraticBasis(u);
  const basisV = quadraticBasis(v);
  let x = 0, y = 0;
  for (let row = 0; row < 3; row++) {
    for (let col = 0; col < 3; col++) {
      const w = basisU[col] * basisV[row];
      x += points[row * 3 + col].x * w;
      y += points[row * 3 + col].y * w;
    }
  }
  return { x, y };
}
4.3 三角剖分 + 仿射近似
Mesh 输出不走全局单应性,而是:
- 把
[0,1]²参数域细分为steps×steps网格(fast=16, balanced=24, high=36) - 每个小四边形拆成 2 个三角形
- 三角形内部用仿射变换(3 对点精确求解),逐像素重心坐标插值
function getBarycentricWeights(point, a, b, c) {
  const w0 = ((b.y - c.y) * (point.x - c.x) + (c.x - b.x) * (point.y - c.y)) / denominator;
  const w1 = ((c.y - a.y) * (point.x - c.x) + (a.x - c.x) * (point.y - c.y)) / denominator;
  const w2 = 1 - w0 - w1;
  return { w0, w1, w2 };
}

// 源坐标 = w0·A源 + w1·B源 + w2·C源
const sourceX = a.source.x * w0 + b.source.x * w1 + c.source.x * w2;
预览用 Canvas clip + transform + drawImage 逐三角形绘制(GPU 友好);输出仍走 CPU 逐像素采样,保证质量一致。
五、交互设计:让设计师「敢用、好用」
算法再漂亮,交互拉胯就没人用。插件 UI 围绕几个核心体验打磨:
5.1 编辑画布(Workspace)
┌─────────────────────────────────────────┐
│  [网格]  [比例锁定]  [适合视图]          │
├─────────────────────────────────────────┤
│                                         │
│      TL ●─────────────● TR              │
│         │   透视预览    │               │
│         │   (matrix3d   │               │
│         │    或 Mesh)   │               │
│      BL ●─────────────● BR              │
│                                         │
├─────────────────────────────────────────┤
│  滚轮=平移  Ctrl+滚轮=缩放  Space=拖拽    │
│  方向键=微调角点  Shift=加速  Alt=精调   │
└─────────────────────────────────────────┘
关键实现:
- 坐标系转换:屏幕坐标 ↔ 逻辑坐标(原图像素空间),缩放/平移不影响最终输出精度
- 角点吸附:边缘、中心线、45° 辅助线、其他角点对齐
- 撤销/重做:最多 50 步历史,
commitHistory在 drag end 时入栈
export function commitHistory(history, previousCorners, nextCorners) {
  if (cornersEqual(previousCorners, nextCorners)) return history;
  return {
    past: [...history.past, cloneCorners(previousCorners)].slice(-50),
    present: cloneCorners(nextCorners),
    future: []
  };
}
5.2 输出设置面板
| 选项 | 可选值 | 作用 |
|---|---|---|
| 变换模式 | Perspective / Mesh | 四角 vs 九格 |
| 输出倍率 | auto / 1x~4x / custom | 控制 PNG 分辨率 |
| 质量 | fast / balanced / high | 密度乘数 0.7 / 1 / 1.35 |
| 裁切 | bounds / source / margin | 输出画布范围 |
| 羽化 | 0–8 px | 边缘透明渐变 |
| 写回模式 | 新建 / 隐藏原图 / 替换原图 | 非破坏性工作流 |
5.3 取消长时间渲染
大图 warp 可能跑 10–30 秒。用 AbortController + 循环内检查:
function throwIfAborted(signal) {
  if (signal?.aborted) {
    throw new DOMException('Processing was cancelled', 'AbortError');
  }
}

// 每 16 行 yield 一次,同时检查 abort
if (y % ROWS_PER_YIELD === 0) {
  throwIfAborted(options.signal);
  await yieldToMainThread();
}
六、Figma 写回:元数据驱动的非破坏性编辑
6.1 写回流程
async function handleApplyImage(message) {
  const image = figma.createImage(bytes);
  const rect = figma.createRectangle();
  rect.name = `${sourceName} - Perspective`;
  rect.resize(width, height);
  rect.fills = [{ type: 'IMAGE', scaleMode: 'FILL', imageHash: image.hash }];

  // 定位:相对源图层偏移
  rect.x = referenceNode.x + x;
  rect.y = referenceNode.y + y;
  insertNearReference(rect, referenceNode);  // 插入到源图层旁边

  setStoredMetadata(rect, metadata);  // 写入 pluginData
}
6.2 pluginData 元数据结构
{
  "schema": 1,
  "pluginVersion": "0.6.0",
  "transformMode": "perspective",
  "sourceNodeId": "123:456",
  "sourceName": "Logo",
  "points": [{ "x": 0, "y": 0 }, ...],
  "settings": { "quality": "high", "cropMode": "bounds", ... },
  "output": { "x": -12, "y": 5, "width": 320, "height": 180 },
  "createdAt": 1719234567890
}
二次编辑:用户选中结果图层 → 插件读 pluginData → 找到 sourceNodeId → 重新 export 源图 → 恢复角点和设置。
这是 Photoshop Smart Object 思路在 Figma 里的轻量实现。
6.3 三种写回模式
| 模式 | 行为 |
|---|---|
new |
新建结果图层,源图不动 |
hide-original |
新建 + 隐藏源图 |
replace-original |
新建 + 删除源图(失败则回退为隐藏) |
可选「自动分组」:把源图和结果 figma.group() 在一起。
七、工程化:在 Figma 沙箱里跑 React
7.1 为什么不能外链 JS/CSS?
Figma 插件 UI 加载在 data:text/html 环境,相对路径 ./ui.js 会 404。必须构建成单文件自包含 HTML:
src/ui/template.html
    + 内联 ui.css(Tailwind 编译产物)
    + 内联 ui.js(esbuild 打包产物)
    = ui.html(最终产物)
const css = fs.readFileSync(cssPath, 'utf8').replace(/<\/style/gi, '<\\/style');
const js = fs.readFileSync(jsPath, 'utf8').replace(/<\/script/gi, '<\\/script');
</script> 不转义会截断 HTML——这是 Figma 插件开发头号踩坑。
7.2 构建命令
npm install
npm run build     # esbuild + tailwind + 内联
npm run test      # 纯函数单元测试
npm run validate  # test → build → package → 发布包校验
技术栈:React 18 + esbuild + Tailwind CSS 3,零运行时 npm 依赖。
7.3 发布混淆
Community 发布时对 code.js / ui.js 做 javascript-obfuscator,保留 figma、parent 等运行时全局变量。
7.4 manifest 安全配置
{
  "networkAccess": { "allowedDomains": ["none"] },
  "documentAccess": "dynamic-page"
}
对用户说明「数据不出本地」,有利于 Community 审核和用户信任。
八、测试:不打开 Figma 也能验证核心逻辑
核心算法抽成纯函数,Node 原生 assert 测试:
function testPerspectiveHomography() {
  const destination = [
    { x: 20, y: 5 }, { x: 180, y: 25 },
    { x: 210, y: 115 }, { x: -10, y: 90 }
  ];
  const matrix = calculateHomography(200, 100, destination);

  // 四角映射精度 < 1e-6
  approxPoint(transformPoint(matrix, { x: 0, y: 0 }), destination[0], 'TL');
  // ...
}

function testDegenerateQuad() {
  assert.throws(() => calculateHomography(100, 100, [同一点×4]), /too small/);
}
测试覆盖:
| 模块 | 测试内容 |
|---|---|
| homography.js | 线性求解、恒等变换、透视变换、矩阵求逆、退化四边形 |
| mesh.js | B 样条求值、三角剖分、SVG 路径 |
| editing.js | 历史栈、输出设置归一化、坐标转换 |
| metadata.js | 序列化/反序列化、schema 校验 |
| package-output.test.js | zip 结构、HTML 内联完整性 |
九、性能优化清单(实战总结)
| 优化点 | 做法 | 效果 |
|---|---|---|
| 预览帧率 | CSS matrix3d / 三角形 Canvas clip | 拖拽不卡 |
| 输出不阻塞 | 每 16 行 setTimeout(0) yield |
UI 可响应取消 |
| 预览分辨率 | 上限 150 万像素 × devicePixelRatio | 预览清晰但不 OOM |
| 导出倍率 | 按面积反算 scale,上限 4x | 大图不爆内存 |
| 输出密度 | 超限 sqrt 等比缩减 | 自动保护 |
| 对象 URL | 切换图层时 revokeObjectURL |
防内存泄漏 |
| Mesh 渲染 | 按三角形 bounding box 裁剪像素循环 | 跳过空白区域 |
十、与 Photoshop / 在线工具的对比
| 维度 | Photoshop 透视 | 在线 Mockup 工具 | Free Perspective |
|---|---|---|---|
| 工作流 | 导出 → PS → 导回 | 上传图片 | Figma 内闭环 |
| 矢量保持 | ❌ 栅格化 | ❌ | ❌(PNG 输出,但可二次编辑) |
| 实时预览 | ✅ | ⚠️ 较慢 | ✅ matrix3d |
| 批量 | Actions | 部分支持 | 预设 + 批处理 |
| 隐私 | 本地 | 上传云端 | 纯本地 |
| 价格 | 订阅 | 免费/付费 | 免费 |
Figma 插件的核心价值不是「比 PS 算法更强」,而是不打断设计工作流。
十一、完整数据流(一图看懂)
十二、你可以直接复用的代码模块
如果你要做自己的 Figma 图像插件,建议直接 fork 这几个模块:
free-perspective/src/
├── shared/homography.js      ← 单应性矩阵(零依赖,可单独 npm 化)
├── shared/mesh.js            ← Mesh 变形数学
├── ui/warp-image.js          ← Canvas 渲染管线
├── ui/editing.js             ← 坐标转换、历史栈、输出设置
├── ui/Workspace.jsx          ← 交互画布(可改做其他控制点工具)
├── shared/plugin-metadata.js ← pluginData 持久化模式
└── build-ui.js               ← esbuild + 内联 HTML 模板
十三、本地运行指南
git clone <your-repo>
cd free-perspective
npm install
npm run build
npm run test
Figma Desktop → Plugins → Development → Import plugin from manifest… → 选择 manifest.json。
发布:
npm run package
# 输出 dist/free-perspective-tool.zip
十四、常见问题 FAQ
Q:为什么不直接用 WebGL?
A:Figma UI iframe 环境对 WebGL 支持不稳定;Canvas 2D + CPU 逆映射在 800 万像素以内足够快,且代码更易测试和维护。
Q:能输出 SVG 吗?
A:当前输出 PNG 栅格图。SVG 透视可用 <feDisplacementMap> 或四路径 clipPath,但 Figma 对 SVG 滤镜支持有限,PNG 是更稳妥的选择。
Q:多选图层怎么办?
A:当前版本单图层。批处理走「预设 + 队列」模式——同一套角点参数应用到多个图层(路线图已规划)。
Q:FigJam 能用吗?
A:manifest 目前 editorType: ["figma"],扩展 FigJam 只需改 manifest 并测试 exportAsync 兼容性。
十五、总结
开发 Figma 自由透视插件,技术栈可以概括为:
数学层:单应性矩阵 + B 样条 Mesh + 重心坐标
渲染层:CSS 预览 + Canvas 逆映射 + 预乘 Alpha 插值
架构层:双线程 postMessage + pluginData 元数据
工程层:esbuild 单文件内联 + 纯函数测试 + 发布混淆
体验层:撤销重做 + 吸附 + 取消 + 非破坏性写回
三个最关键的认知:
- 像素处理在 UI 线程——这是 Figma 插件不同于普通 Web App 的地方
- 预览和输出是两条渲染路径——预览求快,输出求质量
- pluginData 是非破坏性编辑的关键——让用户敢实验、能回退
如果本文对你有帮助,欢迎收藏 + 关注,后续会持续更新 Figma 插件开发系列。
立即体验
文中介绍的 Free Perspective(自由透视工具) 已发布至 Figma Community,可直接安装使用:
👉 Free Perspective - Figma 自由透视工具
在 Figma 中打开上述链接,点击 Try it out 即可添加到插件列表。选中任意图层,即可体验四角透视、Mesh 变形与高质量 PNG 写回。

欢迎加入 MCP 技术社区!与志同道合者携手前行,一同解锁 MCP 技术的无限可能!
更多推荐

 0
0 0
0- 0


 已为社区贡献2条内容

所有评论(0)