【AI-MCP】使用Postman调试MCP接口
·
手打不易,如果转摘,请注明出处!
注明原文:https://zhangxiaofan.blog.csdn.net/article/details/156906941
目录
下载新版的postman
https://www.postman.com/downloads/
创建MCP请求
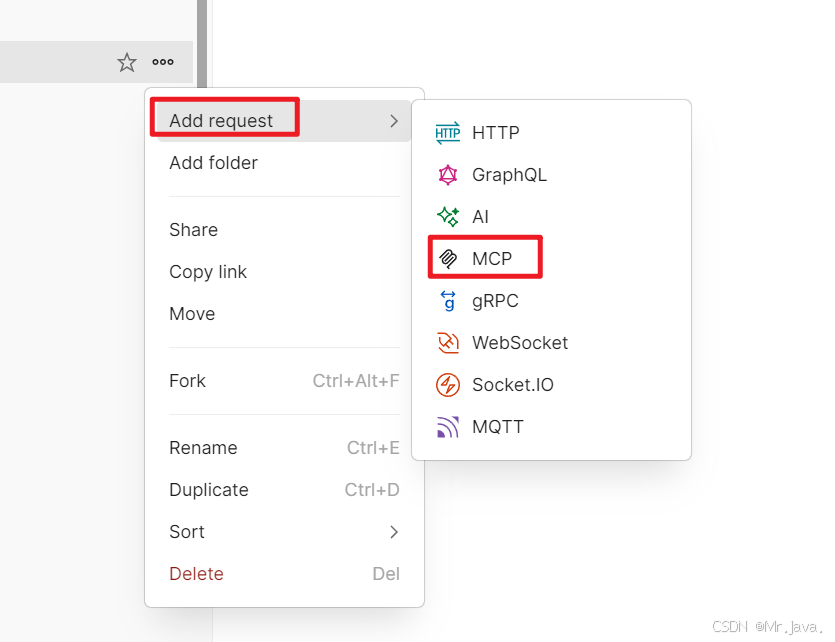
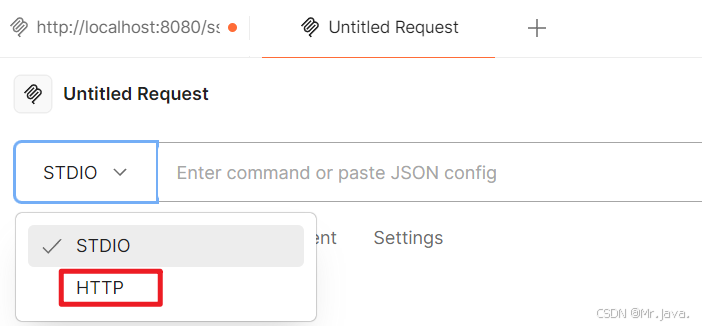
选择协议
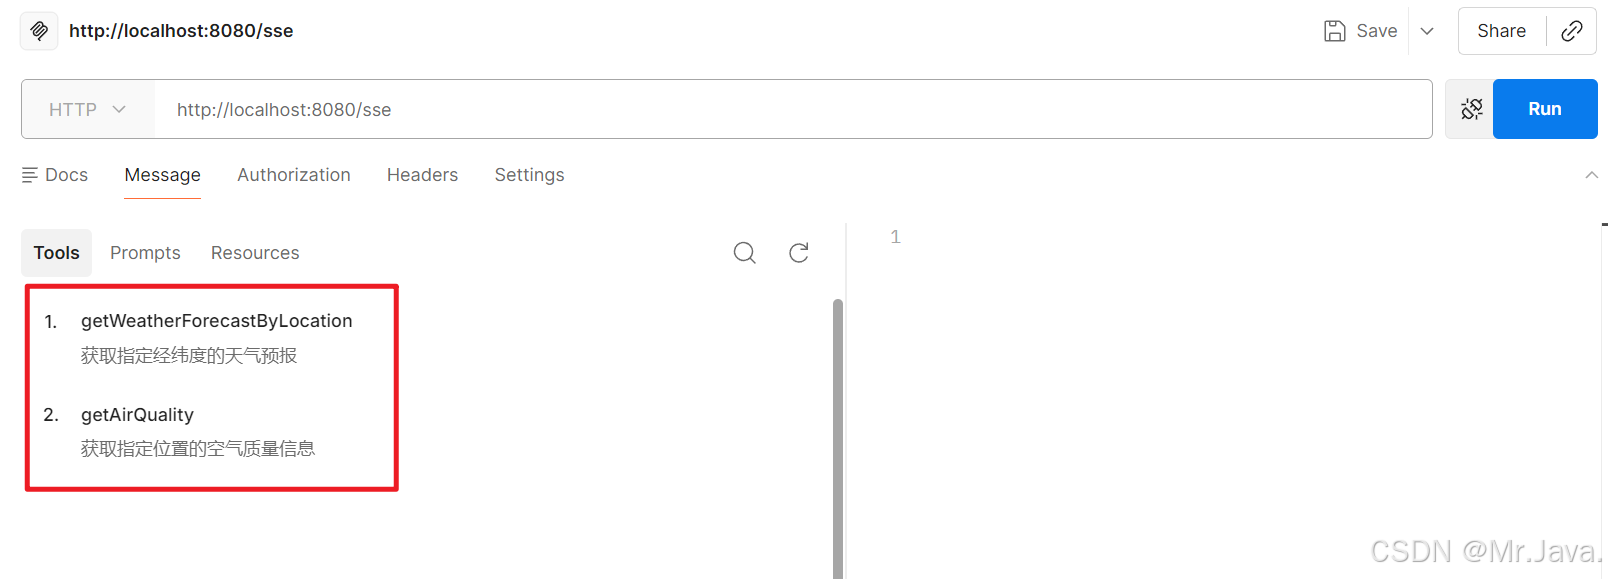
选择工具发送请求
有认证信息的直接填上,多个工具可以选择调用。
一般认证信息就是 Authorization:{key}
这里测试的url是:http://localhost:8080/sse
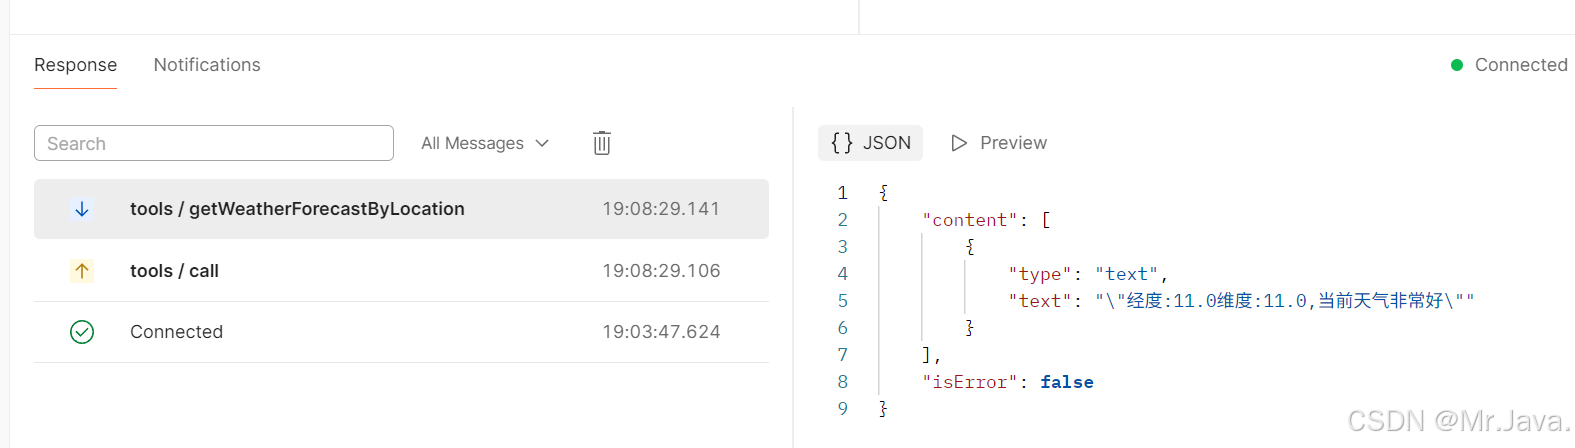
返回结果
代码示例
这里我用 spring-ai-starter-mcp-server-webflux 写了个简单的MCP
Maven:
<?xml version="1.0" encoding="UTF-8"?>
<project xmlns="http://maven.apache.org/POM/4.0.0"
         xmlns:xsi="http://www.w3.org/2001/XMLSchema-instance"
         xsi:schemaLocation="http://maven.apache.org/POM/4.0.0
         http://maven.apache.org/xsd/maven-4.0.0.xsd">
    <modelVersion>4.0.0</modelVersion>

    <parent>
        <groupId>org.springframework.boot</groupId>
        <artifactId>spring-boot-starter-parent</artifactId>
        <version>3.5.7</version>
    </parent>

    <groupId>com.example</groupId>
    <artifactId>mcp-webflux-server1</artifactId>
    <version>1.0.0</version>
    <name>mcp-webflux-server1</name>

    <properties>
        <spring-ai-alibaba.version>1.1.0</spring-ai-alibaba.version>
    </properties>

    <dependencies>
        <dependency>
            <groupId>org.springframework.ai</groupId>
            <artifactId>spring-ai-starter-mcp-server-webflux</artifactId>
            <version>1.1.0</version>
        </dependency>


        <dependency>
            <groupId>org.springframework</groupId>
            <artifactId>spring-web</artifactId>
            <version>6.2.12</version>
        </dependency>
    </dependencies>

    <build>
        <plugins>
            <plugin>
                <groupId>org.springframework.boot</groupId>
                <artifactId>spring-boot-maven-plugin</artifactId>
            </plugin>
        </plugins>
    </build>
</project>
application.yaml
server:
  port: 8080
spring:
  main:
    banner-mode: off
  ai:
    mcp:
      server:
        name: my-weather-server
        type: ASYNC  # Recommended for reactive applications
        # 配置 sse 的根路径,默认值为 /sse
        # 下面的最终路径为 ip:port/sse/mcp
        protocol: sse
        sse-endpoint: /sse
        sse-message-endpoint: /mcp


logging:
  level:
    com.alibaba.cloud.ai.mcp.server: DEBUG # 打印debug日志
    io.modelcontextprotocol: DEBUG
#    org.springframework.web.reactive: DEBUG
工具类
import org.springframework.ai.tool.annotation.Tool;
import org.springframework.ai.tool.annotation.ToolParam;
import org.springframework.stereotype.Service;

@Service
public class WeatherService {
    /**
     * 获取指定经纬度的天气预报
     *
     * @param latitude  纬度
     * @param longitude 经度
     */
    @Tool(description = "获取指定经纬度的天气预报")
    public String getWeatherForecastByLocation(@ToolParam(description = "纬度") double latitude, @ToolParam(description = "经度") double longitude) {
        String clsName = this.getClass().getName();
        System.out.println("------------ 执行工具" + clsName + "------------");
        String result = "经度:" + latitude + "维度:" + longitude + ",当前天气非常好";
        System.out.println(result);
        return result;
    }

    /**
     * 获取指定位置的空气质量信息
     *
     * @param latitude  纬度
     * @param longitude 经度
     * @return 空气质量信息
     */
    @Tool(description = "获取指定位置的空气质量信息")
    public String getAirQuality(@ToolParam(description = "纬度") double latitude, @ToolParam(description = "经度") double longitude) {
        String clsName = this.getClass().getName();
        System.out.println("------------ 执行工具" + clsName + "------------");
        String result = "经度:" + latitude + "维度:" + longitude + ",当前空气质量非常好";
        System.out.println(result);
        return result;
    }
}
注册工具
import com.demo.service.WeatherService;

import org.springframework.ai.tool.ToolCallbackProvider;
import org.springframework.ai.tool.method.MethodToolCallbackProvider;
import org.springframework.beans.factory.annotation.Autowired;
import org.springframework.context.annotation.Bean;
import org.springframework.context.annotation.Configuration;

@Configuration
public class ToolConfig {
    @Autowired
    private WeatherService weatherService;

    @Bean
    public ToolCallbackProvider weatherTools() {
        return MethodToolCallbackProvider.builder()
                .toolObjects(weatherService)
                .build();
    }
}

欢迎加入 MCP 技术社区!与志同道合者携手前行,一同解锁 MCP 技术的无限可能!
更多推荐

 3
3 0
0- 0


 已为社区贡献2条内容

所有评论(0)