React Native移动端米家插件自定义色盘取色组件(基于图片与手势)
/**
 * @fileoverview 颜色选择器组件
 * @file components/ColorPicker.tsx
 * @description 本组件实现了基于色盘图片的颜色选择功能,支持触摸交互和颜色转换
 * @author rrfhecong@163.com
 * @version 1.0.0
 * @created 2026-02-28
 */

// ============================================================================
// 导入依赖模块
// ============================================================================

/**
 * 导入 React 框架及相关 Hooks
 * @description 使用 React 的函数式组件、memo、useEffect、useRef 和 useState Hooks
 */
import React, { memo, useEffect, useRef, useState } from 'react';

/**
 * 导入 React Native 组件
 * @description 使用 View、Image、StyleSheet 和 PanResponder 组件
 */
import { View, Image, StyleSheet, PanResponder, Dimensions } from 'react-native';

import { adjustSize } from "miot/utils/sizes";

/**
 * 导入颜色转换工具库
 * @description 使用自定义的 colorsys 库进行颜色格式转换
 */
import colorsys from './colorsys.ts';

/**
 * 导入图像资源
 * @description 从图像文件中导入色盘图像
 */
import {
    colorWheel
} from "../utils/img.ts";

// ============================================================================
// 类型定义
// ============================================================================

/**
 * 组件属性接口
 * @interface Props
 * @description 定义 ColorPicker 组件的属性类型
 */
interface Props {
    /** 颜色变化回调函数 */
    onColorChange: (color: string) => void;
    /** 初始颜色值(十六进制格式) */
    initialColor?: string;
    /** 色盘大小 */
    size?: number;
    /** 是否禁用选择器 */
    disabled?: boolean;
}

// ============================================================================
// 默认属性
// ============================================================================

/**
 * 组件默认属性
 * @constant {object} defaultProps
 * @description 定义组件的默认属性值
 */
const defaultProps = {
    initialColor: '#ffffff',
    size: 200,
    disabled: false
};

/**
 * 获取屏幕宽度用于计算卡片宽度
 */
const { width } = Dimensions.get('window');

/**
 * 卡片左右间距
 */
const cardMargin = adjustSize(36);

/**
 * 卡片宽度(屏幕宽度减去左右间距)
 */
const cardWidth = width - cardMargin * 2;

// ============================================================================
// 组件定义
// ============================================================================

/**
 * 颜色选择器组件
 * @function ColorPicker
 * @param {Props} props - 组件属性
 * @returns {React.ReactNode} 颜色选择器组件
 *
 * @组件功能
 * ==========
 * 1. 颜色选择界面
 *    - 显示色盘图像
 *    - 支持触摸交互选择颜色
 *    - 显示颜色选择指示器
 *
 * 2. 颜色处理
 *    - 根据触摸位置计算颜色值
 *    - 支持 HSV 到 hex 颜色转换
 *    - 初始颜色设置和位置计算
 *
 * 3. 交互处理
 *    - 支持手势响应
 *    - 实时更新颜色选择
 */
const ColorPicker = (props: Props) => {
    /** 当前选中的颜色 */
    const [currentColor, setCurrentColor] = useState(props.initialColor);

    /** 选择器指示器位置 */
    const [offset, setOffset] = useState({ x: 0, y: 0 });

    /** 色盘视图引用 */
    const colorWheelRef = useRef(null);

    /** 色盘半径 */
    const radius = props.size / 2;

    /** 指示器大小 */
    const thumbSize = 20;

    /**
     * 初始化颜色和指示器位置
     * @function useEffect
     * @description 当初始颜色、半径或指示器大小变化时,重新计算指示器位置
     */
    useEffect(() => {
        // 根据初始颜色计算滑点位置
        const hsv = colorsys.hex2Hsv(currentColor);
        // 角度转换,与参考实现一致
        let angle = 180 - hsv.h;
        // 计算长度
        let length = (radius / 100) * hsv.s;
        // 计算坐标
        let offsett = hypotenuse(length, angle);
        // 计算偏移位置
        const offx = radius - offsett.x - thumbSize / 4;
        const offy = radius - offsett.y - thumbSize / 4;
        setOffset({
            x: offx,
            y: offy,
        });
    }, [props.initialColor, radius, thumbSize]);

    /**
     * 已知角度和斜边,计算直角边坐标
     * @function hypotenuse
     * @param {number} long - 斜边长度
     * @param {number} angle - 角度(度)
     * @returns {object} 直角边坐标 {x, y}
     */
    const hypotenuse = (long: number, angle: number) => {
        // 转换为弧度
        const radian = (2 * Math.PI) / 360 * angle;
        return {
            x: Math.cos(radian) * long,
            y: Math.sin(radian) * long,
        };
    };

    /**
     * 根据触摸坐标更新颜色值和指示器位置
     * @function updateColor
     * @param {number} x - 触摸x坐标
     * @param {number} y - 触摸y坐标
     * @param {boolean} moving - 是否正在移动
     */
    const updateColor = (x: number, y: number, moving: boolean) => {
        // 如果禁用状态,不更新颜色
        if (props.disabled) return;

        // 获取坐标信息
        const { angle, maxX, maxY, length, exceed } = getPointValues(x, y);
        // 如果超出半径范围,不更新颜色
        if (exceed) {
            console.log('ColorPicker', 'updateColor exceed = ', exceed);
            return;
        }

        // 计算饱和度
        let rads = length / radius;
        // 限制在0-1之间
        const rad = rads > 1 ? 1 : rads;
        // 构建HSV颜色
        const hsv = { h: angle, s: 100 * rad, v: 100 };
        // 转换为十六进制颜色
        const hexColor = colorsys.hsv2Hex(hsv);
        // 更新当前颜色
        setCurrentColor(hexColor);

        //滑动结束 发送当前颜色值
        if (moving === false) {
            // 滑动结束 发送当前颜色值
            props.onColorChange(hexColor);
        }
    };

    /**
     * 获取实际坐标的角度、坐标值和长度
     * @function getPointValues
     * @param {number} locationX - 触摸x坐标
     * @param {number} locationY - 触摸y坐标
     * @returns {object} 包含角度、坐标和长度的对象
     */
    const getPointValues = (locationX: number, locationY: number) => {
        // 计算相对于中心的偏移
        const relX = locationX - radius;
        const relY = radius - locationY;
        // 计算斜边长度
        let length = Math.sqrt(relX * relX + relY * relY);

        // 计算角度
        let angle = 0;
        if (length > 0.1) { // 避免除以零的情况
            angle = getPointAngle(radius - locationX, radius - locationY);
        }

        // 计算最终坐标
        let maxX = locationX - thumbSize / 2;
        let maxY = locationY - thumbSize / 2;

        // 处理超出边界的情况
        if (length > radius) {
            return {
                exceed: true
            };
        } else {
            setOffset({
                x: maxX,
                y: maxY,
            });

            return {
                angle: angle,
                maxX: maxX,
                maxY: maxY,
                length: length,
                exceed: false
            };
        }
    };

    /**
     * 根据坐标计算角度
     * @function getPointAngle
     * @param {number} x - x坐标(相对于中心)
     * @param {number} y - y坐标(相对于中心)
     * @returns {number} 角度值(度)
     */
    const getPointAngle = (x: number, y: number) => {
        // 计算角度
        let angle = Math.atan2(y, x) * (180 / Math.PI);
        // 转换为从左边为 0°开始 顺时针转一圈为 360°
        angle = 180 - angle;
        return angle;
    };

    /**
     * 手势响应器
     * @constant {object} panResponder
     * @description 处理触摸手势事件
     */
    const panResponder = PanResponder.create({
        /** 开始触摸时是否响应 */
        onStartShouldSetPanResponder: () => !props.disabled,

        /** 触摸移动时是否响应 */
        onMoveShouldSetPanResponder: () => !props.disabled,

        /** 触摸移动时的处理 */
        onPanResponderMove: (e) => {
            if (props.disabled) return;
            const locationX = e.nativeEvent.locationX;
            const locationY = e.nativeEvent.locationY;
            updateColor(locationX, locationY, true);
        },

        /** 触摸结束时的处理 */
        onPanResponderRelease: (e) => {
            if (props.disabled) return;
            const locationX = e.nativeEvent.locationX;
            const locationY = e.nativeEvent.locationY;
            updateColor(locationX, locationY, false);
        }
    });

    /**
     * 渲染组件
     * @returns {React.ReactNode} 组件渲染结果
     */
    return (
        <View style={[styles.container, { height: props.size }]}>
            <View
                ref={colorWheelRef}
                style={[styles.colorWheel, { width: props.size, height: props.size }]}
                {...panResponder.panHandlers}
            >
                <Image
                    source={colorWheel}
                    style={[
                        styles.colorWheelImage,
                        { width: props.size, height: props.size },
                        props.disabled && styles.disabledImage
                    ]}
                />
                {!props.disabled && (
                    <View
                        style={[
                            styles.thumb,
                            {
                                width: thumbSize,
                                height: thumbSize,
                                left: offset.x,
                                top: offset.y,
                                backgroundColor: currentColor,
                            }
                        ]}
                    />
                )}
            </View>
        </View>
    );
};

/**
 * 设置组件默认属性
 * @description 将 defaultProps 赋值给 ColorPicker 组件的 defaultProps 属性
 */
ColorPicker.defaultProps = defaultProps;

/**
 * 导出的组件
 * @description 使用 memo 包装组件以优化性能,避免不必要的重渲染
 */
export default memo(ColorPicker);

// ============================================================================
// 样式定义
// ============================================================================

/**
 * 组件样式
 * @constant {object} styles
 * @description 使用 StyleSheet.create 定义组件样式
 */
const styles = StyleSheet.create({
    /** 容器样式 */
    container: {
        alignItems: 'center',
        justifyContent: 'center',
        width: cardWidth
    },

    /** 色盘容器样式 */
    colorWheel: {
        position: 'relative',
    },

    /** 色盘图像样式 */
    colorWheelImage: {
        borderRadius: 100,
    },

    /** 颜色选择指示器样式 */
    thumb: {
        position: 'absolute',
        borderRadius: 10,
        borderWidth: 2,
        borderColor: '#fff',
        shadowColor: '#000',
        shadowOffset: {
            width: 0,
            height: 2,
        },
        shadowOpacity: 0.25,
        shadowRadius: 3.84,
        elevation: 5,
    },
    /** 禁用状态下的图片样式 */
    disabledImage: {
        opacity: 0.5
    },
});
一、引言
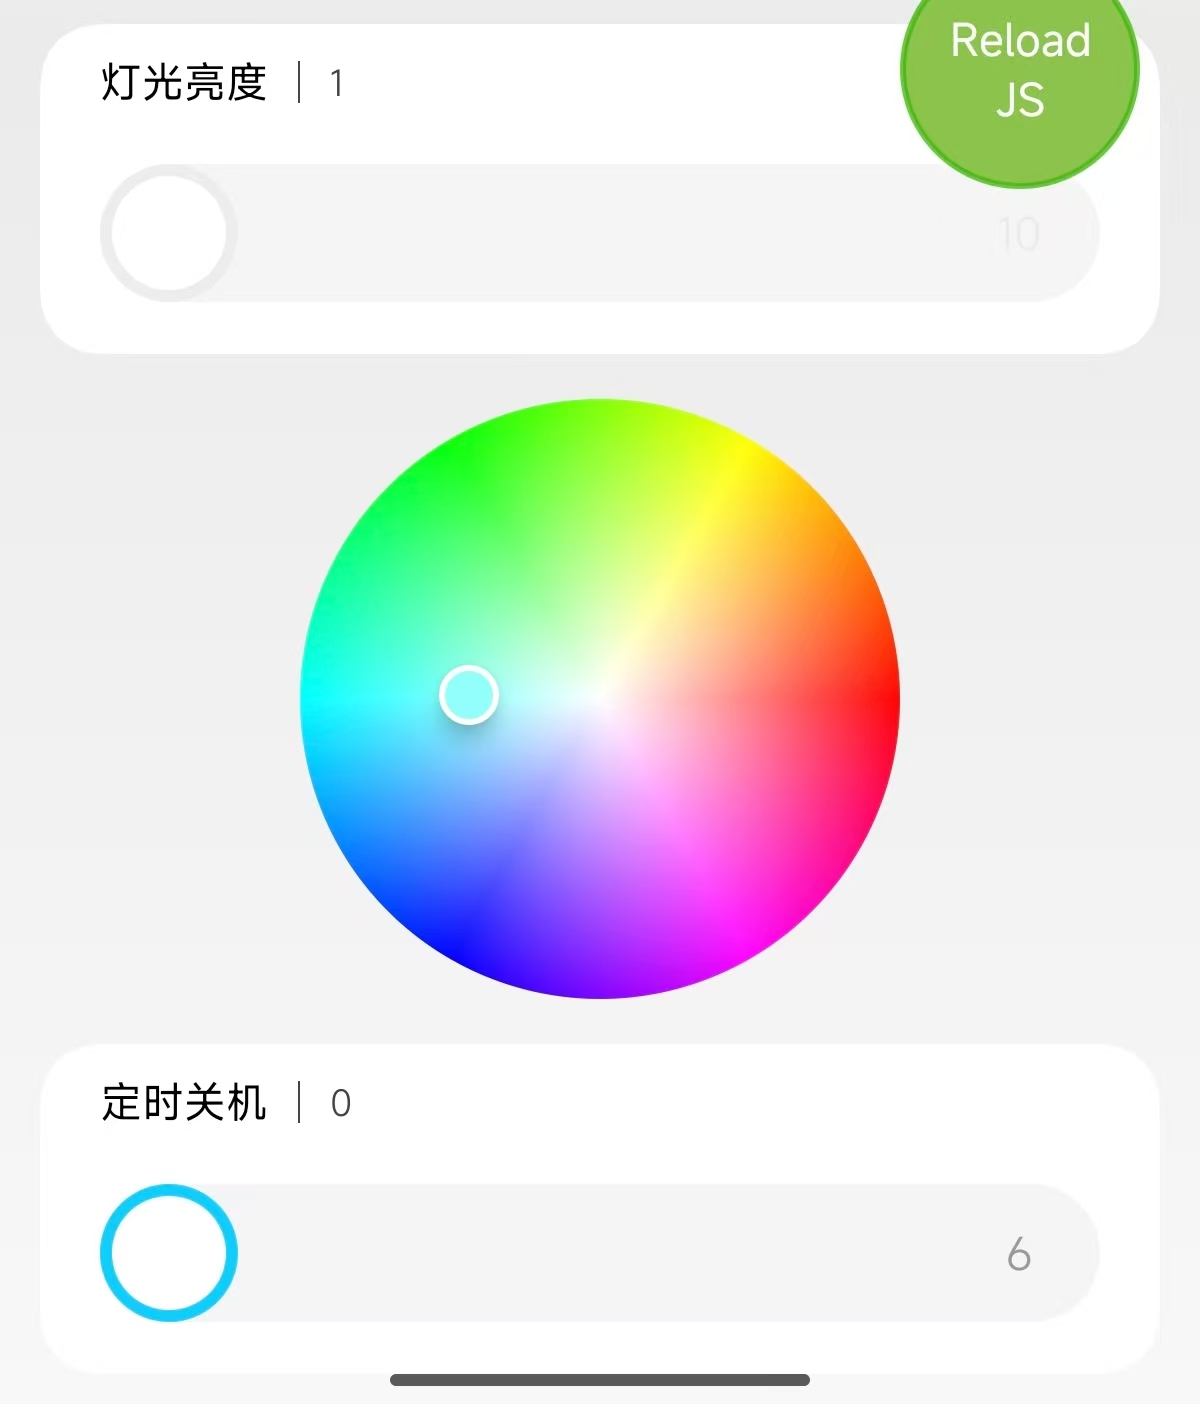
在米家插件开发中,经常需要为用户提供直观的颜色选择界面,例如控制智能灯的色相、饱和度。虽然社区有现成的react-native-color-picker等库,但有时我们需要更轻量、更定制化的实现,或者由于米家插件环境限制,无法引入过多原生依赖。本文将基于色盘图片和React Native手势系统,从零实现一个自定义色盘取色组件,并完美适配米家插件开发。
二、设计思路
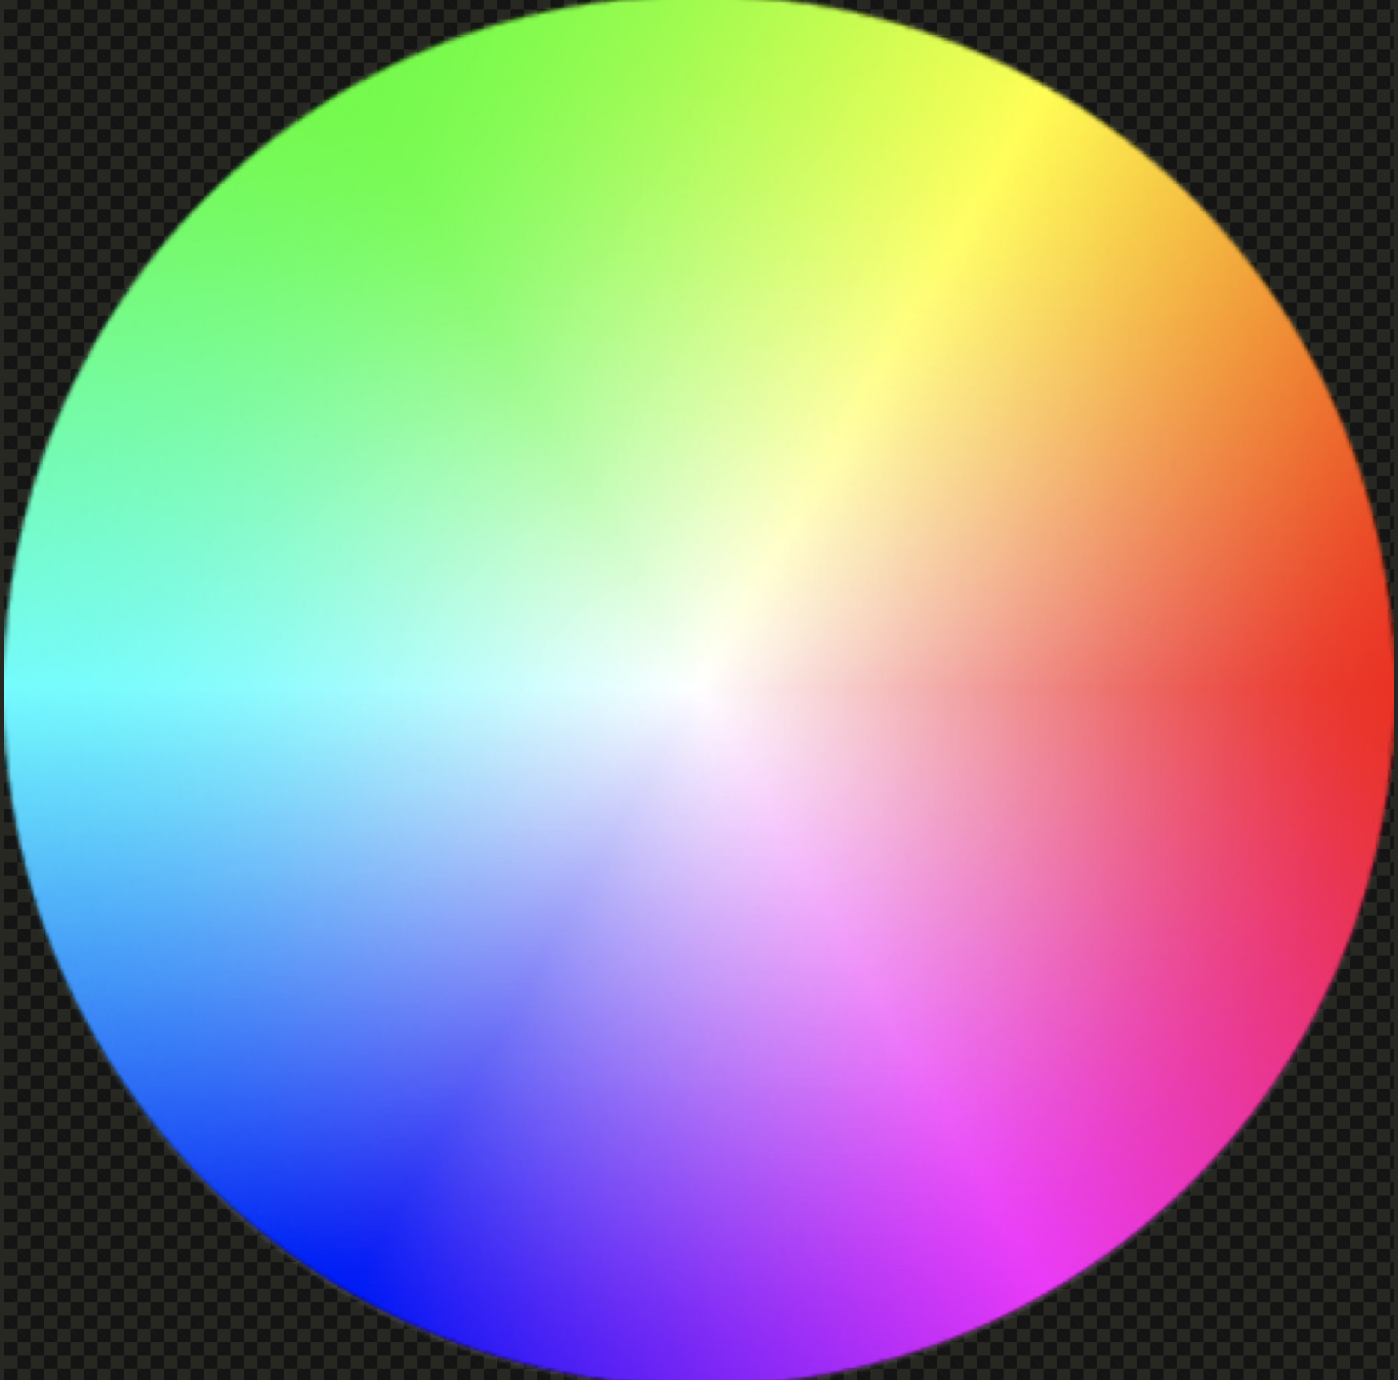
色盘通常是一个圆形渐变色图,色相沿圆周分布,饱和度沿半径方向变化。我们的目标是:用户触摸色盘时,获取触摸点相对于色盘中心的角度和距离,从而计算出对应的HSV值,再转换为HEX颜色,并通过回调返回。
核心要点:
-
使用一张标准的色盘图片作为背景(通常是HSV色盘)。
-
通过
PanResponder监听触摸事件,获取触摸坐标。 -
计算触摸点与色盘中心的极坐标(角度θ、半径r)。
-
角度对应色相H(0-360°),半径比例对应饱和度S(0-100%),亮度V固定为100%。
-
在触摸点绘制一个圆形指示器,显示当前选中的颜色。
三、组件实现详解
1. 组件结构
组件接收四个属性:
-
size:色盘尺寸(宽高相等) -
disabled:是否禁用选择 -
onColorChange:颜色变化回调,返回HEX色值 -
initialColor:初始颜色,用于定位指示器
interface Props {
    onColorChange: (color: string) => void;
    initialColor?: string;
    size?: number;
    disabled?: boolean;
}
2. 状态定义
const [currentColor, setCurrentColor] = useState(props.initialColor);
const [offset, setOffset] = useState({ x: 0, y: 0 }); // 指示器位置
3. 根据初始颜色计算指示器位置
当初始颜色变化时,需要将HEX颜色转换为HSV,然后计算出指示器应在色盘上的坐标。这是通过colorsys工具库实现的(可自行编写转换函数)。
const hypotenuse = (long: number, angle: number) => {
    const radian = (2 * Math.PI) / 360 * angle;
    return {
        x: Math.cos(radian) * long,
        y: Math.sin(radian) * long,
    };
};
4. 手势处理:PanResponder
创建PanResponder,监听触摸移动和释放事件。移动时实时更新颜色,释放时触发onColorChange回调。
const panResponder = PanResponder.create({
    onStartShouldSetPanResponder: () => !props.disabled,
    onMoveShouldSetPanResponder: () => !props.disabled,
    onPanResponderMove: (e) => {
        const { locationX, locationY } = e.nativeEvent;
        updateColor(locationX, locationY, true);
    },
    onPanResponderRelease: (e) => {
        const { locationX, locationY } = e.nativeEvent;
        updateColor(locationX, locationY, false);
    }
});
5. 核心算法:坐标转颜色
updateColor函数是核心,它接收触摸坐标,计算角度和半径比例,得到HSV,再转为HEX。
const updateColor = (x: number, y: number, moving: boolean) => {
    if (props.disabled) return;
    const { angle, length, exceed } = getPointValues(x, y);
    if (exceed) return; // 超出半径范围

    let rads = length / radius; // 半径比例,即饱和度(0-1)
    const rad = rads > 1 ? 1 : rads;
    const hsv = { h: angle, s: 100 * rad, v: 100 };
    const hexColor = colorsys.hsv2Hex(hsv);
    setCurrentColor(hexColor);
    if (!moving) {
        props.onColorChange(hexColor); // 滑动结束才回调
    }
};getPointValues函数计算触摸点的角度、长度,并更新指示器位置:
const getPointValues = (locationX: number, locationY: number) => {
    const relX = locationX - radius;
    const relY = radius - locationY;
    let length = Math.sqrt(relX * relX + relY * relY);
    let angle = 0;
    if (length > 0.1) {
        angle = getPointAngle(radius - locationX, radius - locationY);
    }
    let maxX = locationX - thumbSize / 2;
    let maxY = locationY - thumbSize / 2;
    if (length > radius) {
        return { exceed: true };
    } else {
        setOffset({ x: maxX, y: maxY });
        return { angle, maxX, maxY, length, exceed: false };
    }
};角度计算函数getPointAngle:
const getPointAngle = (x: number, y: number) => {
    let angle = Math.atan2(y, x) * (180 / Math.PI);
    angle = 180 - angle; // 调整起始方向
    return angle;
};
6. 渲染
渲染一个容器,内部包裹色盘图片和指示器。将panResponder的手柄绑定到图片容器上,实现触摸响应。
return (
    <View style={[styles.container, { height: props.size }]}>
        <View
            ref={colorWheelRef}
            style={[styles.colorWheel, { width: props.size, height: props.size }]}
            {...panResponder.panHandlers}
        >
            <Image
                source={colorWheel}
                style={[styles.colorWheelImage, { width: props.size, height: props.size }, props.disabled && styles.disabledImage]}
            />
            {!props.disabled && (
                <View style={[styles.thumb, { left: offset.x, top: offset.y, backgroundColor: currentColor }]} />
            )}
        </View>
    </View>
);
四、颜色转换工具库 colorsys.ts
为了方便进行HEX与HSV之间的转换,编写了一个工具库。核心函数如下:
// colorsys.ts
export interface HSV { h: number; s: number; v: number; }
interface RGB { r: number; g: number; b: number; }

const hex2Rgb = (hex: string): RGB => {
    hex = hex.replace(/^#/, '');
    if (hex.length === 3) hex = hex.split('').map(c => c + c).join('');
    return {
        r: parseInt(hex.substring(0, 2), 16),
        g: parseInt(hex.substring(2, 4), 16),
        b: parseInt(hex.substring(4, 6), 16)
    };
};

const rgb2Hsv = (rgb: RGB): HSV => {
    const { r, g, b } = rgb;
    const max = Math.max(r, g, b), min = Math.min(r, g, b), delta = max - min;
    let h = 0, s = 0;
    const v = (max / 255) * 100;
    if (delta > 0) {
        if (max === r) h = ((g - b) / delta) * 60;
        else if (max === g) h = (2 + (b - r) / delta) * 60;
        else h = (4 + (r - g) / delta) * 60;
        s = (delta / max) * 100;
    }
    if (h < 0) h += 360;
    return { h, s, v };
};

const hsv2Rgb = (hsv: HSV): RGB => {
    const { h, s, v } = hsv;
    const sNorm = s / 100, vNorm = v / 100;
    if (sNorm === 0) {
        const gray = Math.round(vNorm * 255);
        return { r: gray, g: gray, b: gray };
    }
    const c = vNorm * sNorm;
    const x = c * (1 - Math.abs(((h / 60) % 2) - 1));
    const m = vNorm - c;
    let r = 0, g = 0, b = 0;
    if (h >= 0 && h < 60) { r = c; g = x; b = 0; }
    else if (h >= 60 && h < 120) { r = x; g = c; b = 0; }
    else if (h >= 120 && h < 180) { r = 0; g = c; b = x; }
    else if (h >= 180 && h < 240) { r = 0; g = x; b = c; }
    else if (h >= 240 && h < 300) { r = x; g = 0; b = c; }
    else if (h >= 300 && h < 360) { r = c; g = 0; b = x; }
    r = Math.round((r + m) * 255);
    g = Math.round((g + m) * 255);
    b = Math.round((b + m) * 255);
    return { r, g, b };
};

const rgb2Hex = (rgb: RGB): string => {
    const toHex = (n: number) => n.toString(16).padStart(2, '0');
    return `#${toHex(rgb.r)}${toHex(rgb.g)}${toHex(rgb.b)}`;
};

export const hex2Hsv = (hex: string): HSV => rgb2Hsv(hex2Rgb(hex));
export const hsv2Hex = (hsv: HSV): string => rgb2Hex(hsv2Rgb(hsv));
这个工具库提供了完整的转换链条,支持HEX、RGB、HSV之间的相互转换。
五、在米家插件中使用
1. 导入组件
import ColorPicker from './components/ColorPicker';2. 使用示例
const [selectedColor, setSelectedColor] = useState('#ff2942');
const [disabled, setDisabled] = useState(false);

const handleColorChange = (color: string) => {
    setSelectedColor(color);
    // 调用米家设备控制API
    MiJSBridge.invoke('device/control', {
        did: deviceId,
        params: { color: color }
    });
};

// 渲染
<ColorPicker
    size={200}
    disabled={disabled}
    onColorChange={handleColorChange}
    initialColor={selectedColor}
/>
3. 米家插件特有的适配
-
尺寸适配:代码中使用了
import { adjustSize } from "miot/utils/sizes";来根据屏幕密度调整间距。例如cardMargin = adjustSize(36)可以确保在不同分辨率设备上有一致的视觉表现。 -
图片资源:色盘图片
colorWheel需要从../utils/img.ts中导入,通常是本地静态图片。
六、注意事项
-
色盘图片:需要一张标准的HSV色盘图片,确保色相分布与代码计算一致(即红色在0°方向,绿色在120°等)。图片应导入为静态资源,并设置合适的尺寸。
-
坐标转换:由于图片坐标系和数学坐标系可能有差异(Y轴方向相反),代码中做了相应调整(如
180 - angle、radius - locationY等),请根据实际图片微调。 -
性能优化:组件使用了
memo包装,避免不必要的重绘。如果滑动卡顿,可考虑使用useCallback包裹回调函数。 -
边界处理:当触摸点超出色盘半径时,代码直接返回,不更新颜色,这符合预期行为。
-
初始颜色:务必传入有效的HEX颜色字符串,否则
colorsys.hex2Hsv可能出错。
七、总结
本文实现了一个基于图片和手势的自定义色盘取色组件,无需引入任何第三方库,代码完全可控,适合米家插件等React Native项目。通过极坐标转换和HSV颜色模型,我们能够精确地将触摸位置映射为颜色值,并实时反馈给用户。配套的colorsys工具库提供了完整的颜色转换支持。该组件已在实际米家插件项目中验证,稳定可靠。
如果你需要更丰富的功能(如亮度调节、预设颜色),可以在本组件基础上轻松扩展。希望本文能为你的米家插件开发带来启发。

欢迎加入 MCP 技术社区!与志同道合者携手前行,一同解锁 MCP 技术的无限可能!
更多推荐


 12
12 0
0- 0


 已为社区贡献1条内容

所有评论(0)