三大 Agent-UI 协议深度剖析:AG-UI、A2UI 与 MCP-UI 的设计哲学与工程实践
1. 引言:为什么需要 Agent-UI 协议?
1.1 传统 Chatbot 的局限性
传统的 AI 聊天机器人采用简单的 Request-Response 模式:用户输入文本,模型返回文本。这种模式在面对复杂业务场景时暴露出严重不足:
用户 → "帮我订一家北京的川菜馆" |
|
传统 Bot → "好的,我找到了以下餐厅:1. 川办餐厅... 2. 眉州东坡..." |
问题:
- ❌ 无法展示餐厅图片、评分、价格等结构化信息
- ❌ 用户需要手动复制餐厅名称再去搜索
- ❌ 无法直接在对话中完成预订操作
1.2 Agent 时代的新需求
当 AI 从 Chatbot 升级为 Agent 后,交互模式发生了本质变化:
| 维度 | Chatbot | Agent |
|---|---|---|
| 运行时间 | 短(毫秒级) | 长(秒/分钟级) |
| 输出类型 | 纯文本 | 文本 + 结构化数据 + UI 控制 |
| 状态管理 | 无状态 | 复杂状态机 |
| 交互模式 | 单轮 Q&A | 多轮工具调用 + 人机协作 |
演进
🦾 智能体 Agent
多模态输入
状态事件
UI 更新
工具调用
用户操作
👤 用户
🧠 Agent
📊 状态机
🖥️ 富交互 UI
🔧 Tools
🤖 传统 Chatbot
文本输入
文本输出
👤 用户
💬 Bot
1.3 三种协议的定位
业界给出了三种截然不同的解决方案:
| 协议 | 来源 | 核心定位 | 一句话概括 |
|---|---|---|---|
| AG-UI | CopilotKit | 事件驱动的状态同步协议 | "让前端实时感知 Agent 的每一步思考" |
| A2UI | 声明式 UI 组件规范 | "Agent 描述意图,客户端负责渲染" | |
| MCP-UI | 社区 | MCP 工具的可视化扩展 | "让工具调用结果具备可视化能力" |
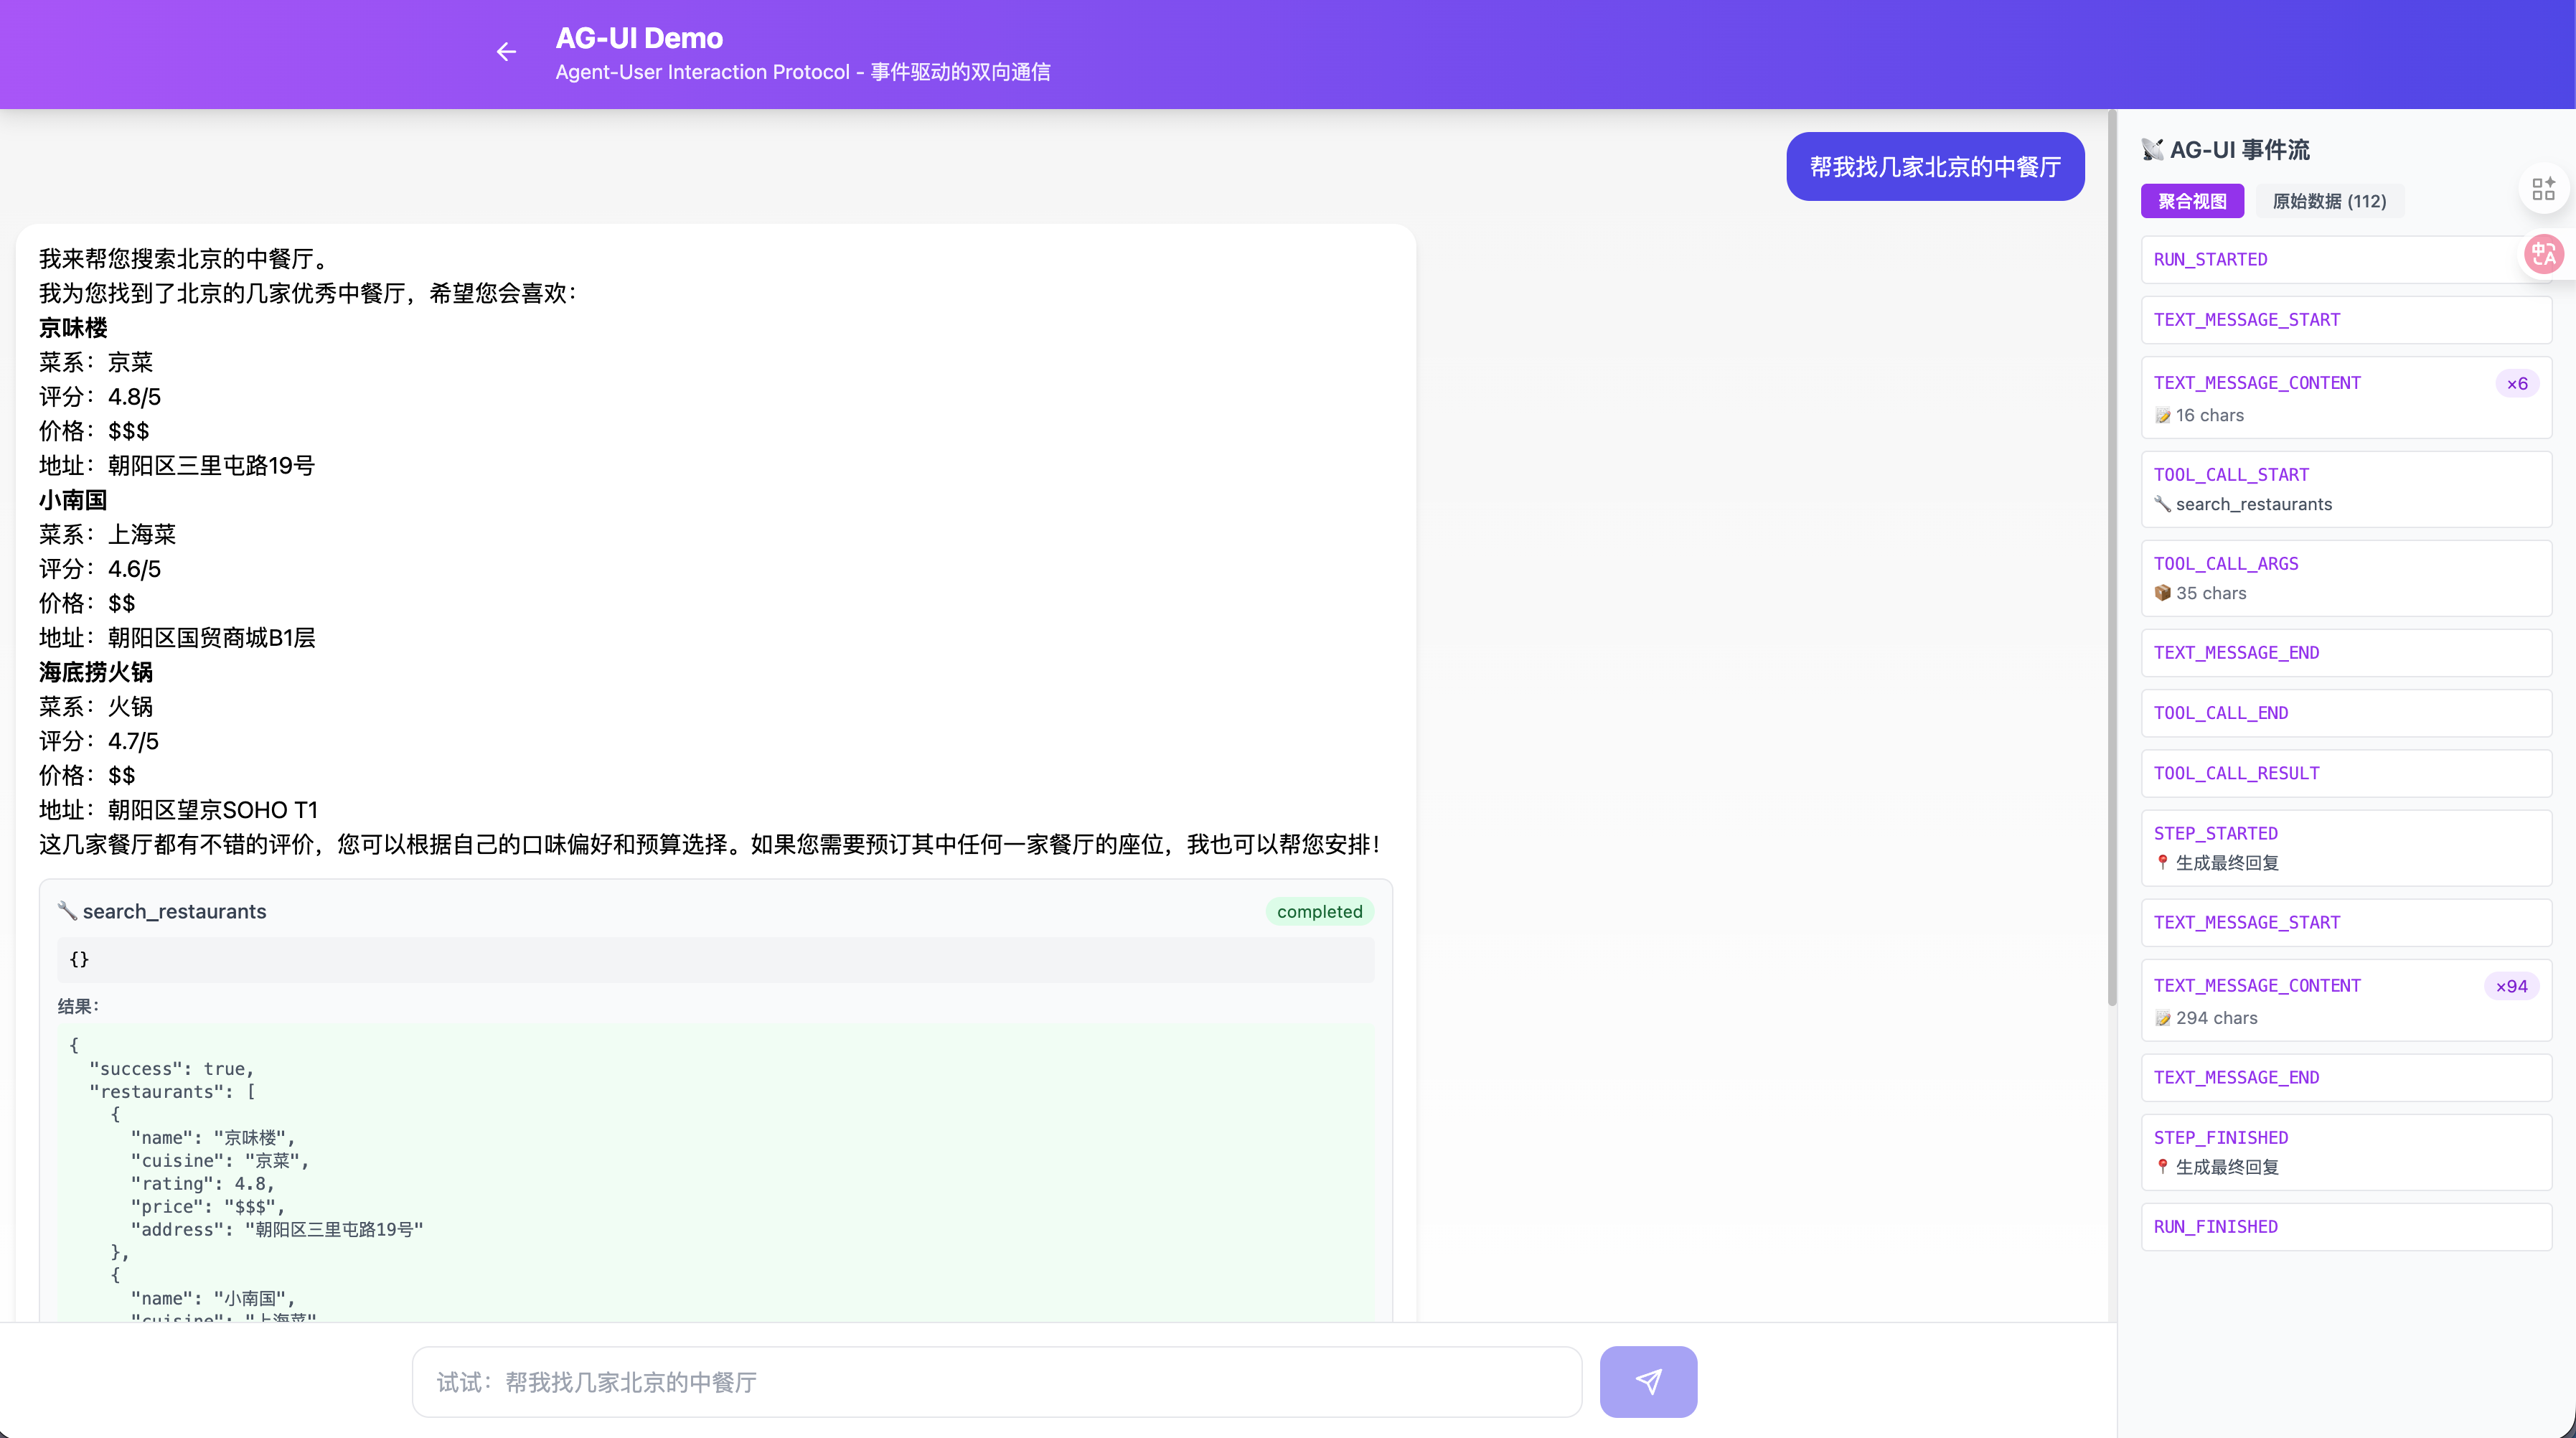
2. AG-UI:事件驱动的智能体交互协议
2.1 设计哲学
AG-UI(Agent-User Interaction Protocol)的核心理念可以概括为:
"UI 是前端的领域,Agent 只负责广播状态变化"
AG-UI 认为:Agent 不应该知道"按钮是圆的还是方的",不应该知道"当前是 React 还是 Vue"。Agent 只需要告诉前端:"我正在调用搜索工具"、"搜索参数是 XXX"、"搜索结果是 YYY"。至于如何渲染这些信息,完全由前端决定。
这种设计带来了几个核心优势:
- 前端自由度最大化:同一个 Agent 可以对接 Web、Mobile、CLI 等不同客户端
- 实时性极强:基于流式事件,用户能看到 Agent 思考的每一步
- 与现有应用深度集成:Agent 可以驱动现有 UI 的状态变化
🖥️ Frontend
📡 传输层
🔙 Agent Backend
SSE Stream
TEXT_MESSAGE
TOOL_CALL
STATE_DELTA
🧠 LLM
Event Producer
🔧 Tools
text/event-stream
Event Parser
State Machine
💬 聊天区
🔧 工具卡片
📊 应用状态
2.2 核心机制:事件类型系统
AG-UI 定义了一套完整的事件类型体系(约 20+ 种),按功能可分为四大类:
2.2.1 生命周期事件
// 源码位置:ag-ui/sdks/typescript/packages/core/src/events.ts |
|
enum EventType { |
|
// 运行生命周期 |
|
RUN_STARTED = "RUN_STARTED", // Agent 开始执行 |
|
RUN_FINISHED = "RUN_FINISHED", // Agent 执行完成 |
|
RUN_ERROR = "RUN_ERROR", // Agent 执行出错 |
|
// 步骤生命周期 |
|
STEP_STARTED = "STEP_STARTED", // 开始执行某个步骤 |
|
STEP_FINISHED = "STEP_FINISHED", // 步骤执行完成 |
|
} |
2.2.2 消息流事件
enum EventType { |
|
// 文本消息(流式) |
|
TEXT_MESSAGE_START = "TEXT_MESSAGE_START", |
|
TEXT_MESSAGE_CONTENT = "TEXT_MESSAGE_CONTENT", // delta: 增量文本 |
|
TEXT_MESSAGE_END = "TEXT_MESSAGE_END", |
|
TEXT_MESSAGE_CHUNK = "TEXT_MESSAGE_CHUNK", // 批量模式 |
|
// 思考过程(可选暴露) |
|
THINKING_TEXT_MESSAGE_START = "THINKING_TEXT_MESSAGE_START", |
|
THINKING_TEXT_MESSAGE_CONTENT = "THINKING_TEXT_MESSAGE_CONTENT", |
|
THINKING_TEXT_MESSAGE_END = "THINKING_TEXT_MESSAGE_END", |
|
} |
2.2.3 工具调用事件
enum EventType { |
|
// 工具调用生命周期 |
|
TOOL_CALL_START = "TOOL_CALL_START", // 包含 toolCallId, toolCallName |
|
TOOL_CALL_ARGS = "TOOL_CALL_ARGS", // 流式参数:delta 字段 |
|
TOOL_CALL_END = "TOOL_CALL_END", |
|
TOOL_CALL_RESULT = "TOOL_CALL_RESULT", // 工具执行结果 |
|
TOOL_CALL_CHUNK = "TOOL_CALL_CHUNK", // 批量模式 |
|
} |
2.2.4 状态同步事件
enum EventType { |
|
// 状态管理 |
|
STATE_SNAPSHOT = "STATE_SNAPSHOT", // 完整状态快照 |
|
STATE_DELTA = "STATE_DELTA", // 增量状态(JSON Patch RFC 6902) |
|
MESSAGES_SNAPSHOT = "MESSAGES_SNAPSHOT", // 完整消息历史 |
|
// 活动状态(用于 UI 展示) |
|
ACTIVITY_SNAPSHOT = "ACTIVITY_SNAPSHOT", |
|
ACTIVITY_DELTA = "ACTIVITY_DELTA", |
|
} |
2.3 实现方案:传输层与客户端
2.3.1 传输层:SSE + HTTP Binary
AG-UI 支持多种传输方式,其中 SSE(Server-Sent Events)是最常用的:
// 源码位置:ag-ui/sdks/typescript/packages/client/src/agent/http.ts |
|
export class HttpAgent extends AbstractAgent { |
|
protected requestInit(input: RunAgentInput): RequestInit { |
|
return { |
|
method: "POST", |
|
headers: { |
|
"Content-Type": "application/json", |
|
Accept: "text/event-stream", // 关键:请求 SSE 格式 |
|
}, |
|
body: JSON.stringify(input), |
|
}; |
|
} |
|
run(input: RunAgentInput): Observable<BaseEvent> { |
|
// 1. 发起 HTTP 请求获取 SSE 流 |
|
const httpEvents = runHttpRequest(this.url, this.requestInit(input)); |
|
// 2. 转换为 AG-UI 事件流 |
|
return transformHttpEventStream(httpEvents); |
|
} |
|
} |
传输层数据格式示例:
event: TEXT_MESSAGE_START |
|
data: {"type":"TEXT_MESSAGE_START","messageId":"msg_001","role":"assistant"} |
|
event: TEXT_MESSAGE_CONTENT |
|
data: {"type":"TEXT_MESSAGE_CONTENT","messageId":"msg_001","delta":"我来帮您"} |
|
event: TEXT_MESSAGE_CONTENT |
|
data: {"type":"TEXT_MESSAGE_CONTENT","messageId":"msg_001","delta":"搜索餐厅..."} |
|
event: TOOL_CALL_START |
|
data: {"type":"TOOL_CALL_START","toolCallId":"call_001","toolCallName":"search_restaurants"} |
|
event: TOOL_CALL_ARGS |
|
data: {"type":"TOOL_CALL_ARGS","toolCallId":"call_001","delta":"{\"cuisine\":\"川菜\"}"} |
2.3.2 客户端:Observable + 中间件架构
AG-UI 客户端采用 RxJS Observable 模式处理事件流,并支持中间件扩展:
// 源码位置:ag-ui/sdks/typescript/packages/client/src/agent/agent.ts |
|
export abstract class AbstractAgent { |
|
private middlewares: Middleware[] = []; |
|
// 订阅者模式:支持多个消费者 |
|
public subscribe(subscriber: AgentSubscriber) { |
|
this.subscribers.push(subscriber); |
|
return { unsubscribe: () => { /* ... */ } }; |
|
} |
|
// 中间件注册 |
|
public use(...middlewares: (Middleware | MiddlewareFunction)[]): this { |
|
this.middlewares.push(...normalizedMiddlewares); |
|
return this; |
|
} |
|
// 抽象方法:具体 Agent 实现事件流 |
|
abstract run(input: RunAgentInput): Observable<BaseEvent>; |
|
} |
2.4 对接方式
2.4.1 服务端对接(Python 示例)
# Demo 项目:demo-agent-ui-protocols/agents/ag-ui-agent/server.py |
|
from sse_starlette.sse import EventSourceResponse |
|
async def generate_events() -> AsyncGenerator[str, None]: |
|
# 1. 发送 RUN_STARTED |
|
yield create_event(EventType.RUN_STARTED, { |
|
"threadId": thread_id, |
|
"runId": run_id |
|
}) |
|
# 2. 流式调用 LLM |
|
async for chunk in llm_stream: |
|
if chunk.choices[0].delta.content: |
|
yield create_event(EventType.TEXT_MESSAGE_CONTENT, { |
|
"messageId": msg_id, |
|
"delta": chunk.choices[0].delta.content |
|
}) |
|
if chunk.choices[0].delta.tool_calls: |
|
# 处理工具调用... |
|
yield create_event(EventType.TOOL_CALL_START, {...}) |
|
# 3. 发送 RUN_FINISHED |
|
yield create_event(EventType.RUN_FINISHED, { |
|
"threadId": thread_id, |
|
"runId": run_id |
|
}) |
|
@app.post("/run") |
|
async def run(request: RunRequest): |
|
return EventSourceResponse(generate_events()) |
2.4.2 前端对接(React 示例)
// Demo 项目:demo-agent-ui-protocols/apps/web/src/app/ag-ui-demo/page.tsx |
|
const handleSendMessage = async (content: string) => { |
|
const response = await fetch('http://localhost:8001/run', { |
|
method: 'POST', |
|
headers: { 'Content-Type': 'application/json' }, |
|
body: JSON.stringify({ messages: [{ role: 'user', content }] }), |
|
}); |
|
const reader = response.body.getReader(); |
|
const decoder = new TextDecoder(); |
|
while (true) { |
|
const { done, value } = await reader.read(); |
|
if (done) break; |
|
// 解析 SSE 事件 |
|
const events = parseSSE(decoder.decode(value)); |
|
for (const event of events) { |
|
switch (event.type) { |
|
case 'TEXT_MESSAGE_CONTENT': |
|
// 更新消息内容(流式) |
|
setMessages(prev => updateMessageContent(prev, event)); |
|
break; |
|
case 'TOOL_CALL_START': |
|
// 显示工具调用 UI |
|
setMessages(prev => addToolCall(prev, event)); |
|
break; |
|
case 'TOOL_CALL_RESULT': |
|
// 渲染工具结果 |
|
setMessages(prev => updateToolResult(prev, event)); |
|
break; |
|
} |
|
} |
|
} |
|
}; |
初始化
重试
RUN_STARTED
RUN_FINISHED
RUN_ERROR
Idle
Running
TOOL_CALL_START
TOOL_CALL_RESULT
TEXT_MESSAGE_CONTENT
Streaming
ToolCalling
Error
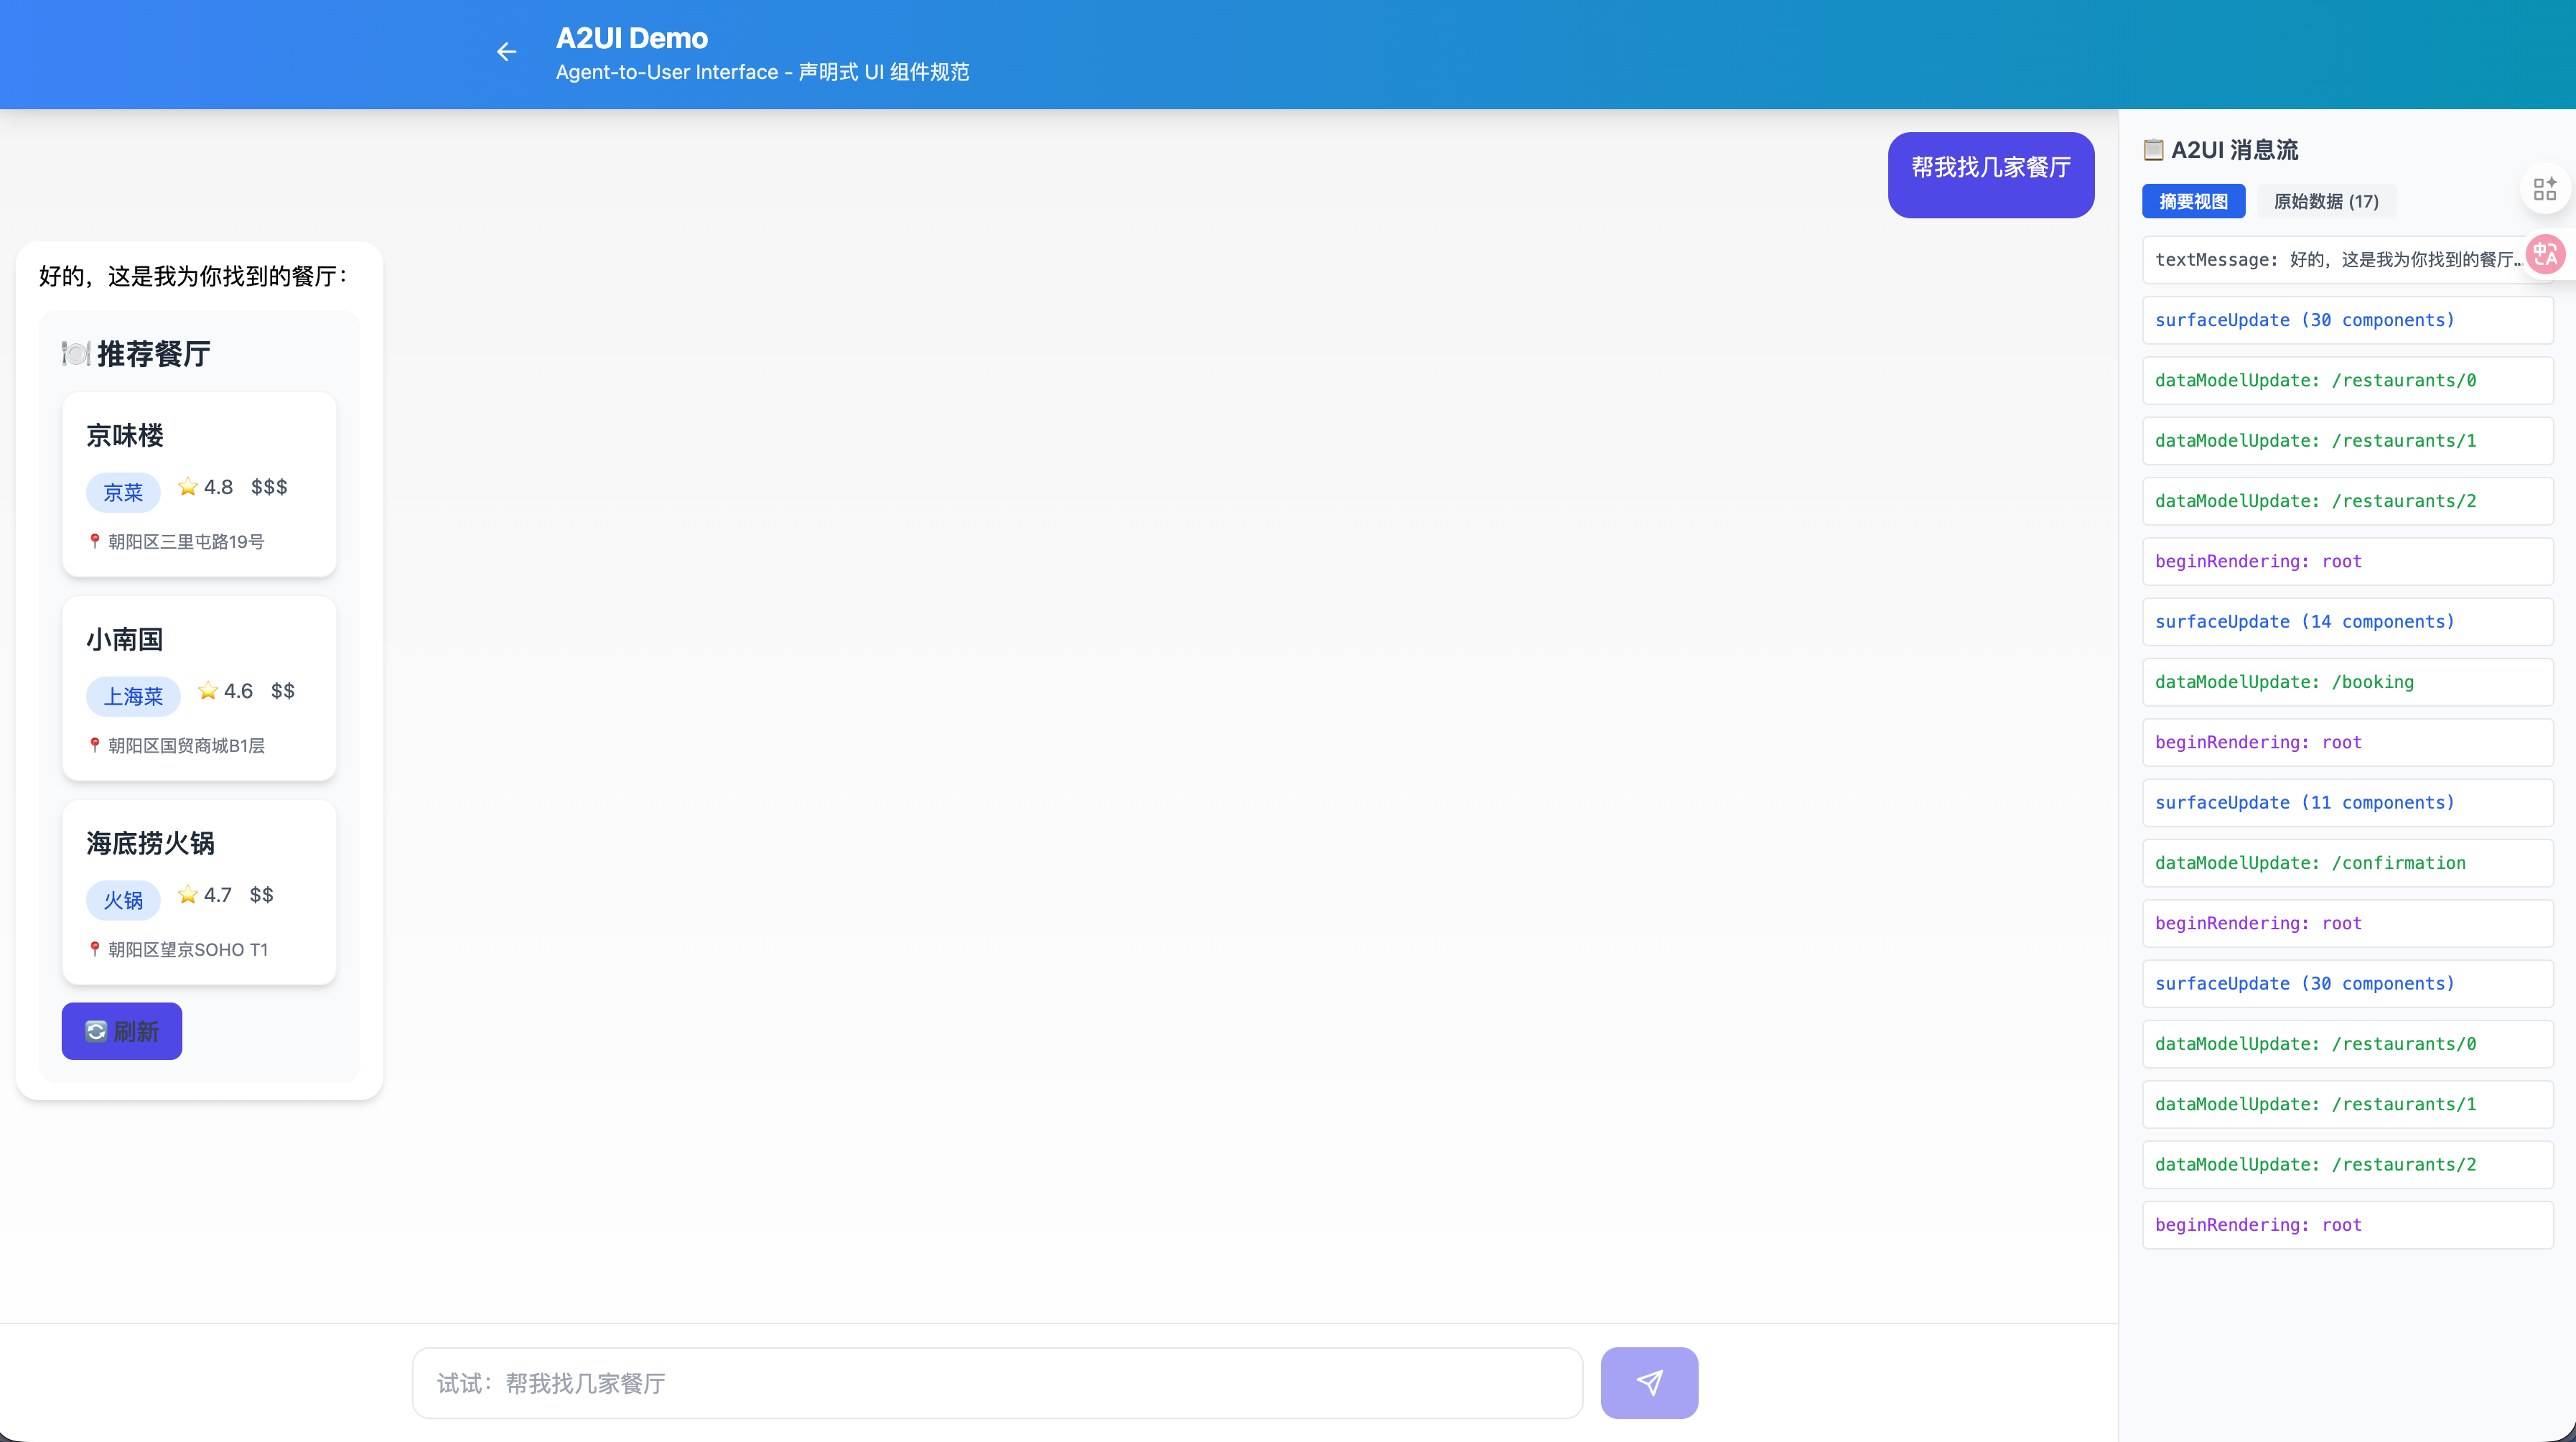
3. A2UI:声明式 UI 的零信任渲染引擎
3.1 设计哲学
A2UI(Agent-to-User Interface)由 Google 推出,其核心理念是:
"Safe like data, expressive like code"(像数据一样安全,像代码一样有表现力)
与 AG-UI 的"前端主导"不同,A2UI 采用"后端主导"的思路:Agent 不仅发送数据,还发送 UI 结构描述。但为了安全,A2UI 绝对不允许 Agent 发送可执行代码(HTML/JS),而是发送一种声明式的组件描述 JSON。
3.1.1 安全性设计
A2UI 的安全模型基于"白名单组件库"(Catalog)机制:
Agent 只能说:"我要渲染一个 Card 组件,ID 是 123,标题是 XXX" |
|
Agent 不能说:"<script>alert('XSS')</script>" |
这种设计完全杜绝了 LLM 生成恶意代码的风险。
3.1.2 跨平台设计
由于 A2UI 发送的是抽象组件描述而非具体实现,同一套协议可以:
- 在 Web 端渲染为 DOM 元素
- 在 iOS 端渲染为 SwiftUI View
- 在 Android 端渲染为 Compose 组件
- 在 Flutter 中渲染为 Widget
📱 原生 UI
🌐 各平台渲染器
📦 A2UI JSON
🧠 Agent
LLM
A2UI Generator
{“updateComponents”: ...}
🌐 Web\nLit/React
🍎 iOS\nSwiftUI
🤖 Android\nCompose
🐦 Flutter\nWidget
🖥️ DOM
📱 UIKit View
📱 Compose UI
📱 Widget Tree
3.2 核心机制:邻接表组件模型
3.2.1 为什么不用嵌套 JSON?
传统的 UI 描述通常采用嵌套结构:
// ❌ 传统嵌套结构 - 对 LLM 不友好 |
|
{ |
|
"type": "Column", |
|
"children": [ |
|
{ |
|
"type": "Text", |
|
"text": "Hello" |
|
}, |
|
{ |
|
"type": "Button", |
|
"children": [{ "type": "Text", "text": "Click" }] |
|
} |
|
] |
|
} |
问题:
- LLM 必须一次性生成完美嵌套,容易出错
- 难以增量更新(需要重新发送整个树)
- 深层嵌套难以流式生成
3.2.2 邻接表模型
A2UI 采用邻接表(Adjacency List)结构,将组件树"拍平"为列表:
// 源码位置:A2UI/docs/concepts/components.md |
|
// ✅ A2UI 邻接表结构 - LLM 友好 |
|
{ |
|
"surfaceUpdate": { |
|
"surfaceId": "main", |
|
"components": [ |
|
{"id": "root", "component": {"Column": {"children": {"explicitList": ["greeting", "buttons"]}}}}, |
|
{"id": "greeting", "component": {"Text": {"text": {"literalString": "Hello"}}}}, |
|
{"id": "buttons", "component": {"Row": {"children": {"explicitList": ["cancel-btn", "ok-btn"]}}}}, |
|
{"id": "cancel-btn", "component": {"Button": {"child": "cancel-text", "action": {"name": "cancel"}}}}, |
|
{"id": "cancel-text", "component": {"Text": {"text": {"literalString": "Cancel"}}}}, |
|
{"id": "ok-btn", "component": {"Button": {"child": "ok-text", "action": {"name": "ok"}}}}, |
|
{"id": "ok-text", "component": {"Text": {"text": {"literalString": "OK"}}}} |
|
] |
|
} |
|
} |
优势:
- ✅ LLM 可以逐个生成组件,无需考虑嵌套
- ✅ 增量更新:只发送变化的组件
- ✅ 天然支持流式传输(JSONL 格式)
3.3 消息类型体系
A2UI 定义了四种核心消息类型:
// 源码位置:A2UI/specification/0.9/json/server_to_client.json |
|
{ |
|
"oneOf": [ |
|
{ "$ref": "#/$defs/CreateSurfaceMessage" }, // 创建 UI 表面 |
|
{ "$ref": "#/$defs/UpdateComponentsMessage" }, // 更新组件 |
|
{ "$ref": "#/$defs/UpdateDataModelMessage" }, // 更新数据模型 |
|
{ "$ref": "#/$defs/DeleteSurfaceMessage" } // 删除 UI 表面 |
|
] |
|
} |
3.3.1 createSurface:初始化 UI 表面
{ |
|
"createSurface": { |
|
"surfaceId": "restaurant-list", |
|
"catalogId": "a2ui.dev:standard" // 声明使用的组件库 |
|
} |
|
} |
3.3.2 updateComponents:发送组件定义
{ |
|
"updateComponents": { |
|
"surfaceId": "restaurant-list", |
|
"components": [ |
|
{ |
|
"id": "root", |
|
"component": { |
|
"Column": { |
|
"children": {"explicitList": ["header", "list"]} |
|
} |
|
} |
|
}, |
|
{ |
|
"id": "header", |
|
"component": { |
|
"Text": { |
|
"text": {"literalString": "推荐餐厅"}, |
|
"usageHint": "h1" |
|
} |
|
} |
|
} |
|
// ... 更多组件 |
|
] |
|
} |
|
} |
3.3.3 updateDataModel:数据与 UI 分离
A2UI 的一个重要设计是数据模型与组件结构分离。组件可以通过 path 绑定数据:
// 1. 组件定义(结构) |
|
{ |
|
"updateComponents": { |
|
"surfaceId": "restaurant-list", |
|
"components": [{ |
|
"id": "restaurant-name", |
|
"component": { |
|
"Text": { |
|
"text": {"path": "/restaurants/0/name"} // 数据绑定 |
|
} |
|
} |
|
}] |
|
} |
|
} |
|
// 2. 数据更新(内容) |
|
{ |
|
"updateDataModel": { |
|
"surfaceId": "restaurant-list", |
|
"path": "/restaurants/0", |
|
"op": "replace", |
|
"value": { |
|
"name": "川办餐厅", |
|
"rating": 4.8, |
|
"price": "$$" |
|
} |
|
} |
|
} |
优势:
- 更新数据无需重新发送组件结构
- 多个组件可以绑定同一数据路径
- LLM 可以分步生成结构和数据
3.4 标准组件库(Catalog)
A2UI 定义了一套标准组件库,涵盖常见 UI 需求:
// 源码位置:A2UI/specification/0.9/json/standard_catalog_definition.json |
|
{ |
|
"$defs": { |
|
"anyComponent": { |
|
"oneOf": [ |
|
// 展示类 |
|
{ "$ref": "#/$defs/Text" }, |
|
{ "$ref": "#/$defs/Image" }, |
|
{ "$ref": "#/$defs/Icon" }, |
|
{ "$ref": "#/$defs/Video" }, |
|
{ "$ref": "#/$defs/AudioPlayer" }, |
|
// 布局类 |
|
{ "$ref": "#/$defs/Row" }, |
|
{ "$ref": "#/$defs/Column" }, |
|
{ "$ref": "#/$defs/List" }, |
|
// 容器类 |
|
{ "$ref": "#/$defs/Card" }, |
|
{ "$ref": "#/$defs/Tabs" }, |
|
{ "$ref": "#/$defs/Modal" }, |
|
{ "$ref": "#/$defs/Divider" }, |
|
// 交互类 |
|
{ "$ref": "#/$defs/Button" }, |
|
{ "$ref": "#/$defs/CheckBox" }, |
|
{ "$ref": "#/$defs/TextField" }, |
|
{ "$ref": "#/$defs/DateTimeInput" }, |
|
{ "$ref": "#/$defs/ChoicePicker" }, |
|
{ "$ref": "#/$defs/Slider" } |
|
] |
|
} |
|
} |
|
} |
3.5 客户端渲染器(Renderer)
A2UI 提供了多种渲染器实现:
// 源码位置:A2UI/renderers/lit/src/0.8/core.ts |
|
export * as Events from "./events/events.js"; |
|
export * as Types from "./types/types.js"; |
|
import { create as createSignalA2uiMessageProcessor } from "./data/signal-model-processor.js"; |
|
import { A2uiMessageProcessor } from "./data/model-processor.js"; |
|
export const Data = { |
|
createSignalA2uiMessageProcessor, // 响应式数据处理 |
|
A2uiMessageProcessor, // 消息处理器 |
|
Guards, |
|
}; |
渲染流程:
- 解析消息:将 JSONL 解析为消息对象
- 构建组件树:根据邻接表重建树结构
- 数据绑定:将 dataModel 注入组件
- 原生渲染:调用平台原生组件库
📊 数据流
📱 输出
⚙️ 处理流程
📥 输入
/path/to/data
JSONL Stream
1️⃣ 解析消息
2️⃣ 构建组件树
3️⃣ 数据绑定
4️⃣ 原生渲染
原生 UI 组件
DataModel
3.6 用户交互:Action 回传
当用户点击按钮等交互时,客户端发送 userAction 消息:
// 源码位置:A2UI/specification/0.9/json/client_to_server.json |
|
{ |
|
"userAction": { |
|
"name": "book_restaurant", // action 名称 |
|
"surfaceId": "restaurant-list", |
|
"sourceComponentId": "book-btn", |
|
"timestamp": "2024-01-07T10:30:00Z", |
|
"context": { // 上下文数据 |
|
"restaurantId": "rest_001", |
|
"restaurantName": "川办餐厅" |
|
} |
|
} |
|
} |
3.7 对接方式
3.7.1 服务端对接(Python 示例)
# Demo 项目:demo-agent-ui-protocols/agents/a2ui-agent/server.py |
|
class A2UIGenerator: |
|
@staticmethod |
|
def surface_update(surface_id: str, components: list) -> dict: |
|
return {"surfaceUpdate": {"surfaceId": surface_id, "components": components}} |
|
@staticmethod |
|
def data_model_update(surface_id: str, path: str, value: any) -> dict: |
|
return { |
|
"updateDataModel": { |
|
"surfaceId": surface_id, |
|
"path": path, |
|
"op": "replace", |
|
"value": value |
|
} |
|
} |
|
async def generate_ui(restaurants: list): |
|
# 1. 创建 Surface |
|
yield json.dumps({"createSurface": {"surfaceId": "main", "catalogId": "standard"}}) |
|
# 2. 发送组件结构 |
|
components = create_restaurant_list_components() |
|
yield json.dumps(A2UIGenerator.surface_update("main", components)) |
|
# 3. 发送数据 |
|
for i, restaurant in enumerate(restaurants): |
|
yield json.dumps(A2UIGenerator.data_model_update( |
|
"main", |
|
f"/restaurants/{i}", |
|
restaurant |
|
)) |
3.7.2 前端对接(React 示例)
// Demo 项目:demo-agent-ui-protocols/apps/web/src/app/a2ui-demo/A2UIRenderer.tsx |
|
const A2UIRenderer = ({ messages }: { messages: A2UIMessage[] }) => { |
|
const [components, setComponents] = useState<Map<string, ComponentDef>>(); |
|
const [dataModel, setDataModel] = useState<Record<string, any>>({}); |
|
useEffect(() => { |
|
for (const msg of messages) { |
|
if (msg.updateComponents) { |
|
// 更新组件 Map |
|
msg.updateComponents.components.forEach(comp => { |
|
setComponents(prev => new Map(prev).set(comp.id, comp)); |
|
}); |
|
} |
|
if (msg.updateDataModel) { |
|
// 更新数据模型 |
|
setDataModel(prev => ({ |
|
...prev, |
|
[msg.updateDataModel.path]: msg.updateDataModel.value |
|
})); |
|
} |
|
} |
|
}, [messages]); |
|
// 递归渲染组件树 |
|
const renderComponent = (id: string) => { |
|
const comp = components.get(id); |
|
if (!comp) return null; |
|
// 根据组件类型映射到 React 组件 |
|
switch (Object.keys(comp.component)[0]) { |
|
case 'Text': |
|
const textValue = resolveValue(comp.component.Text.text, dataModel); |
|
return <span key={id}>{textValue}</span>; |
|
case 'Column': |
|
return ( |
|
<div key={id} className="flex flex-col"> |
|
{comp.component.Column.children.explicitList.map(renderComponent)} |
|
</div> |
|
); |
|
// ... 其他组件 |
|
} |
|
}; |
|
return renderComponent('root'); |
|
}; |
4. MCP-UI:MCP 协议的可视化扩展层
4.1 设计哲学
MCP-UI 是社区基于 Anthropic 的 Model Context Protocol (MCP) 开发的 UI 扩展。其核心理念是:
"让工具调用结果具备可视化能力"
与 AG-UI、A2UI 不同,MCP-UI 不试图定义新的协议,而是复用现有的 MCP 协议,在工具返回值中添加 UIResource 字段。
4.1.1 与 MCP 的关系
MCP 协议: |
|
- Tool Definition(工具定义) |
|
- Tool Call(工具调用) |
|
- Tool Result(工具结果) ← MCP-UI 在这里扩展 |
MCP-UI 的创新在于:工具不仅可以返回文本/JSON 数据,还可以返回可交互的 UI 片段。
4.2 核心机制:UIResource
4.2.1 UIResource 数据结构
// 源码位置:mcp-ui/sdks/typescript/server/src/types.ts |
|
interface UIResource { |
|
type: 'resource'; |
|
resource: { |
|
uri: string; // 唯一标识,如 ui://component/booking-form |
|
mimeType: MimeType; // 内容类型 |
|
text?: string; // 内联内容 |
|
blob?: string; // Base64 编码内容 |
|
_meta?: Record<string, unknown>; |
|
}; |
|
} |
|
type MimeType = |
|
| 'text/html' // 内联 HTML |
|
| 'text/uri-list' // 外部 URL |
|
| 'application/vnd.mcp-ui.remote-dom+javascript; framework=react' |
|
| 'application/vnd.mcp-ui.remote-dom+javascript; framework=webcomponents'; |
4.2.2 三种渲染模式
MCP-UI 支持三种不同的 UI 资源类型:
1. Raw HTML(内联 HTML)
{ |
|
uri: "ui://restaurant/card", |
|
mimeType: "text/html", |
|
text: ` |
|
<div class="restaurant-card"> |
|
<h2>川办餐厅</h2> |
|
<button onclick="window.parent.postMessage({type:'tool',payload:{toolName:'book'}},'*')"> |
|
预订 |
|
</button> |
|
</div> |
|
` |
|
} |
2. External URL(外部页面)
{ |
|
uri: "ui://restaurant/detail", |
|
mimeType: "text/uri-list", |
|
text: "https://restaurant.example.com/embed/123" |
|
} |
3. Remote DOM(远程 DOM)
这是 MCP-UI 最强大的模式,基于 Shopify 的 remote-dom 技术:
{ |
|
uri: "ui://restaurant/form", |
|
mimeType: "application/vnd.mcp-ui.remote-dom+javascript; framework=react", |
|
text: ` |
|
// 这段 JS 在沙箱中执行,通过 JSON 消息与宿主通信 |
|
const form = document.createElement('ui-form'); |
|
form.addEventListener('submit', (e) => { |
|
window.postMessage({ type: 'tool', payload: { toolName: 'submit_booking', params: e.detail } }); |
|
}); |
|
document.body.appendChild(form); |
|
` |
|
} |
🖥️ Remote DOM
🌐 External URL
📄 Raw HTML
🔧 MCP Server
text/html
text/uri-list
remote-dom
JSON Patch
Tool Result
UIResource
mimeType?
iframe srcDoc
🔒 沙箱渲染
iframe src
🔒 外部页面
JS Script
🔒 沙箱执行
🏠 宿主渲染
📤 postMessage
📱 客户端处理
4.3 客户端渲染器
4.3.1 UIResourceRenderer 组件
// 源码位置:mcp-ui/sdks/typescript/client/src/components/UIResourceRenderer.tsx |
|
export const UIResourceRenderer = (props: UIResourceRendererProps) => { |
|
const { resource, onUIAction, supportedContentTypes } = props; |
|
const contentType = getContentType(resource); |
|
switch (contentType) { |
|
case 'rawHtml': |
|
case 'externalUrl': |
|
// 使用 iframe 沙箱渲染 |
|
return <HTMLResourceRenderer resource={resource} onUIAction={onUIAction} />; |
|
case 'remoteDom': |
|
// 使用 Remote DOM 渲染(更安全、更灵活) |
|
return <RemoteDOMResourceRenderer resource={resource} onUIAction={onUIAction} />; |
|
default: |
|
return <p>Unsupported resource type.</p>; |
|
} |
|
}; |
4.3.2 Remote DOM 渲染器
Remote DOM 模式下,UI 逻辑在 iframe 沙箱中执行,但 DOM 变化通过 JSON 消息同步到宿主:
// 源码位置:mcp-ui/sdks/typescript/client/src/components/RemoteDOMResourceRenderer.tsx |
|
const RemoteDOMResourceRenderer: React.FC<RemoteDOMResourceProps> = ({ |
|
resource, library, onUIAction |
|
}) => { |
|
const iframeRef = useRef<HTMLIFrameElement>(null); |
|
// 1. 创建 Remote Receiver(接收 DOM 变化) |
|
const { receiver, components } = useMemo(() => { |
|
const reactReceiver = new RemoteReceiver(); |
|
// 将组件库映射为 Remote Components |
|
// ... |
|
return { receiver: reactReceiver, components: componentMap }; |
|
}, [library]); |
|
// 2. 监听 iframe 消息(UI Action) |
|
useEffect(() => { |
|
const handleMessage = (event: MessageEvent) => { |
|
if (event.source === iframeRef.current?.contentWindow) { |
|
onUIAction?.(event.data as UIActionResult); |
|
} |
|
}; |
|
window.addEventListener('message', handleMessage); |
|
return () => window.removeEventListener('message', handleMessage); |
|
}, [onUIAction]); |
|
// 3. iframe 加载后注入代码 |
|
const handleIframeLoad = () => { |
|
const thread = new ThreadIframe<SandboxAPI>(iframeRef.current); |
|
thread.imports.render({ code: resource.text, ... }, receiver.connection); |
|
}; |
|
return ( |
|
<> |
|
<iframe ref={iframeRef} srcDoc={IFRAME_SRC_DOC} onLoad={handleIframeLoad} /> |
|
{/* Remote DOM 渲染结果 */} |
|
<RemoteRootRenderer receiver={receiver} components={components} /> |
|
</> |
|
); |
|
}; |
4.4 UI Action 系统
MCP-UI 定义了五种 UI 交互类型:
// 源码位置:mcp-ui/sdks/typescript/client/src/types.ts |
|
export type UIActionResult = |
|
| { type: 'tool', payload: { toolName: string, params: Record<string, unknown> } } |
|
| { type: 'prompt', payload: { prompt: string } } |
|
| { type: 'link', payload: { url: string } } |
|
| { type: 'intent', payload: { intent: string, params: Record<string, unknown> } } |
|
| { type: 'notify', payload: { message: string } }; |
使用场景:
tool:触发工具调用(如"预订"按钮)prompt:发送新的用户消息link:打开外部链接intent:触发应用内意图notify:显示通知消息
4.5 对接方式
4.5.1 服务端对接(Python 示例)
# Demo 项目:demo-agent-ui-protocols/agents/mcp-ui-agent/server.py |
|
def create_restaurant_card_ui(restaurants: list) -> dict: |
|
html = f""" |
|
<div class="restaurant-list"> |
|
{''.join([f''' |
|
<div class="restaurant-card" data-id="{r['id']}"> |
|
<img src="{r['image']}" /> |
|
<h3>{r['name']}</h3> |
|
<p>评分: {r['rating']} | 价格: {r['price']}</p> |
|
<button onclick="window.parent.postMessage({{ |
|
type: 'tool', |
|
payload: {{ |
|
toolName: 'show_booking_form', |
|
params: {{ restaurant_name: '{r['name']}' }} |
|
}} |
|
}}, '*')">预订</button> |
|
</div> |
|
''' for r in restaurants])} |
|
</div> |
|
""" |
|
return { |
|
"type": "ui_resource", |
|
"resource": { |
|
"uri": "ui://restaurant/list", |
|
"mimeType": "text/html", |
|
"text": html |
|
} |
|
} |
|
@app.post("/run") |
|
async def run(request: RunRequest): |
|
if request.tool_call: |
|
# 直接执行工具调用 |
|
result = execute_tool(request.tool_call.name, request.tool_call.params) |
|
return result |
|
else: |
|
# 让 LLM 决定调用哪个工具 |
|
response = await call_llm_with_tools(request.messages) |
|
return response |
4.5.2 前端对接(React 示例)
// Demo 项目:demo-agent-ui-protocols/apps/web/src/app/mcp-ui-demo/page.tsx |
|
const MCPUIDemo = () => { |
|
const [currentUI, setCurrentUI] = useState<UIResource | null>(null); |
|
// 处理来自 UI 的 Action |
|
useEffect(() => { |
|
const handleMessage = async (event: MessageEvent) => { |
|
const { type, payload } = event.data; |
|
if (type === 'tool') { |
|
// 调用后端工具 |
|
const response = await fetch('http://localhost:8003/run', { |
|
method: 'POST', |
|
body: JSON.stringify({ tool_call: payload }), |
|
}); |
|
const result = await response.json(); |
|
if (result.type === 'ui_resource') { |
|
setCurrentUI(result.resource); |
|
} |
|
} |
|
}; |
|
window.addEventListener('message', handleMessage); |
|
return () => window.removeEventListener('message', handleMessage); |
|
}, []); |
|
return ( |
|
<div> |
|
{currentUI && ( |
|
<UIResourceRenderer |
|
resource={currentUI.resource} |
|
onUIAction={handleToolCallback} |
|
/> |
|
)} |
|
</div> |
|
); |
|
}; |
5. 协议组合:AG-UI + A2UI 的协同架构
5.1 为什么要组合使用?
三种协议并非互斥关系,它们可以协同工作,发挥各自优势。特别是 AG-UI + A2UI 的组合,在 A2UI 官方文档中被明确提及:
"AG UI translates from A2UI messages to AG UI messages, and handles transport and state sync automatically."
5.2 AG-UI 作为 A2UI 的传输层
在这种架构下:
- A2UI 负责:UI 结构定义、组件规范、数据模型
- AG-UI 负责:消息传输、状态同步、事件路由
🤖 Agent
📡 Transport
🖥️ Frontend
SSE Events
AG-UI Client\n(Events)
A2UI Messages\n(JSON)
A2UI Renderer\n(Components)
AG-UI Server\n(SSE Stream)
A2UI Generator\n(JSONL)
LLM / Tools
5.3 实现方式:将 A2UI 消息包装为 AG-UI 事件
// 伪代码:AG-UI + A2UI 集成 |
|
// 1. Agent 生成 A2UI 消息 |
|
const a2uiMessages = generateA2UIComponents(restaurants); |
|
// 2. 包装为 AG-UI 的 CUSTOM 或 ACTIVITY_SNAPSHOT 事件 |
|
for (const msg of a2uiMessages) { |
|
yield { |
|
type: EventType.ACTIVITY_SNAPSHOT, |
|
messageId: `a2ui-${Date.now()}`, |
|
activityType: "a2ui", // 标记为 A2UI 消息 |
|
content: msg, // A2UI 原始消息 |
|
}; |
|
} |
|
// 3. 前端根据 activityType 路由到 A2UI 渲染器 |
|
agent.subscribe({ |
|
onActivitySnapshot: (event) => { |
|
if (event.activityType === "a2ui") { |
|
a2uiRenderer.processMessage(event.content); |
|
} |
|
} |
|
}); |
5.4 AG-UI + MCP-UI 的组合
AG-UI 官方提供了 @ag-ui/mcp-apps-middleware,可以将 MCP-UI 的 UI 资源集成到 AG-UI 事件流中:
// 源码位置:ag-ui/middlewares/mcp-apps-middleware/README.md |
|
import { MCPAppsMiddleware } from "@ag-ui/mcp-apps-middleware"; |
|
const agent = new YourAgent().use( |
|
new MCPAppsMiddleware({ |
|
mcpServers: [ |
|
{ type: "http", url: "http://localhost:3001/mcp" } |
|
], |
|
}) |
|
); |
|
// 中间件自动: |
|
// 1. 发现 MCP Server 的 UI-enabled Tools |
|
// 2. 将工具注入 Agent 的工具列表 |
|
// 3. 执行工具调用并获取 UIResource |
|
// 4. 发射 ACTIVITY_SNAPSHOT 事件(activityType: "mcp-apps") |
5.5 三协议融合架构
在复杂场景下,三种协议可以同时使用:
🖥️ Frontend
SSE Events
🤖 Agent
AG-UI Server + Middlewares
LLM Adapter
🧠 LLM\n(OpenAI)
A2A Middleware
🤝 A2A Agents\n(Sub-agents)
MCP-Apps Middleware
🔌 MCP Servers\n(Tools+UI)
AG-UI Event Router
📝 Text/Tool\nRenderer
📱 A2UI Renderer\n(a2ui type)
🔧 MCP-UI Renderer\n(mcp-apps type)
Server
各协议职责:
- AG-UI:作为"总线",负责事件路由和状态同步
- A2UI:负责复杂的、跨平台的声明式 UI
- MCP-UI:负责工具级别的快速 UI 扩展
6. 技术选型决策框架
6.1 维度对比表
| 维度 | AG-UI | A2UI | MCP-UI |
|---|---|---|---|
| 核心理念 | 事件驱动的状态同步 | 声明式 UI 组件规范 | MCP 工具的 UI 扩展 |
| UI 控制权 | 前端主导 | 后端主导(结构) | 后端主导(内容) |
| 安全模型 | 依赖前端实现 | 最高(白名单组件) | 中等(iframe 沙箱) |
| 跨平台能力 | 弱(需各端适配) | 最强(抽象组件) | 中等(Web 优先) |
| 实时性 | 最强(流式事件) | 中等(JSONL 流) | 弱(Request-Response) |
| 开发复杂度 | 前端复杂 | 架构复杂 | 最简单 |
| 生态兼容性 | CopilotKit 生态 | Google 生态 | MCP 生态 |
6.2 场景-协议匹配指南
场景 A:企业级 Copilot 系统
需求特征:
- 需要与现有复杂业务系统深度集成
- Agent 需要操作现有 UI 状态(如高亮表格行、填写表单)
- 需要实时展示 Agent 思考过程
推荐方案:AG-UI 为主
// AG-UI 可以驱动现有 UI 状态 |
|
agent.subscribe({ |
|
onStateDelta: (event) => { |
|
// 增量更新应用状态 |
|
applyJsonPatch(appState, event.delta); |
|
}, |
|
onToolCallStart: (event) => { |
|
// 高亮相关 UI 区域 |
|
highlightUIRegion(event.toolCallName); |
|
} |
|
}); |
场景 B:跨平台消费级 App
需求特征:
- 同时支持 Web、iOS、Android
- 对安全性要求极高(防止 XSS、幻觉输出)
- 需要统一的设计语言
推荐方案:A2UI 为主
// A2UI 一次定义,多端渲染 |
|
{ |
|
"updateComponents": { |
|
"components": [ |
|
{"id": "card", "component": {"Card": {...}}} |
|
] |
|
} |
|
} |
|
// Web 端:渲染为 <div class="card"> |
|
// iOS 端:渲染为 SwiftUI Card |
|
// Android 端:渲染为 Compose Card |
场景 C:开发者工具 / IDE 插件
需求特征:
- 需要快速为现有工具添加 UI
- 希望第三方开发者能贡献 UI 插件
- 不需要复杂的跨平台支持
推荐方案:MCP-UI 为主
// MCP Server 返回 UI |
|
server.tool("show_code_diff", () => ({ |
|
type: "ui_resource", |
|
resource: { |
|
uri: "ui://diff/viewer", |
|
mimeType: "text/html", |
|
text: generateDiffHTML(changes) |
|
} |
|
})); |
场景 D:复杂多 Agent 系统
需求特征:
- 多个 Agent 协作
- 既需要实时状态同步,又需要丰富 UI
- 需要调用外部 MCP 工具
推荐方案:AG-UI + A2UI + MCP-UI 组合
const agent = new OrchestrationAgent() |
|
.use(new A2AMiddleware({ agentUrls: [...] })) // 连接子 Agent |
|
.use(new MCPAppsMiddleware({ mcpServers: [...] })) // 连接 MCP 工具 |
|
.use(new A2UIMiddleware({ catalog: 'standard' })); // 支持 A2UI 渲染 |
6.3 决策流程图
💡 组合方案
✅ Yes
❌ No
✅ Yes
❌ No
✅ Yes
❌ No
🚀 开始选型
是否需要
跨平台原生渲染?
📱 A2UI 为主
统一定义,多端原生
是否需要
实时状态同步?
⚡ AG-UI 为主
事件驱动,状态透明
是否复用
MCP 生态?
🔧 MCP-UI 为主
工具即 UI,渐进增强
🎨 自定义方案
根据需求定制
AG-UI + A2UI
事件传输 + 声明式UI
AG-UI + MCP-UI
事件传输 + 工具UI
7. Demo 项目实战解析
7.1 项目结构
demo-agent-ui-protocols 项目通过一个统一的"餐厅搜索"场景,同时演示三种协议:
demo-agent-ui-protocols/ |
|
├── apps/web/ # Next.js 前端 |
|
│ └── src/app/ |
|
│ ├── ag-ui-demo/ # AG-UI 演示页面 |
|
│ ├── a2ui-demo/ # A2UI 演示页面 |
|
│ └── mcp-ui-demo/ # MCP-UI 演示页面 |
|
│ |
|
├── agents/ |
|
│ ├── ag-ui-agent/ # AG-UI Python Agent (port 8001) |
|
│ ├── a2ui-agent/ # A2UI Python Agent (port 8002) |
|
│ └── mcp-ui-agent/ # MCP-UI Python Agent (port 8003) |
|
│ |
|
└── packages/shared/ # 共享类型定义 |
7.2 同一场景的三种实现对比
7.2.1 用户输入
"帮我找一家北京的川菜馆"
7.2.2 AG-UI 实现
[SSE Stream] |
|
event: RUN_STARTED |
|
data: {"runId":"run_001","threadId":"thread_001"} |
|
event: TEXT_MESSAGE_START |
|
data: {"messageId":"msg_001","role":"assistant"} |
|
event: TEXT_MESSAGE_CONTENT |
|
data: {"messageId":"msg_001","delta":"好的,我来帮您"} |
|
event: TEXT_MESSAGE_CONTENT |
|
data: {"messageId":"msg_001","delta":"搜索北京的川菜馆..."} |
|
event: TOOL_CALL_START |
|
data: {"toolCallId":"call_001","toolCallName":"search_restaurants"} |
|
event: TOOL_CALL_ARGS |
|
data: {"toolCallId":"call_001","delta":"{\"cuisine\":\"川菜\",\"location\":\"北京\"}"} |
|
event: TOOL_CALL_RESULT |
|
data: {"toolCallId":"call_001","result":"[{\"name\":\"川办餐厅\",...}]"} |
|
event: TEXT_MESSAGE_CONTENT |
|
data: {"messageId":"msg_001","delta":"为您找到以下餐厅:"} |
|
event: RUN_FINISHED |
|
data: {"runId":"run_001"} |
前端效果:实时展示打字效果 + 工具调用卡片
7.2.3 A2UI 实现
[JSONL Stream] |
|
{"createSurface":{"surfaceId":"results","catalogId":"standard"}} |
|
{"updateComponents":{"surfaceId":"results","components":[ |
|
{"id":"root","component":{"Column":{"children":{"explicitList":["header","list"]}}}}, |
|
{"id":"header","component":{"Text":{"text":{"literalString":"推荐餐厅"},"usageHint":"h1"}}}, |
|
{"id":"list","component":{"List":{"children":{"template":{"dataBinding":"/restaurants","componentId":"card-template"}}}}} |
|
]}} |
|
{"updateDataModel":{"surfaceId":"results","path":"/restaurants","value":[ |
|
{"name":"川办餐厅","rating":4.8,"price":"$$","image":"..."}, |
|
{"name":"眉州东坡","rating":4.5,"price":"$$$","image":"..."} |
|
]}} |
前端效果:原生组件渲染的餐厅卡片列表
7.2.4 MCP-UI 实现
// Request |
|
{ "messages": [{ "role": "user", "content": "帮我找一家北京的川菜馆" }] } |
|
// Response |
|
{ |
|
"role": "assistant", |
|
"content": "好的,这是搜索结果:", |
|
"ui_resource": { |
|
"type": "resource", |
|
"resource": { |
|
"uri": "ui://restaurant/list", |
|
"mimeType": "text/html", |
|
"text": "<div class='restaurant-list'>..." |
|
} |
|
} |
|
} |
前端效果:iframe 内嵌的 HTML 卡片
7.3 运行 Demo
# 1. 克隆项目 |
|
git clone https://github.com/MadLongTom/demo-agent-ui-protocols |
|
cd demo-agent-ui-protocols |
|
# 2. 配置环境变量 |
|
cp .env.example .env |
|
# 编辑 .env 填入 OPENAI_API_KEY 等 |
|
# 3. 安装依赖 |
|
./install.sh |
|
# 4. 启动所有服务 |
|
./run.sh |
|
# 5. 访问 Demo |
|
# AG-UI: http://localhost:3000/ag-ui-demo |
|
# A2UI: http://localhost:3000/a2ui-demo |
|
# MCP-UI: http://localhost:3000/mcp-ui-demo |

欢迎加入 MCP 技术社区!与志同道合者携手前行,一同解锁 MCP 技术的无限可能!
更多推荐

 7
7 0
0- 0


 已为社区贡献1条内容

所有评论(0)