【全网唯一】懒人精灵 iOS版纯本地离线文字识别插件
目的
懒人精灵是一款可以模拟鼠标和键盘操作的自动化工具,目前已经推出iOS版。它可以帮助用户自动完成一些重复的、繁琐的任务,节省大量人工操作的时间。懒人精灵也包含图色功能,识别屏幕上的图像,根据图像的变化自动执行相应的操作。本篇文章主要讲解下更优秀的懒人精灵iOS版TomatoOCR纯本地离线文字识别插件如何使用和集成。
准备工作
1、下载懒人精灵手机助手开发工具:懒人精灵官网,网站中只能下载高级版的编辑器,普通版的编辑器需在官方群中获取。

2、下载iOS版TomatoOCR纯本地离线文字识别插件:点击下载

- 目前插件支持中英文、繁体字、日语、韩语识别;
- 支持小图、区域图和单行文字识别,准确率高达99%;
- 支持多种返回格式,json\文本\数字\自定义;
- 支持增强版二值化;
- 支持懒人的多线程;
- 支持找字返回坐标并点击;
- 超高的稳定性,速度快;
- 不联网、不联网、不联网;
插件集成
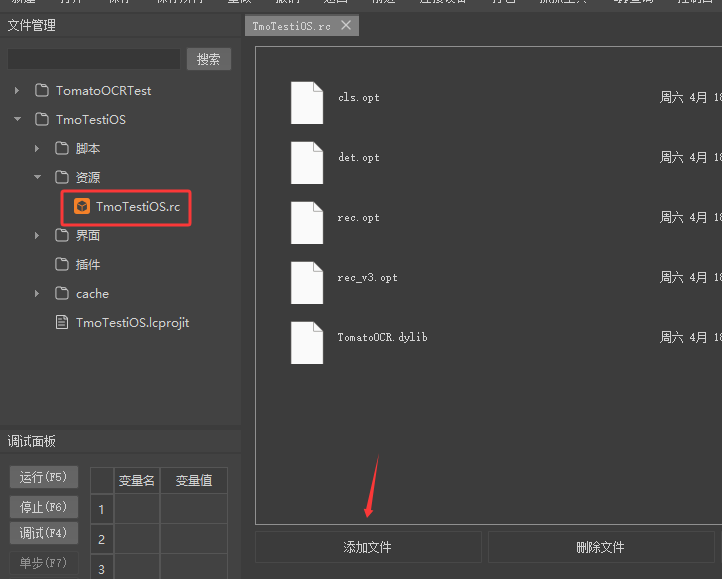
1、打开懒人精灵iOS.exe,新建项目,双击资源.rc文件,添加文字识别插件
2、记事本打开调用说明文件,并拷贝到项目的lua文件中
注意:请换成自己项目里的名字
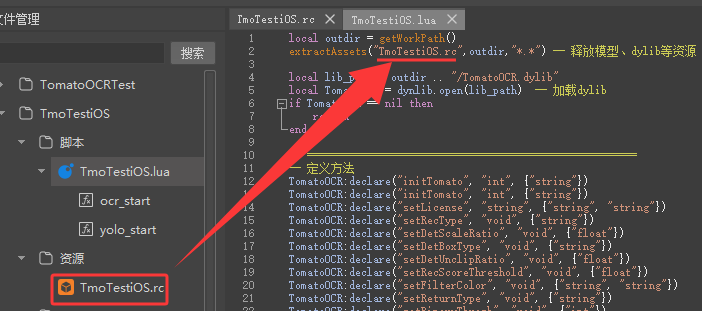
lua示例代码:
-- ********************************************************************************************
-- ********欢迎使用TomatoOCR文字识别插件,https://www.52tomato.com官网可获取最新版本!!!************
-- ********************************************************************************************


local outdir = getWorkPath()
extractAssets("TmoTestiOS.rc", outdir, "*.*") -- 释放模型、dylib等资源

local lib_path = outdir .. "/TomatoOCR.dylib"
local TomatoOCR = dynlib.open(lib_path)  -- 加载dylib
if TomatoOCR != nil then
    print("成功加载TomatoOCR。")
end

-------------------------引入方式-------------------------
-- 定义方法 开始
TomatoOCR:declare("initTomato", "int", {"string"})
TomatoOCR:declare("setLicense", "string", {"string", "string"})
TomatoOCR:declare("setRecType", "void", {"string"})
TomatoOCR:declare("setDetScaleRatio", "void", {"float"})
TomatoOCR:declare("setDetBoxType", "void", {"string"})
TomatoOCR:declare("setDetUnclipRatio", "void", {"float"})
TomatoOCR:declare("setRecScoreThreshold", "void", {"float"})
TomatoOCR:declare("setFilterColor", "void", {"string", "string"})
TomatoOCR:declare("setReturnType", "void", {"string"})
TomatoOCR:declare("setBinaryThresh", "void", {"int"})
TomatoOCR:declare("setRunMode", "void", {"string"})
TomatoOCR:declare("ocrFile", "string", {"string", "int"})
TomatoOCR:declare("findTapPoint", "string", {"string"})
TomatoOCR:declare("findTapPoints", "string", {"string"})
TomatoOCR:declare("release", "void", {})

-- 定义方法 结束


--- 初始化
TomatoOCR:call("initTomato", outdir)
local license = ""
local remark = "测试"
local flag = TomatoOCR:call("setLicense", license, remark)
print("授权结果: ", flag)

----------------------注:以上代码全局只需写一次-------------------------------

-- 开始调用吧
function ocr_start(x1, y1, x2, y2, zi)
    -- 注:ch、ch-2.0、ch-3.0版可切换使用,对部分场景可适当调整
    -- "ch":普通中英文识别,1.0版模型
    -- "ch-2.0":普通中英文识别,2.0版模型
    -- "ch-3.0":普通中英文识别,3.0版模型
    -- "number":数字识别
    -- "cht":繁体,"japan":日语,"korean":韩语
    TomatoOCR:call("setRecType", "ch-3.0")

    TomatoOCR:call("setDetBoxType", "rect")     -- 调整检测模型检测文本参数- 默认"rect": 由于手机上截图文本均为矩形文本,从该版本之后均改为rect,"quad":可准确检测倾斜文本
    TomatoOCR:call("setDetScaleRatio", 1.0)     -- 设置输入图片缩放大小的参数 - 默认为1.0,值范围0.1-10.0之间
    TomatoOCR:call("setDetUnclipRatio", 1.9)    -- 调整检测模型检测文本参数 - 默认1.9,值范围1.6-2.5之间
    TomatoOCR:call("setRecScoreThreshold", 0.3) -- 识别得分过滤 - 默认0.1,值范围0.1-0.9之间
    TomatoOCR:call("setReturnType", "json")
    -- 返回类型 - 默认"json": 包含得分、坐标和文字;
    -- "text":纯文字;
    -- "num":纯数字;
    -- 自定义输入想要返回的文本:".¥1234567890",仅只返回这些内容

    TomatoOCR:call("setBinaryThresh", 0)        -- 二值化设定,非必须,值范围-255~255
    TomatoOCR:call("setRunMode", "slow")        -- 默认“slow”;“fast”:小图识别上会加速,但准确率会降低,推荐用默认值“slow”
    TomatoOCR:call("setFilterColor", "", "black") -- 设置滤色值和背景色(black\white),滤色值默认是空的,详细使用见方法说明

    local type = 3
    -- type=0 : 只检测
    -- type=1 : 方向分类 + 识别
    -- type=2 : 只识别
    -- type=3 : 检测 + 识别

    -- 只检测文字位置:type=0
    -- 全屏识别: type=3或者不传type
    -- 截取单行文字识别:type=1或者type=2

    local image = QImage.new()
    local filepath = getWorkPath() .. "/test.png"
    local result = ""
    if image ~= nil then
        local snapResult = image:snapShot(x1, y1, x2, y2)
        if snapResult then
            local saveResult = image:save(filepath)
            if saveResult then
                result = TomatoOCR:call("ocrFile", filepath, type)
                print("识别结束: ", result)
            else
                print("图片保存失败,请检查路径和权限")
            end
        else
            print("截图失败")
        end
    else
        print("创建QImage对象失败")
    end

    if result ~= "" then
        -- 以后你可能自己解析 jsonLib.decode(result) 等等

        -- 找字返回坐标
        local point = TomatoOCR:call("findTapPoint", zi)
        print("找到单点: ", point)
        if point ~= "" then
            local json_point = jsonLib.decode(point)
            local center_x = json_point[1] + x1
            local center_y = json_point[2] + y1
            -- return {center_x, center_y}
        end

        -- 找字返回坐标数组
        local points = TomatoOCR:call("findTapPoints", zi)
        print("找到所有点: ", points)
        if points ~= "" then
            local tmp = jsonLib.decode(points)
            for i, data in ipairs(tmp) do
                local words = data.words
                local p = data.point
                local center_x = p[1] + x1
                local center_y = p[2] + y1
                -- 写自己的判断逻辑
            end
        end
    end
end


local result = ocr_start(100, 100, 500, 500, "百度")  -- 范围是:x1, y1, x2, y2; 找这个区域内是否有“百度”这个字
-- 如果找字需要点击
-- if result ~= nil then
--    tap(result[1], result[2])
-- end
3、其中的方法说明如下
| 方法名 | 说明 |
| initTomato | 初始化 |
| setLicense | license获取 |
| setRecType |
设置识别语言,默认ch-3.0: ch、ch-2.0、ch-3.0版可切换使用,对部分场景可适当调整 |
| setDetBoxType |
调整检测模型检测文本参数-,默认"rect": 由于手机上截图文本均为矩形文本,从该版本之后均改为rect,"quad":可准确检测倾斜文本 |
setDetUnclipRatio |
调整检测模型检测文本参数,默认1.9: 值范围1.6-2.5之间,如果文字的检测框太小,可调整改参数,一般往大调整 |
setRecScoreThreshold |
设置识别得分过滤,默认0.1: 值范围0.1-0.9之间 |
setReturnType |
设置返回类型,默认"json",包含得分、坐标和文字; "text":纯文字; "num":纯数字; 自定义输入想要返回的文本:".¥1234567890",仅只返回这些内容 |
setBinaryThresh |
对图片进行二值化处理,非必须,正常情况下可以不用写 |
ocrFile |
两个参数,图片路径和类型,一般类型传3: type=-1 : 检测 + 方向分类 + 识别 type=0 : 只检测 type=1 : 方向分类 + 识别 type=2 : 只识别(单行识别) type=3 : 检测 + 识别 只检测文字位置:type=0 全屏识别: type=3或者不传type 截取单行文字识别:type=1或者type=2 如果识别为不到时,返回的数据为“”字符串 |
findTapPoint |
找字,返回传入字的中心点坐标,方便进行点击,找不到字时,返回[-1,-1] |
| findTapPoints | 找字,找出所有符合这个字的所有区域,返回的是个json |
| release | 释放插件,只需要在停止脚本的时候调用 |
4、识别结果

以上就是所有的运行情况。
完毕
相对来说,在懒人精灵进行插件开发还是比较困难的,需要会原生开发,本地识别全屏会相对较慢,区域识别还是非常快,相比部署在服务器上,还可以减少了很多资源占用情况,更加方便便捷。

欢迎加入 MCP 技术社区!与志同道合者携手前行,一同解锁 MCP 技术的无限可能!
更多推荐
 12
12 0
0- 0


 已为社区贡献2条内容

所有评论(0)