Vue3 项目集成 OnlyOffice 在线编辑 + 自定义插件开发(一)
·
在线编辑 Word 文档是非常常见的需求。经过调研和实践,OnlyOffice 是目前最适合嵌入系统的开源在线文档编辑器,并且支持自定义插件扩展功能(比如插入模板、插入图片、资源库联动等)。
这篇文章把我完整落地的流程整理成工作日记,从环境安装、插件开发到项目集成,复制即可用。
一、核心思路
- 用 Docker 部署 OnlyOffice:避免本地环境冲突,一键启动服务
- Vue3 集成官方编辑器:
document-editor-vue快速嵌入 - 自定义插件开发:通过 iframe 桥接,实现插件与文档交互
- 独立弹窗打开编辑页:不占用主页面路由,体验更接近原生 Office
- 数据通信方案:弹窗跨页面使用
localStorage传递数据
二、环境准备(必看)
1. 安装 Docker(推荐)
OnlyOffice 本地直接安装容易与本机端口、环境冲突,强烈建议使用 Docker。
2. 项目安装依赖
npm install @onlyoffice/document-editor-vue
三、自定义插件开发(核心)
OnlyOffice 插件本质是:一个配置文件 + 一个桥接 html + 你的 Vue 插件页面。
1. 创建插件目录
在项目 public 下新建文件夹(如 onlyoffice),存放插件静态文件。
2. 插件桥接层:index.html
作用:与 OnlyOffice 内核通信,接收 Vue 插件的数据并插入文档(文本 / 图片)。
<!DOCTYPE html>
<html lang="zh-CN">
<head>
  <meta charset="UTF-8" />
  <title>ONLYOFFICE 插件桥接</title>
  <!-- OnlyOffice 插件内核 -->
  <script src="./plugins.js"></script>
  <style>
    body, html {
      margin: 0;
      padding: 0;
      width: 100%;
      height: 100%;
      overflow: hidden;
    }
    iframe {
      border: none;
      width: 100%;
      height: 100%;
    }
  </style>
</head>
<body>
  <!-- 你的 Vue 插件页面(iframe 嵌入) -->
  <iframe id="vue-app" src="http://192.168.2.XX:1819/#/plugin-panel"></iframe>

  <script>
    // 1. 与 OnlyOffice 内核握手成功
    window.Asc.plugin.init = function () {
      console.log('✅ [插件桥接] OnlyOffice 握手成功,权限就绪')
    }

    // 2. 接收 Vue 插件发来的消息,插入文档
    window.addEventListener('message', function (event) {
      if (typeof event.data === 'string') {
        try {
          const data = JSON.parse(event.data)

          // 插入纯文本
          if (data.action === 'insertText') {
            console.log('📝 插入文本:', data.text)
            window.Asc.plugin.executeMethod('PasteText', [data.text])
          }

          // 插入 Base64 / 网络图片
          if (data.action === 'insertImage') {
            console.log('🖼️ 插入图片')
            const imgHtml = `<img src="${data.url}" style="max-width:100%;" />`
            window.Asc.plugin.executeMethod('PasteHtml', [imgHtml])
          }
        } catch (e) {}
      }
    })

    // 3. 插件关闭
    window.Asc.plugin.button = function (id) {
      this.executeCommand('close', '')
    }
  </script>
</body>
</html>
3. 插件配置文件:config.json
必须配置 guid,用于在编辑器中唯一识别插件。
{
  "name": "标书资源库",
  "guid": "asc.{99999999-9999-9999-9999-999999999999}",
  "version": "1.0.0",
  "variations": [
    {
      "description": "标书在线制作资源面板",
      "url": "index.html",
      "icons": ["icon.png"],
      "isViewer": false,
      "EditorsSupport": ["word"],
      "isVisual": true,
      "isModal": false,
      "isInsideMode": true,
      "initDataType": "none",
      "initData": "",
      "buttons": []
    }
  ]
}
四、Vue3 编辑器页面(独立弹窗)
新建页面 docEditor.vue,作为 OnlyOffice 编辑容器。
<template>
  <div id="onlyoffice-editor-container" class="onlyoffice-editor-container">
    <DocumentEditor
      id="docEditor"
      :documentServerUrl="documentServerUrl"
      :config="config"
      :events_onDocumentReady="onDocumentReady"
      :onLoadComponentError="onLoadComponentError"
    />
  </div>
</template>

<script setup lang="ts">
import { ref, onMounted } from 'vue'
import { DocumentEditor } from '@onlyoffice/document-editor-vue'

defineOptions({ name: 'DocEditor' })

// OnlyOffice 服务地址(环境变量配置)
const documentServerUrl = import.meta.env.VITE_ONLYOFFICE_API

// 从 localStorage 获取当前编辑文件数据
const getRowData = () => {
  const dataStr = localStorage.getItem('currentBusinessData')
  return dataStr ? JSON.parse(dataStr) : {}
}
const rowData = getRowData()

// 编辑器核心配置
const config = ref({
  document: {
    fileType: 'docx',
    key: rowData.businessFileId + '' || `temp_${Date.now()}`,
    title: rowData.businessFileName || '未命名文档.docx',
    url: rowData.businessFileUrl || '',
  },
  documentType: 'word',
  editorConfig: {
    mode: 'edit',
    lang: 'zh-CN',
    user: { id: 'uid-1', name: '管理员' },
    // 保存回调接口(后端提供)
    callbackUrl: 'http://192.168.2.81:8382/onlyoffice/callback',
    customization: {
      forcesave: true,
      chat: false,
      spellcheck: false,
      plugins: true // 开启插件
    },
    // 插件配置(关键)
    plugins: {
      autostart: ['asc.{99999999-9999-9999-9999-999999999999}'],
      pluginsData: [
        'http://192.168.2.189:1819/onlyoffice/config.json'
      ]
    }
  }
})

// 文档加载完成
const onDocumentReady = () => {
  console.log('✅ OnlyOffice 文档加载完成')
}

// 加载错误处理
const onLoadComponentError = (errorCode, errorDescription) => {
  console.error('❌ 编辑器加载失败:', errorCode, errorDescription)
}

onMounted(() => {})
</script>

<style scoped lang="scss">
.onlyoffice-editor-container {
  width: 100%;
  height: 100vh;
}
</style>
五、在项目表格中调用打开
{
  render: 'tipButton',
  name: 'info',
  title: '制作标书',
  text: '制作',
  type: 'success',
  icon: 'fa fa-file-word-o',
  click: (row) => {
    // 关键:独立弹窗,用 localStorage 传参
    localStorage.setItem('currentBusinessData', JSON.stringify(row))
    openOfficeWindow()
  }
}

// 打开编辑器弹窗
const openOfficeWindow = () => {
  if (isElectronClient()) {
    window.electronAPI.openOfficeWindow()
  } else {
    window.open(`/#/docEditor`, '_blank') // 新窗口打开
  }
}
六、插件中页面开发声明路由地址
  {
        path: '/plugin-panel',
        name: 'pluginPanel',
        // 注意这里的路径:请确保指向你刚才新建的那个 vue 文件的真实相对路径
        // 如果你把它建在了 src/views/ 下面,路径通常是 /@/views/TenderPluginPanel.vue
        component: () => import('/@/views/business/TenderPluginPanel/index.vue'),
        meta: {
            title: '标书资源插件',
        },
    },
    {
        path: '/docEditor',
        name: 'docEditor',
        component: () => import('/@/views/business/docEditor/index.vue'),
        meta: {
            title: 'onlyoffice编辑器',
        },
    },
七、重要注意事项(避坑指南)
-
独立弹窗必须用 localStorage 传值弹窗属于新页面,无法直接用 props/pinia,必须存在
localStorage。 -
接口权限问题编辑器加载、回调、插件请求都会跨页面 / 跨域,token 必须存在 localStorage,不能仅存在 pinia/vuex。
-
本地无法直接调试插件必须部署到测试环境,或使用内网 IP 访问,否则会报跨域 / 无权限。
-
文件 URL 必须公网可访问OnlyOffice 服务必须能直接下载到文件,不能是本地路径。
-
插件必须使用绝对地址
config.json和index.html都必须是公网 / 内网可访问的绝对地址。
八、最终效果
- 表格行点击【制作标书】
- 新窗口打开 OnlyOffice 编辑器
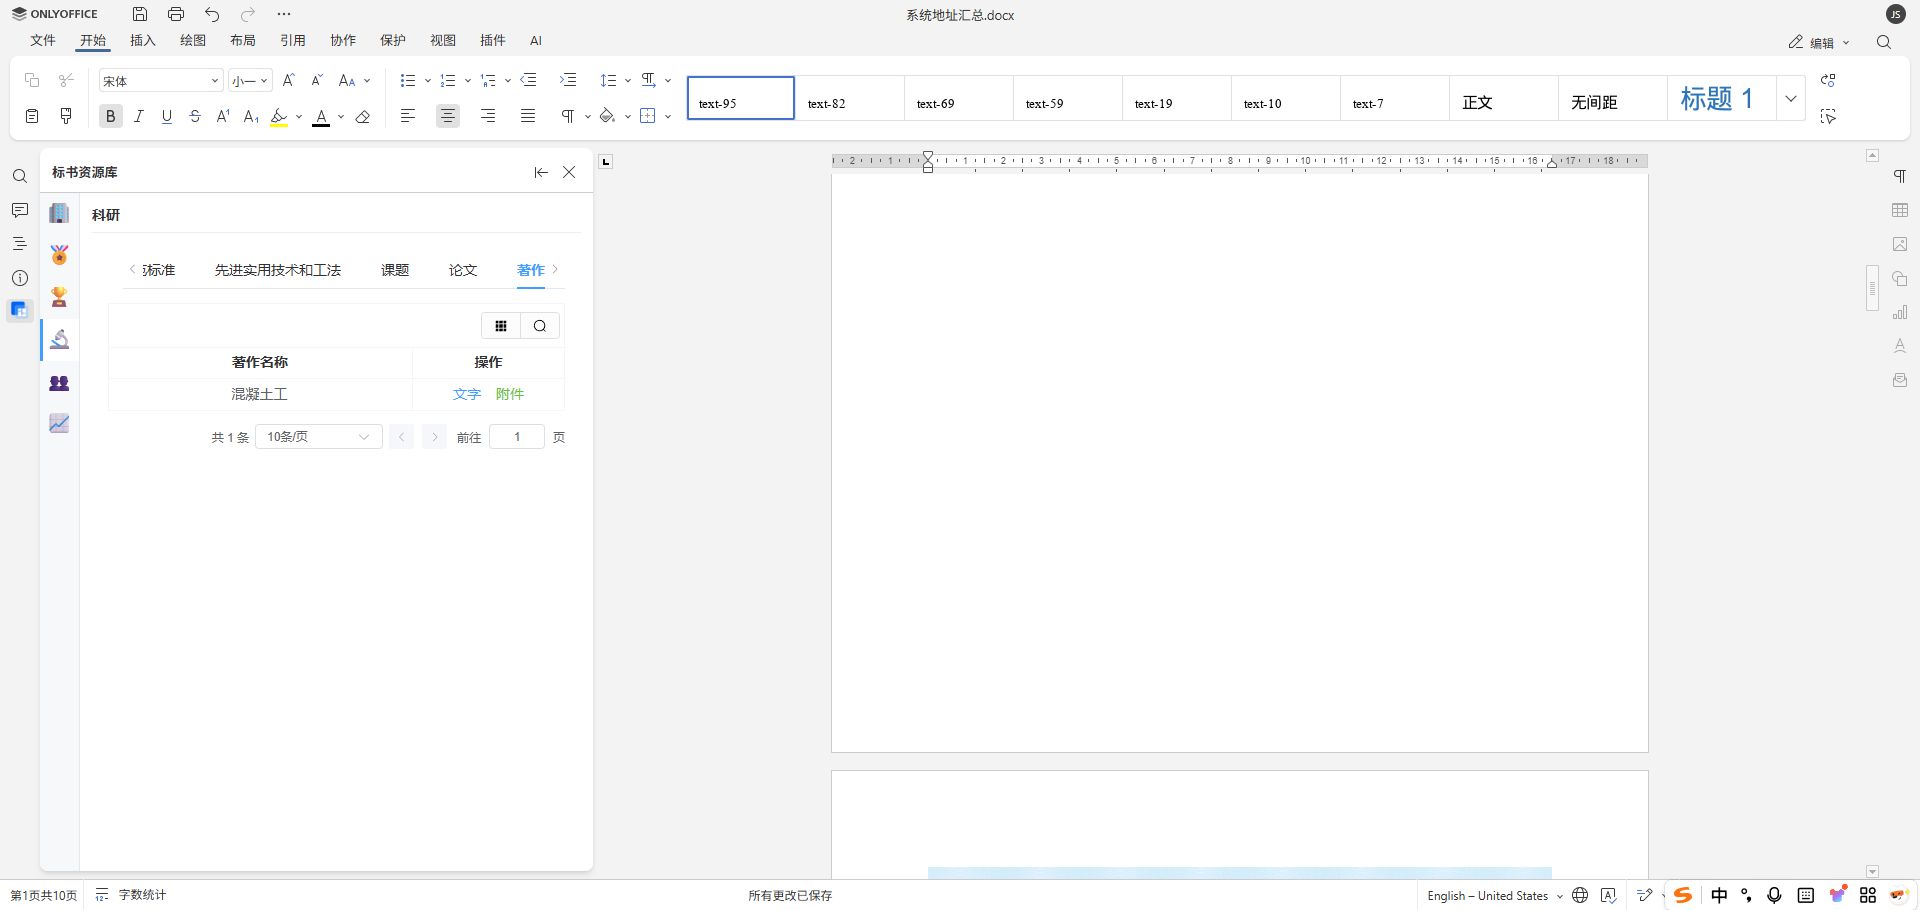
- 侧边自动加载自定义插件(资源库)
- 插件内选择文本 / 图片 → 一键插入文档
- 编辑完成自动保存回调到后端

欢迎加入 MCP 技术社区!与志同道合者携手前行,一同解锁 MCP 技术的无限可能!
更多推荐
 11
11 0
0- 0


 已为社区贡献2条内容

所有评论(0)