【n8n】学习n8n【07】:我的天,更自动化的n8n工作流创建工具【n8n-mcp-server】来了,很惊艳
📚前言
目标
在github上,有可以直接调用生成n8n工作流的mcp工具:n8n-mcp-server,给trae、ChatWise等部署上,直接在对话过程中,就可以把想要的工作流生成到n8n了,这个自动化程度结对比上一篇,用AI智能体自动创建工作流的自动化程度高,上一篇大家可以参考
【n8n】学习n8n【06】:用AI创建n8n工作流-CSDN博客
官方地址

📚开始部署安装测试
1、安装note.js
官网(Node.js — Run JavaScript Everywhere)下载安装很简单,如需参考安装文档,请参考:
【基础】Node.js 介绍、安装及npm 和 npx功能了解-CSDN博客
版本不低于Node.js 20 ,版本查看命令:

2、下载源文件
创建一个空白文件夹,作为安装文件夹,在dos终端打开文件夹,执行下面命令:
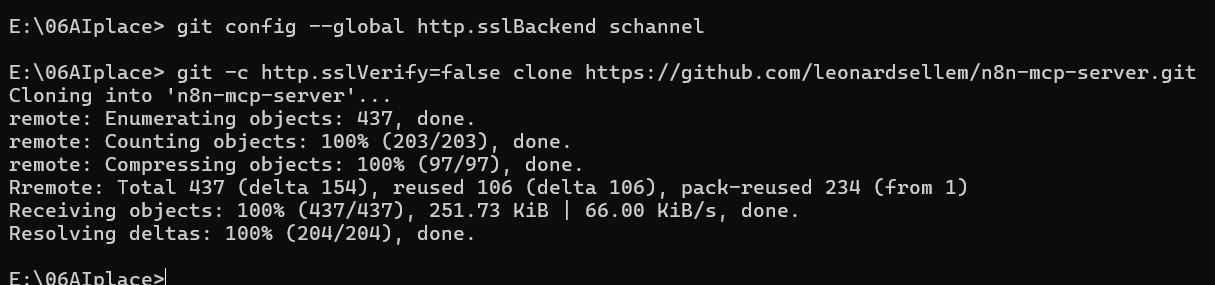
git clone https://github.com/leonardsellem/n8n-mcp-server.git如果你运行这个命令,像我一样,遇到了下面的错误:
fatal: unable to access 'https://github.com/leonardsellem/n8n-mcp-server.git/': SSL certificate problem: unable to get local issuer certificate

解决办法如下:
o resolve the SSL certificate error when cloning the repository, try configuring Git to use the Windows certificate store first:
git config --global http.sslBackend schannelIf that doesn't work, you can temporarily disable SSL verification for this clone operation (not recommended for security-sensitive repositories):
git -c http.sslVerify=false clone https://github.com/leonardsellem/n8n-mcp-server.gitThe first method is preferred as it maintains security by using your system's trusted certificates. After running either command, you should be able to clone the repository successfully.
我就都给他执行了,结果好用:
3、修改配置文件
Mac和Linux系统不需要这一步,Windows系统进行如下修改。
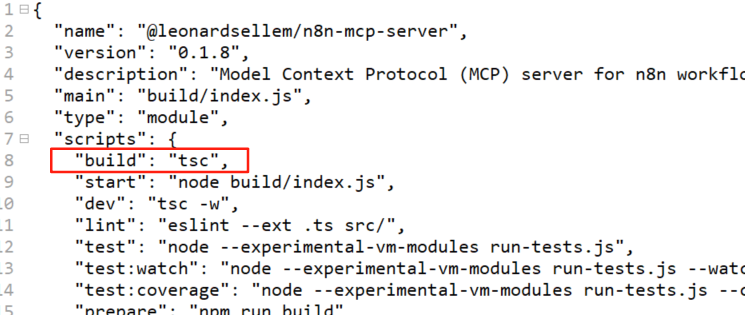
在下载的文件夹n8n-mcp-server,找到package.json,删除第8行,tsc后面的字符串:
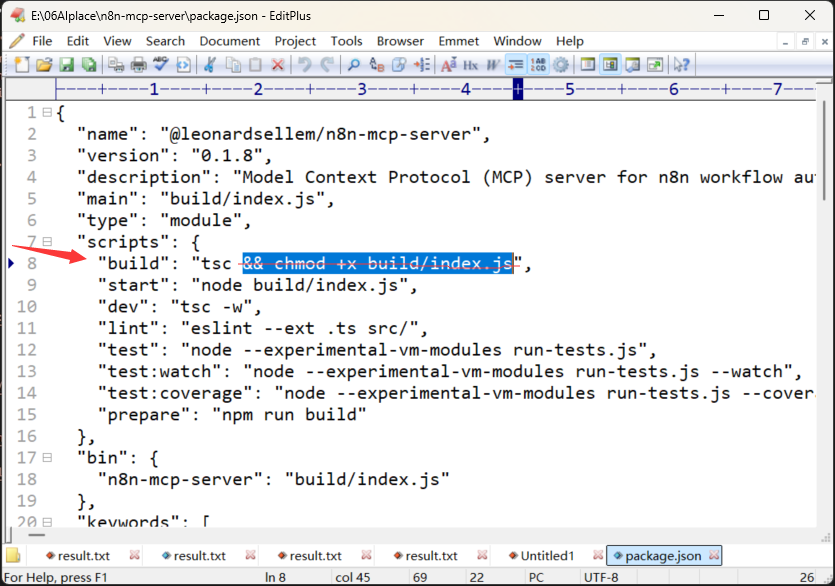
修改的结果:
4、安装
1)执行命令,安装依赖:
cd n8n-mcp-server
# Install dependencies
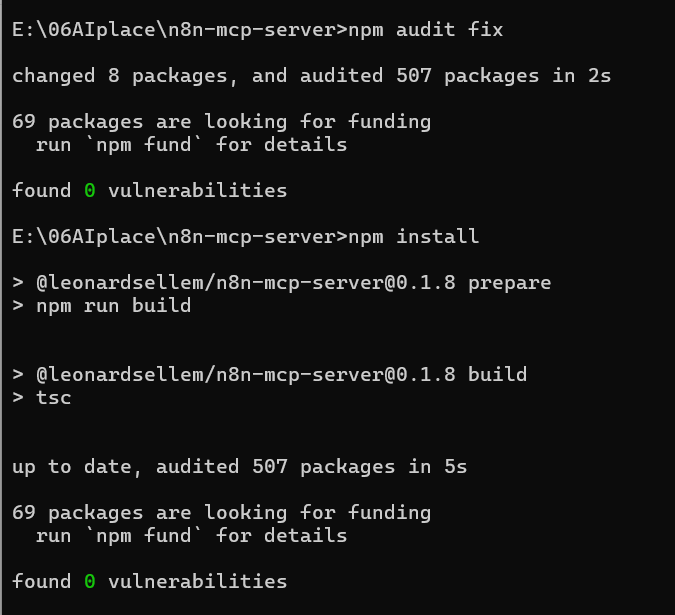
npm install如果你像我一样,执行过程遇到这样的问题:
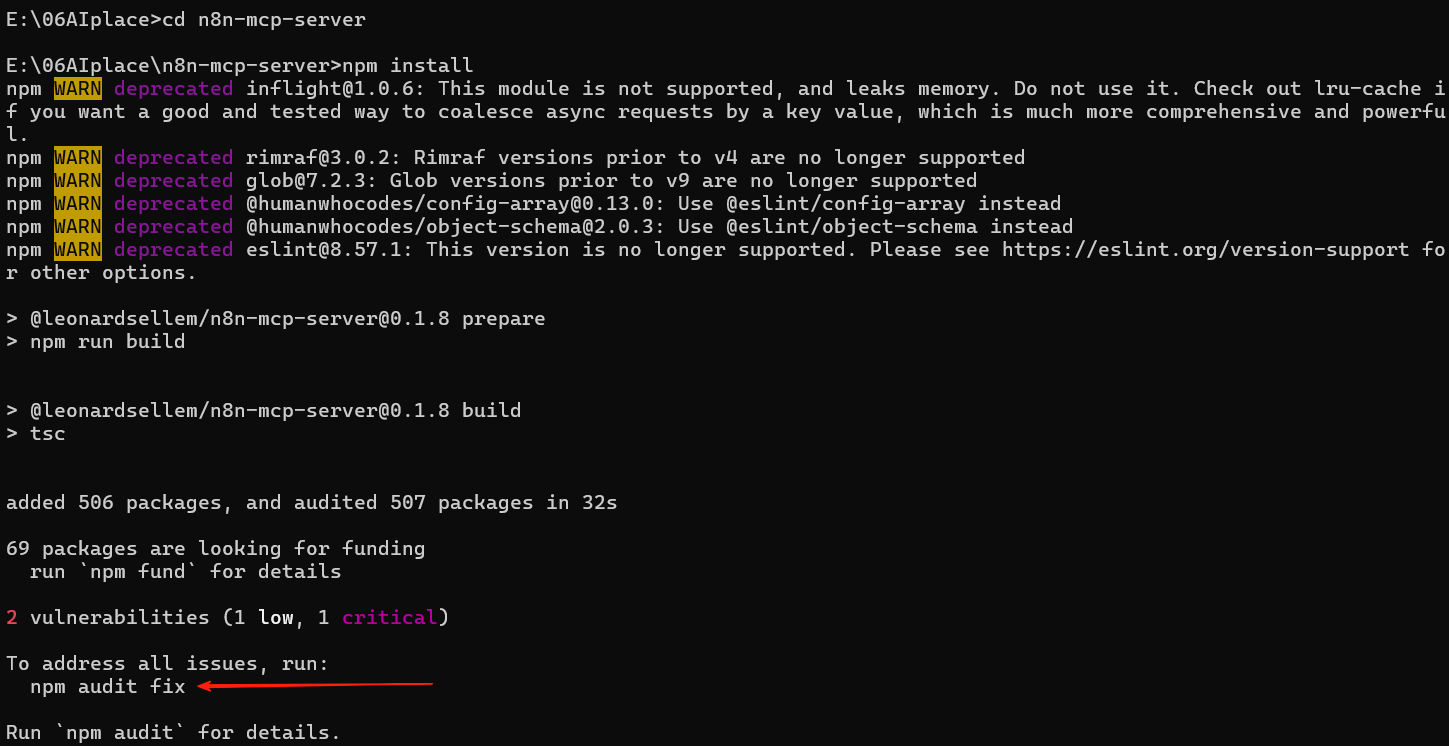
你就像我一样,执行一下给出的命令,在重新运行下安装代码
npm audit fix执行效果:
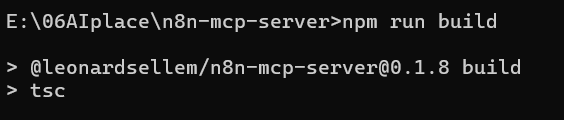
2)然后,执行下面命令构建项目:
# Build the project
npm run build
执行效果:
5、准备MCP配置信息
1)build路径
E:\06AIplace\n8n-mcp-server\build
2)本地n8n地址:
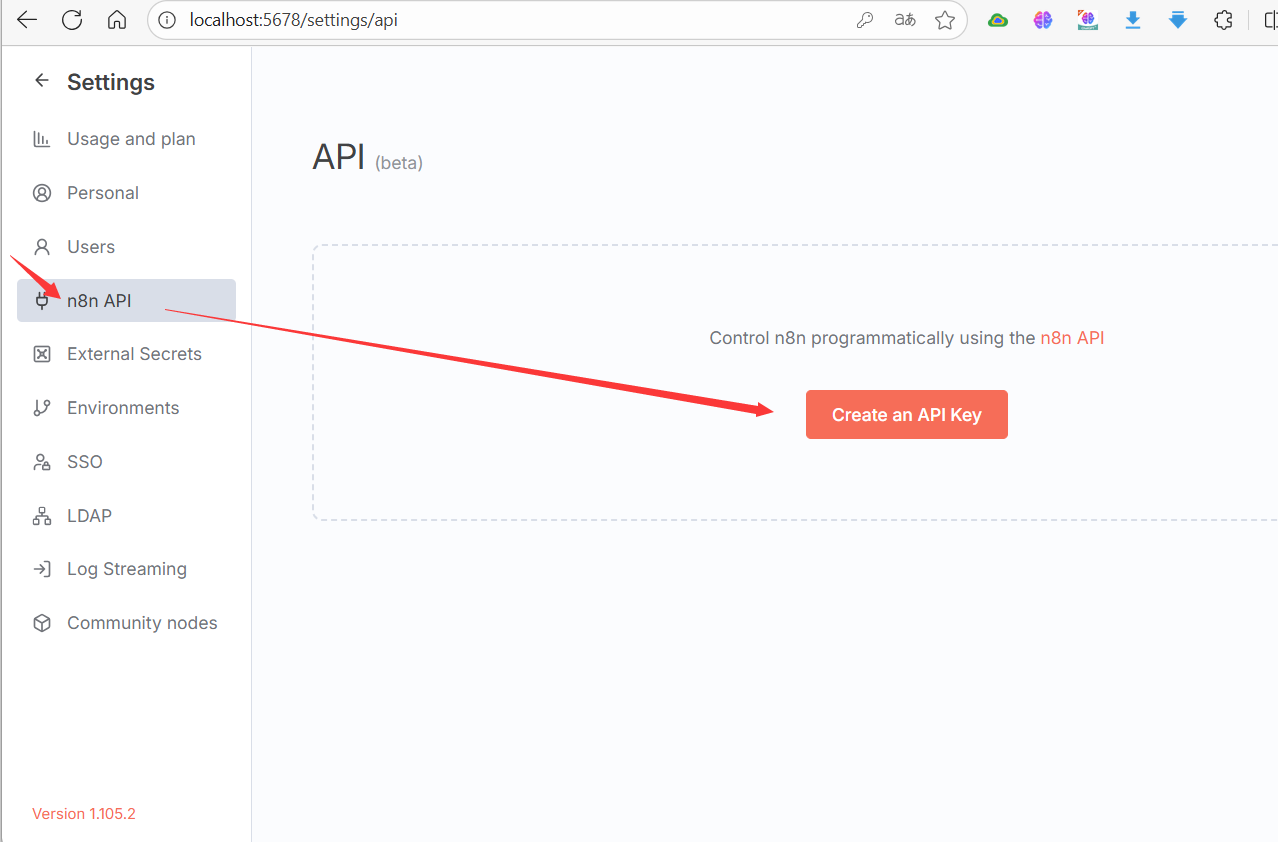
3)n8n的API Key:
在n8n的设置中,创建API Key:
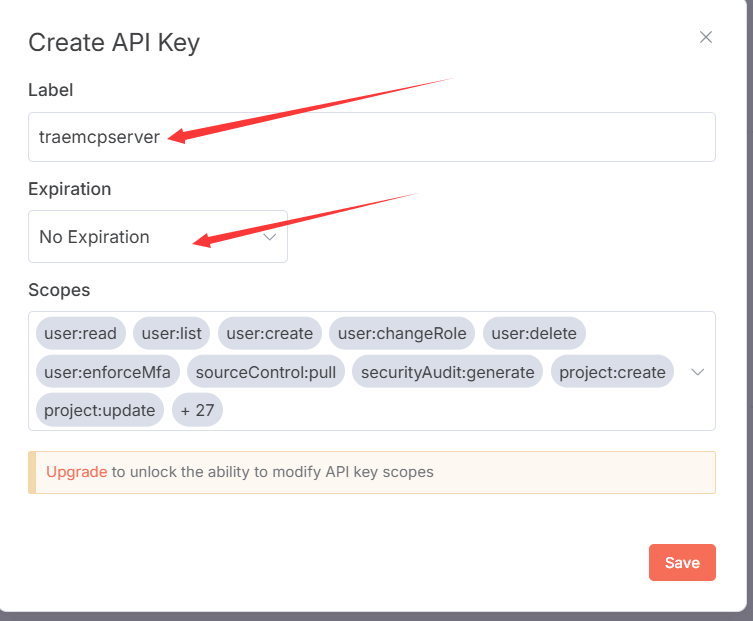
保存后,把生产的key保存下来,备用。
6、配置MCP
1)在Trae中的MCP配置示范
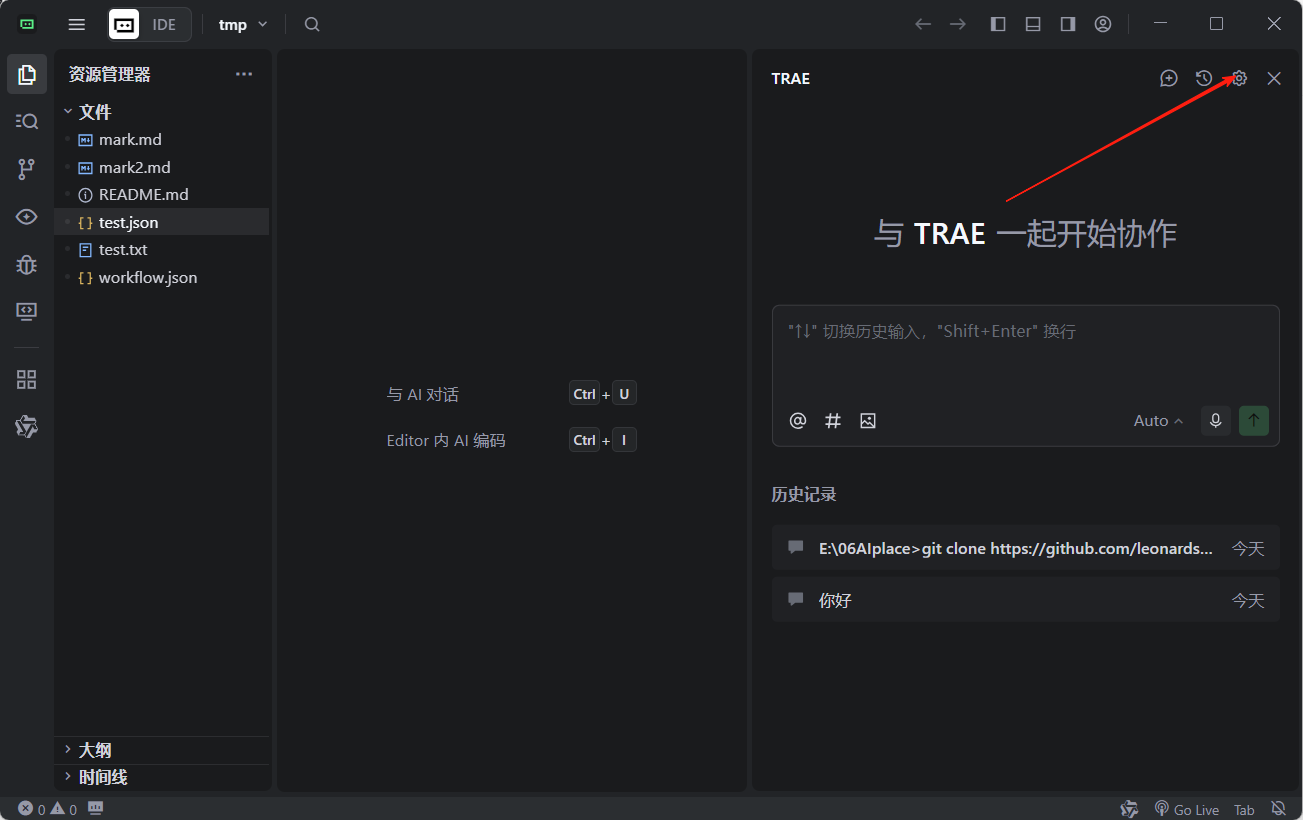
打开Trae,使用ctrl+U,显示AI对话框:

在github上,拷贝配置mcp的代码:
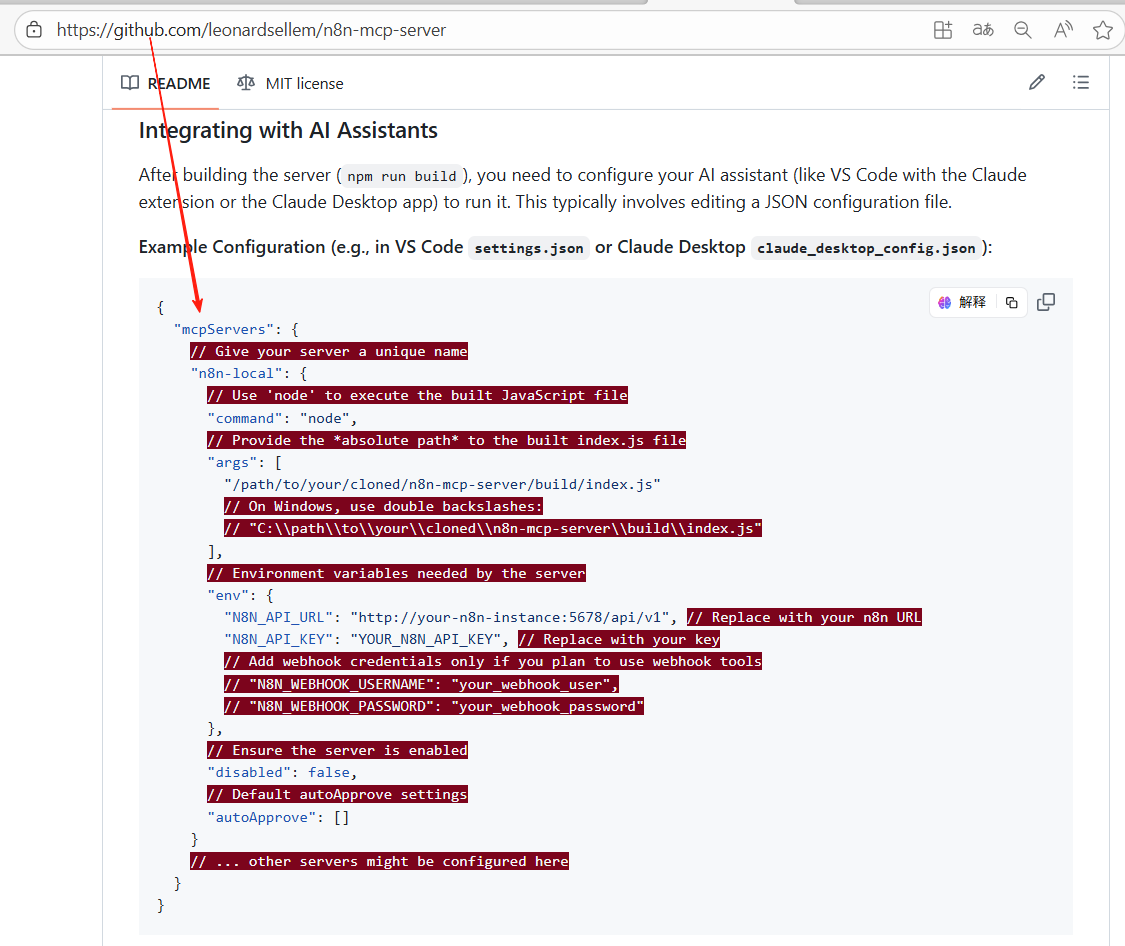
即下面配置信息:
{
  "mcpServers": {
    // Give your server a unique name
    "n8n-local": {
      // Use 'node' to execute the built JavaScript file
      "command": "node",
      // Provide the *absolute path* to the built index.js file
      "args": [
        "/path/to/your/cloned/n8n-mcp-server/build/index.js"
        // On Windows, use double backslashes:
        // "C:\\path\\to\\your\\cloned\\n8n-mcp-server\\build\\index.js"
      ],
      // Environment variables needed by the server
      "env": {
        "N8N_API_URL": "http://your-n8n-instance:5678/api/v1", // Replace with your n8n URL
        "N8N_API_KEY": "YOUR_N8N_API_KEY", // Replace with your key
        // Add webhook credentials only if you plan to use webhook tools
        // "N8N_WEBHOOK_USERNAME": "your_webhook_user",
        // "N8N_WEBHOOK_PASSWORD": "your_webhook_password"
      },
      // Ensure the server is enabled
      "disabled": false,
      // Default autoApprove settings
      "autoApprove": []
    }
    // ... other servers might be configured here
  }
}
填入MCP的配置里,然后确认就可以:
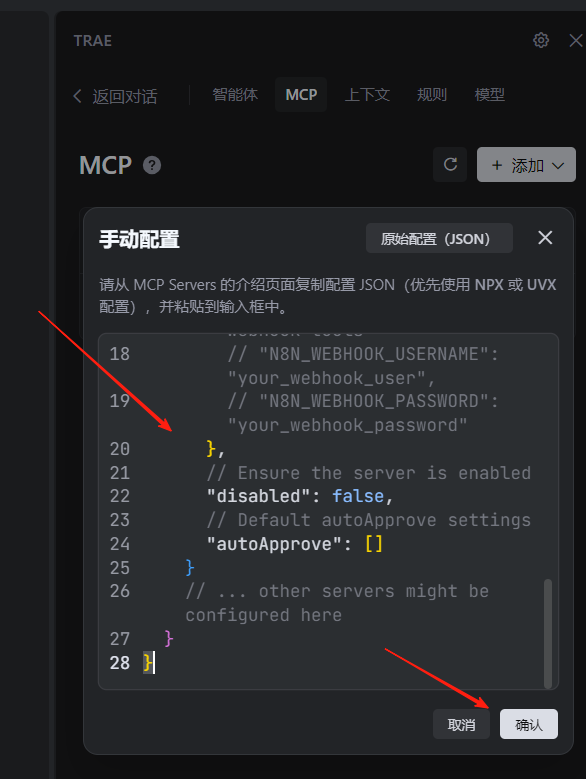
配置信息有错误,我们打开修改一下:
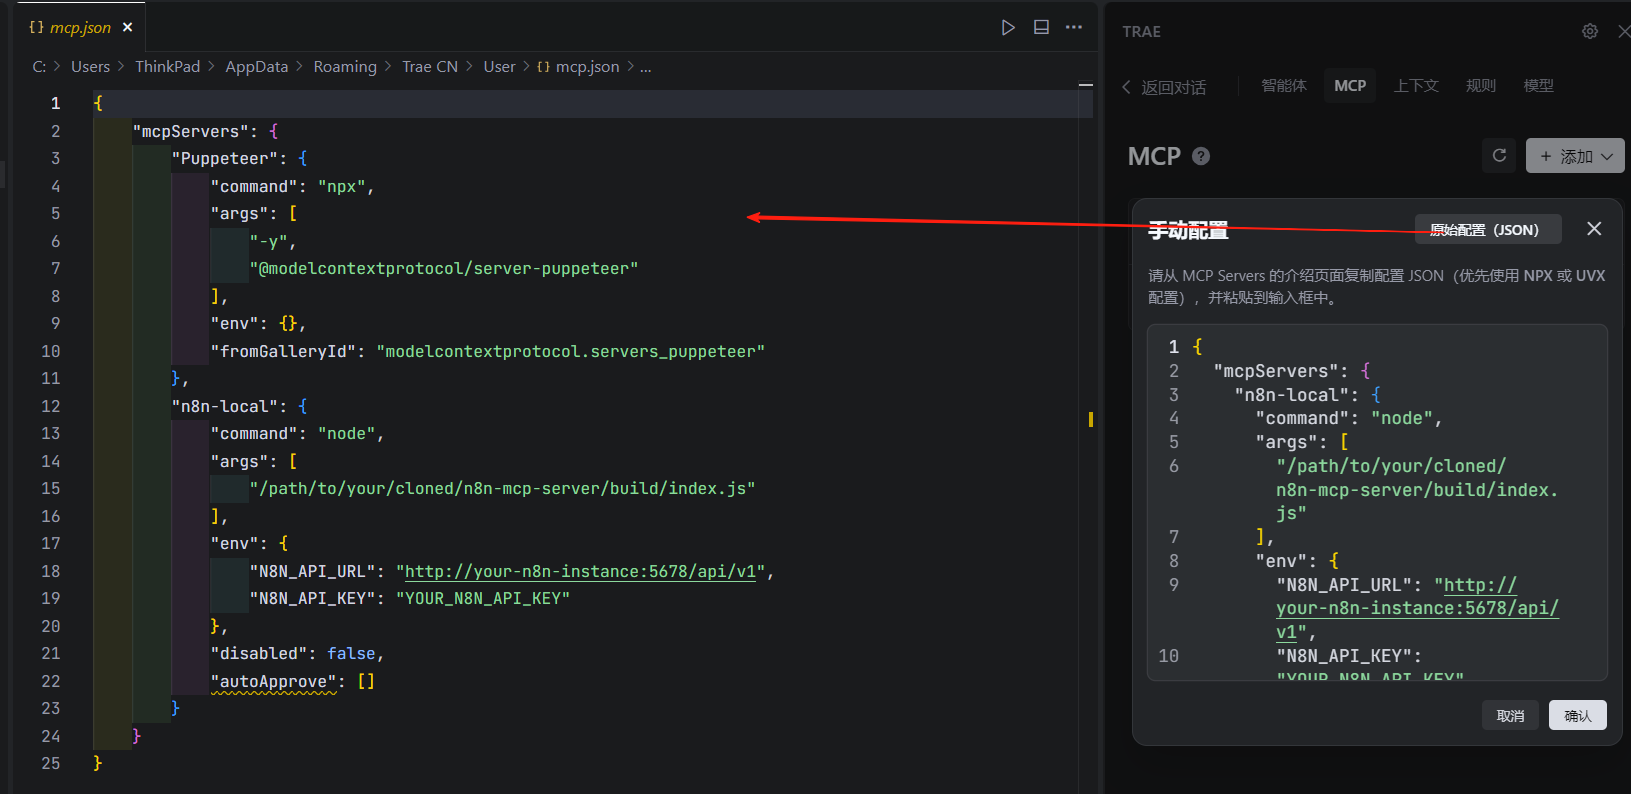
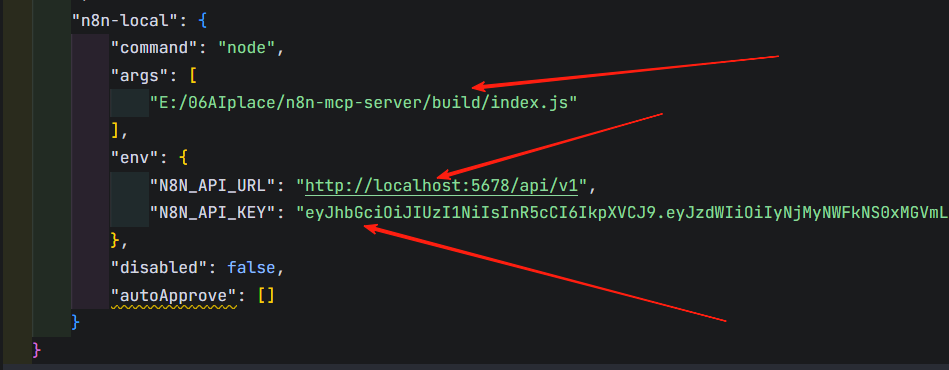
把前边准备的信息,进行对应修改:
⚠️注意:Trae的所有MCP配置信息在一起,注意改自己的mcp信息,不要改到其他的mcp配置上去了
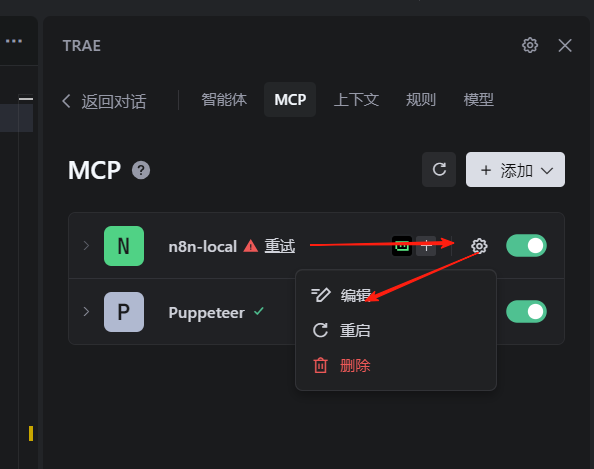
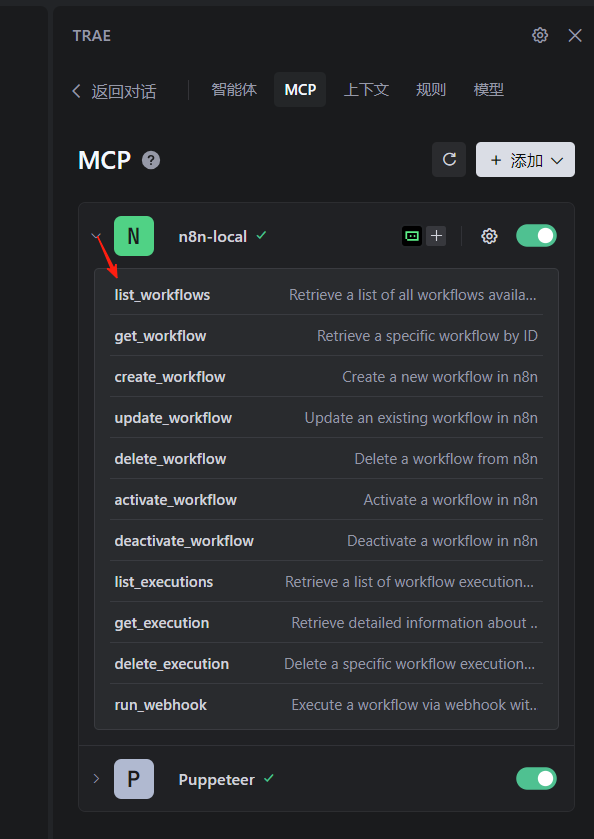
保存关闭修改的配置文件,就可以看到mcp是可用状态,下拉后有相关服务函数:
2)ChatWise下的MCP配置示范
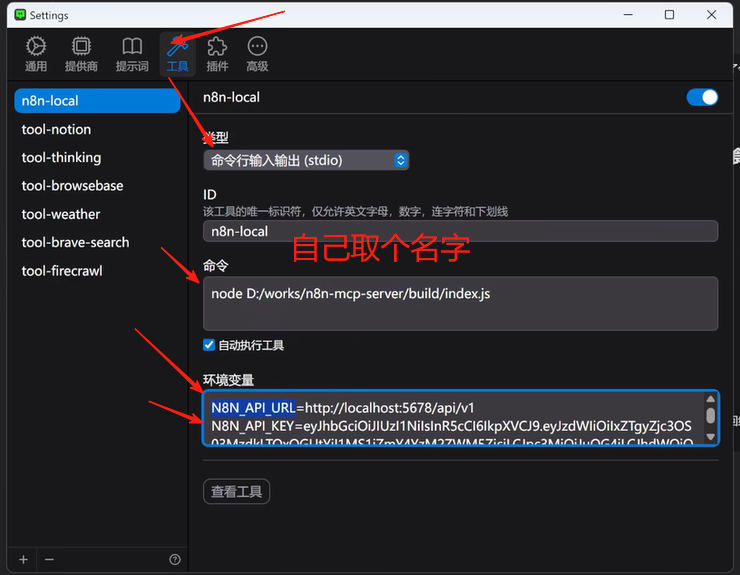
3)Cherry Studio下的MCP配置示范
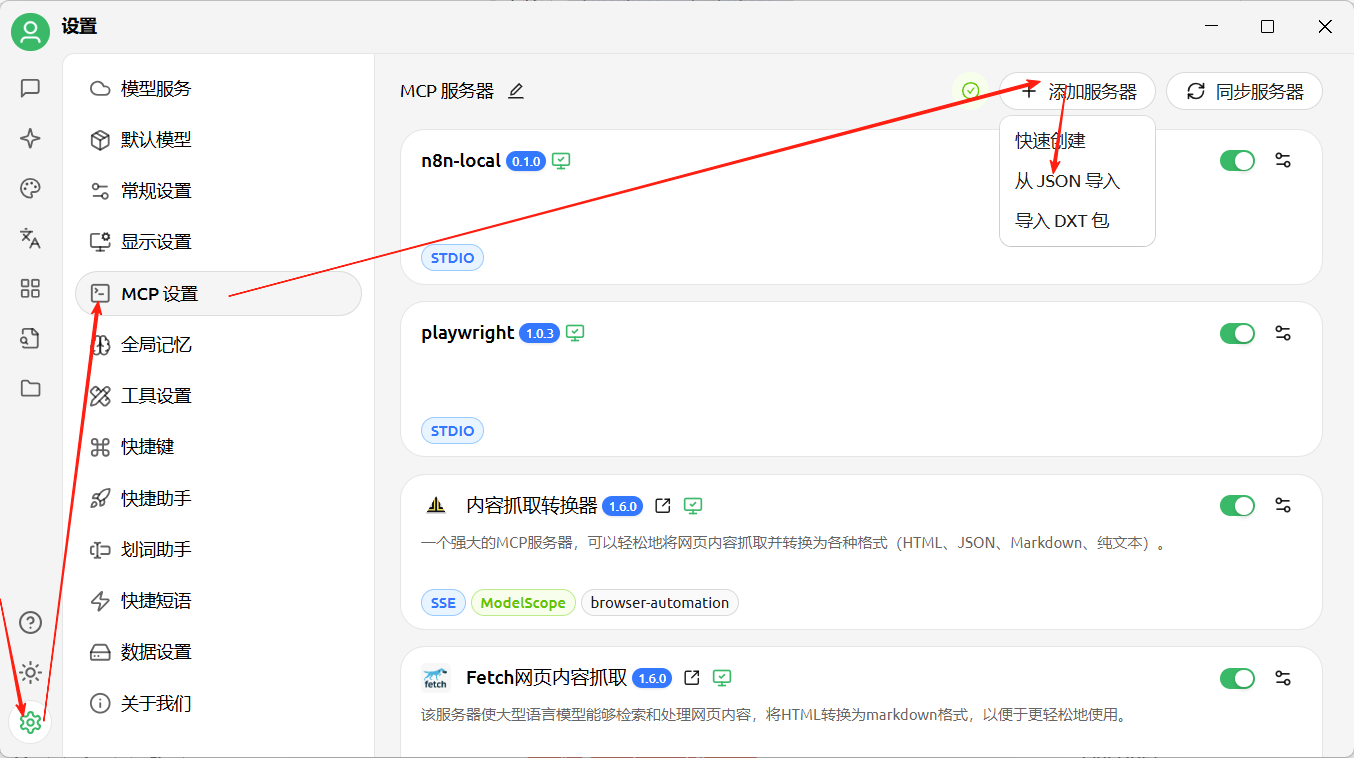
把Trae中对应的mcp配置拷过来就可以了:

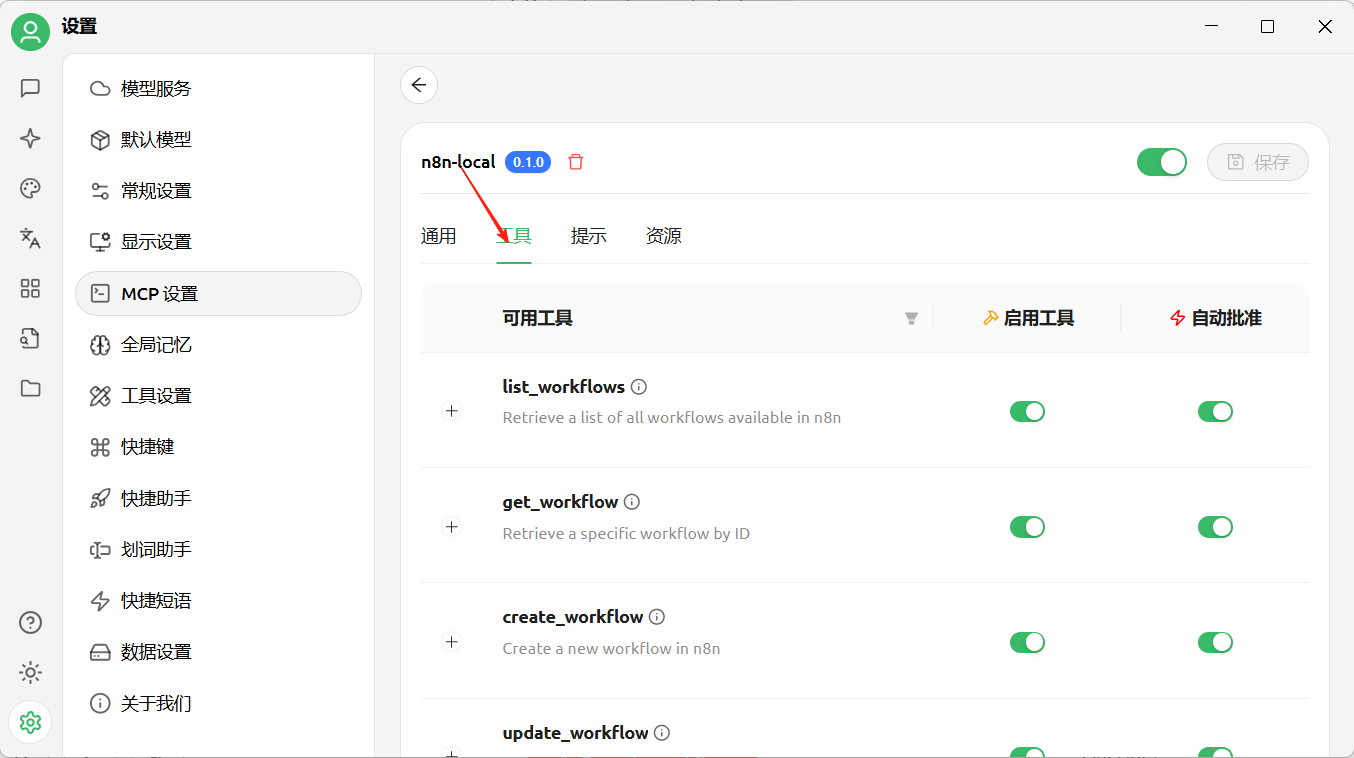
确定后,在mcp列表打开n8n-local,显示出其所有工具,就对了:
7、测试效果
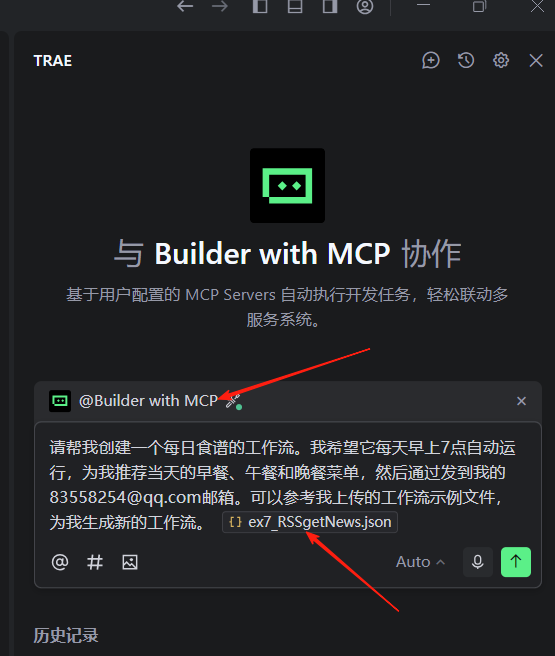
在trae中,AI对话里,设置“与MCP协作”:

然后输入我的要求:
请帮我创建一个每日食谱的工作流。我希望它每天早上7点自动运行,为我推荐当天的早餐、午餐和晚餐菜单,然后通过发到我的835~~@qq.com邮箱。可以参考我上传的工作流示例文件,为我生成新的工作流。
把上篇文档里创建的工作流的json导出来给AI参考,因为里面有大模型调用,及邮件发送节点。
上篇文档的工作流参见:
最终这样:
执行效果:
生成的json有错误,而且还没有部署,于是我只能再给他发布了一个部署的要求:
经过他不懈的努力,终于有了结果:
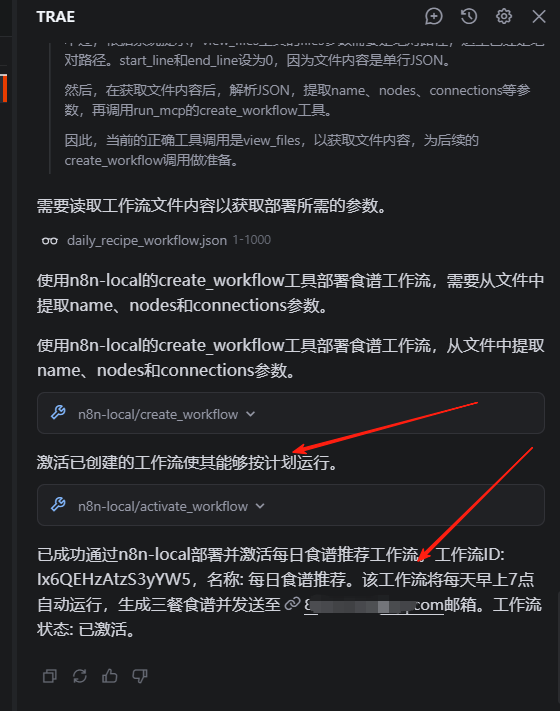
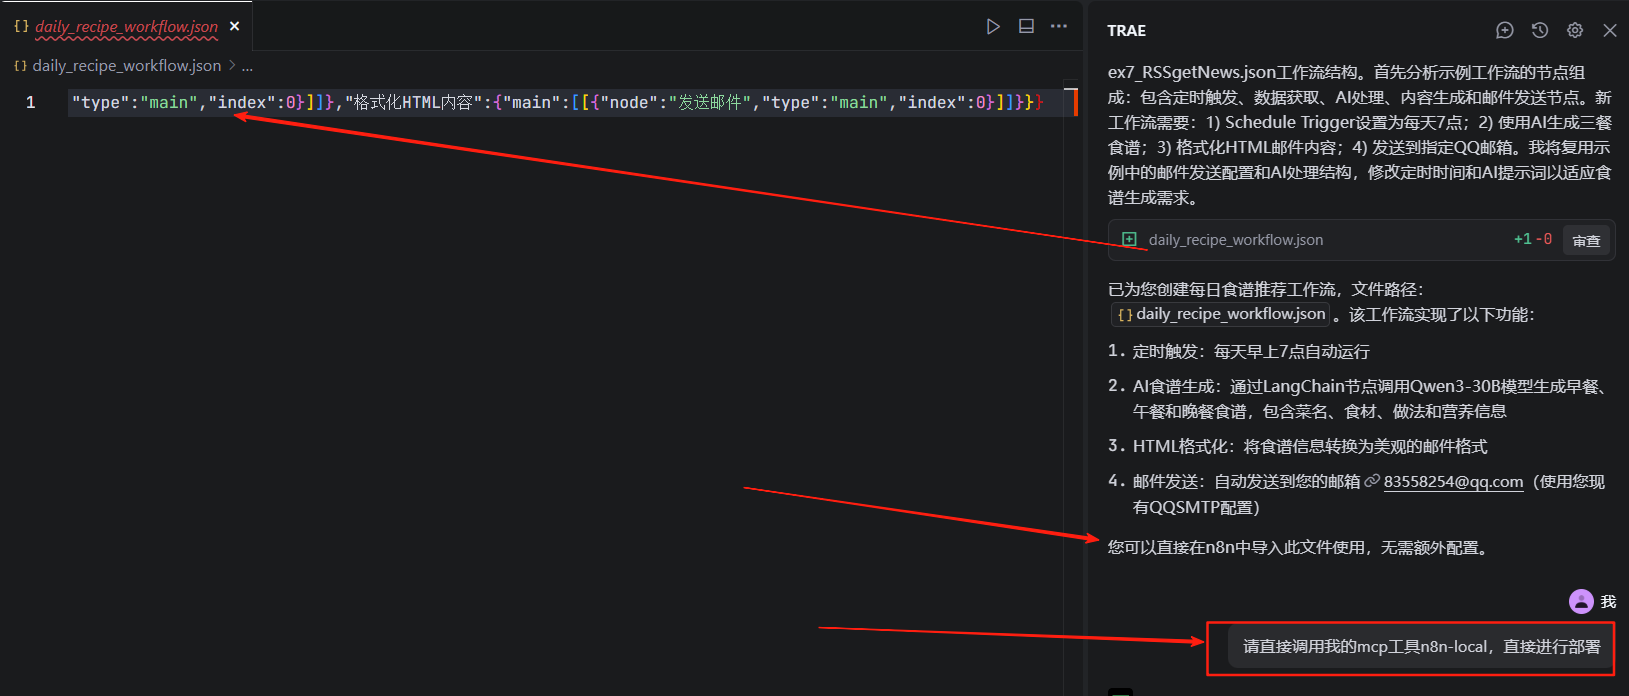
然后,在我的n8n里,居然真的看到了一个新的工作流:

运行工作流,果然还是有错误,需要调整:

主要是js代码的语法错误,确实比较复杂:
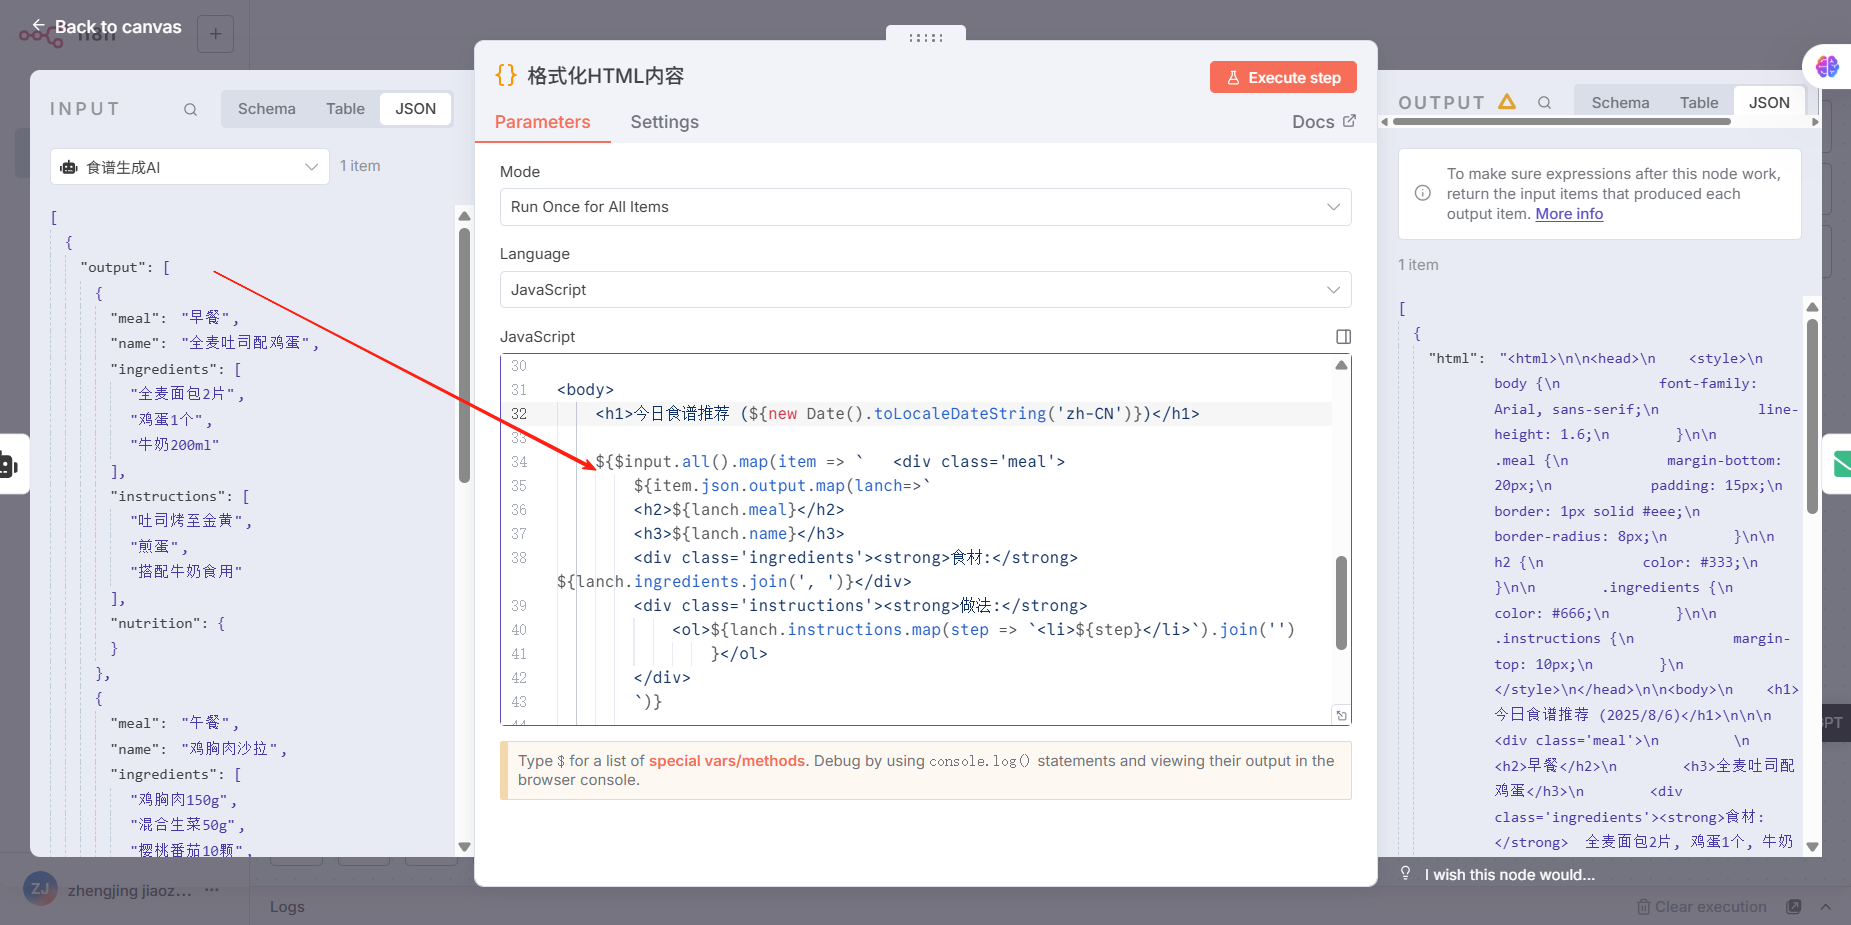
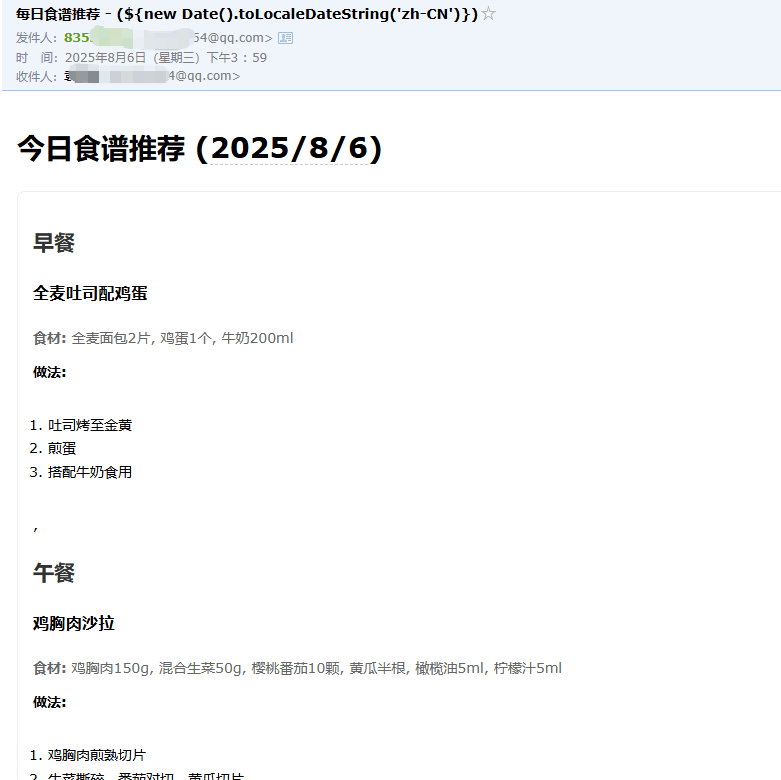
人为调整了一下,执行效果为:
总的json文件为:
{
  "name": "每日食谱推荐",
  "nodes": [
    {
      "parameters": {
        "rule": {
          "interval": [
            {
              "triggerAtHour": 7
            }
          ]
        }
      },
      "type": "n8n-nodes-base.scheduleTrigger",
      "typeVersion": 1.2,
      "position": [
        0,
        0
      ],
      "id": "schedule-trigger",
      "name": "定时触发"
    },
    {
      "parameters": {
        "promptType": "define",
        "text": "={{JSON.stringify($json)}}",
        "hasOutputParser": true,
        "options": {
          "systemMessage": "你是专业营养师,需为用户生成每日三餐食谱。输出格式必须为JSON数组,包含早餐、午餐、晚餐三个对象,每个对象需有name(菜名)、ingredients(食材数组)、instructions(步骤数组)、nutrition(营养信息)字段。示例格式:[{\"meal\":\"早餐\",\"name\":\"全麦吐司配鸡蛋\",\"ingredients\":[\"全麦面包2片\",\"鸡蛋1个\",\"牛奶200ml\"],\"instructions\":[\"吐司烤至金黄\",\"煎蛋\",\"搭配牛奶食用\"],\"nutrition\":{\"calories\":350,\"protein\":18,\"carbs\":42,\"fat\":12}}]"
        }
      },
      "type": "@n8n/n8n-nodes-langchain.agent",
      "typeVersion": 1.9,
      "position": [
        400,
        0
      ],
      "id": "ai-agent",
      "name": "食谱生成AI"
    },
    {
      "parameters": {
        "model": {
          "__rl": true,
          "value": "qwen3-30b-a3b",
          "mode": "list"
        },
        "options": {}
      },
      "type": "@n8n/n8n-nodes-langchain.lmChatOpenAi",
      "typeVersion": 1.2,
      "position": [
        400,
        208
      ],
      "id": "openai-model",
      "name": "OpenAI模型",
      "credentials": {
        "openAiApi": {
          "id": "zQcMYmig8YMIElTm",
          "name": "aliBailianAcc"
        }
      }
    },
    {
      "parameters": {
        "jsonSchemaExample": "[{\"meal\":\"早餐\",\"name\":\"示例菜名\",\"ingredients\":[],\"instructions\":[],\"nutrition\":{}}]"
      },
      "type": "@n8n/n8n-nodes-langchain.outputParserStructured",
      "typeVersion": 1.2,
      "position": [
        608,
        208
      ],
      "id": "output-parser",
      "name": "结构化输出解析器"
    },
    {
      "parameters": {
        "jsCode": "return { html: `<html>\n\n<head>\n    <style>\n        body {\n            font-family: Arial, sans-serif;\n            line-height: 1.6;\n        }\n\n        .meal {\n            margin-bottom: 20px;\n            padding: 15px;\n            border: 1px solid #eee;\n            border-radius: 8px;\n        }\n\n        h2 {\n            color: #333;\n        }\n\n        .ingredients {\n            color: #666;\n        }\n\n        .instructions {\n            margin-top: 10px;\n        }\n    </style>\n</head>\n\n<body>\n    <h1>今日食谱推荐 (${new Date().toLocaleDateString('zh-CN')})</h1>\n\n    ${$input.all().map(item => `   <div class='meal'>\n        ${item.json.output.map(lanch=>` \n        <h2>${lanch.meal}</h2>\n        <h3>${lanch.name}</h3>\n        <div class='ingredients'><strong>食材:</strong>  ${lanch.ingredients.join(', ')}</div>\n        <div class='instructions'><strong>做法:</strong>\n            <ol>${lanch.instructions.map(step => `<li>${step}</li>`).join('')\n                }</ol>\n        </div>\n        `)}    \n    \n        </div>`   \n      ).join('')\n    }\n    \n</body>\n\n</html>`};"
      },
      "type": "n8n-nodes-base.code",
      "typeVersion": 2,
      "position": [
        800,
        0
      ],
      "id": "format-html",
      "name": "格式化HTML内容"
    },
    {
      "parameters": {
        "fromEmail": "83558254@qq.com",
        "toEmail": "83558254@qq.com",
        "subject": "=每日食谱推荐 -  {{new Date().toLocaleDateString('zh-CN', {timeZone: 'Asia/Shanghai', weekday: 'long', year: 'numeric', month: 'long', day: 'numeric'})}}\n",
        "html": "={{ $json.html }}",
        "options": {}
      },
      "type": "n8n-nodes-base.emailSend",
      "typeVersion": 2.1,
      "position": [
        1008,
        0
      ],
      "id": "send-email",
      "name": "发送邮件",
      "webhookId": "814a5711-c225-4689-97de-67ba1e822dcf",
      "executeOnce": true,
      "credentials": {
        "smtp": {
          "id": "O7gXCfdEZC6neGWP",
          "name": "QQSMTP"
        }
      }
    },
    {
      "parameters": {
        "jsCode": "return [{json:{}}];"
      },
      "type": "n8n-nodes-base.code",
      "typeVersion": 2,
      "position": [
        208,
        0
      ],
      "id": "start-signal",
      "name": "启动信号"
    }
  ],
  "pinData": {
    "食谱生成AI": [
      {
        "json": {
          "output": [
            {
              "meal": "早餐",
              "name": "全麦吐司配鸡蛋",
              "ingredients": [
                "全麦面包2片",
                "鸡蛋1个",
                "牛奶200ml"
              ],
              "instructions": [
                "吐司烤至金黄",
                "煎蛋",
                "搭配牛奶食用"
              ],
              "nutrition": {}
            },
            {
              "meal": "午餐",
              "name": "鸡胸肉沙拉",
              "ingredients": [
                "鸡胸肉150g",
                "混合生菜50g",
                "樱桃番茄10颗",
                "黄瓜半根",
                "橄榄油5ml",
                "柠檬汁5ml"
              ],
              "instructions": [
                "鸡胸肉煎熟切片",
                "生菜撕碎,番茄对切,黄瓜切片",
                "所有食材放入碗中",
                "淋上橄榄油和柠檬汁"
              ],
              "nutrition": {}
            },
            {
              "meal": "晚餐",
              "name": "清蒸鲈鱼配糙米",
              "ingredients": [
                "鲈鱼1条(约200g)",
                "糙米100g",
                "西兰花100g",
                "姜丝适量",
                "蒸鱼豉油10ml"
              ],
              "instructions": [
                "鲈鱼清理干净,加姜丝腌制10分钟",
                "水开后入锅蒸12分钟",
                "糙米煮熟",
                "西兰花焯水3分钟",
                "蒸好后淋蒸鱼豉油"
              ],
              "nutrition": {}
            }
          ]
        }
      }
    ]
  },
  "connections": {
    "定时触发": {
      "main": [
        [
          {
            "node": "启动信号",
            "type": "main",
            "index": 0
          }
        ]
      ]
    },
    "启动信号": {
      "main": [
        [
          {
            "node": "食谱生成AI",
            "type": "main",
            "index": 0
          }
        ]
      ]
    },
    "OpenAI模型": {
      "ai_languageModel": [
        [
          {
            "node": "食谱生成AI",
            "type": "ai_languageModel",
            "index": 0
          }
        ]
      ]
    },
    "结构化输出解析器": {
      "ai_outputParser": [
        [
          {
            "node": "食谱生成AI",
            "type": "ai_outputParser",
            "index": 0
          }
        ]
      ]
    },
    "食谱生成AI": {
      "main": [
        [
          {
            "node": "格式化HTML内容",
            "type": "main",
            "index": 0
          }
        ]
      ]
    },
    "格式化HTML内容": {
      "main": [
        [
          {
            "node": "发送邮件",
            "type": "main",
            "index": 0
          }
        ]
      ]
    }
  },
  "active": false,
  "settings": {
    "saveExecutionProgress": true,
    "saveManualExecutions": true,
    "saveDataErrorExecution": "all",
    "saveDataSuccessExecution": "all",
    "executionTimeout": 3600,
    "timezone": "UTC"
  },
  "versionId": "daf28183-a9d1-4a52-937f-2679e0558c0f",
  "meta": {
    "instanceId": "88bf91ff3432d87c5f85f4ca9fcb7aa3c0e08ca79367356d87d5e8f0b5f0bcd4"
  },
  "id": "Ix6QEHzAtzS3yYW5",
  "tags": []
}
📚结论
哇,这个效果已经很感动了,离机器人🤖“取代”人类,又进了一步,哇哈哈😄😄😄

欢迎加入 MCP 技术社区!与志同道合者携手前行,一同解锁 MCP 技术的无限可能!
更多推荐


 33
33 0
0- 0


 已为社区贡献1条内容

所有评论(0)